Time to wrap up and get extra cozy in The Woodlands Blanket Wrap crochet pattern! The Woodlands Blanket Wrap, is oversized and easy to make. I wanted to be able to wear a big ol’ blanket wrap around the house but still have my hands available to do things, like crochet! Haha!
This wrap is made in one piece. You’ll start on the bottom of the back side and work in rows up, split the neckline and work the first front side. Then you’ll go back and attach your yarn to the other side to make the second front panel. The pockets can easily be left out if you prefer not to have them. Simply continue with the normal stitch repeat.
You will be using an entire 2 skeins of Pound Of Love yarn from Lion Brand. If you make any adjustments to the wrap (like adding rows) you will need to get a third skein of yarn. I used the color Sugar Cookie for mine but there are soooo many cute colors to chose from. This yarn is also very soft and easy to work with. Even better, you have less ends to weave in because you only use 2 skeins! You can find the kit here, which includes all the yarn and a free copy of the pdf digital download of the pattern.
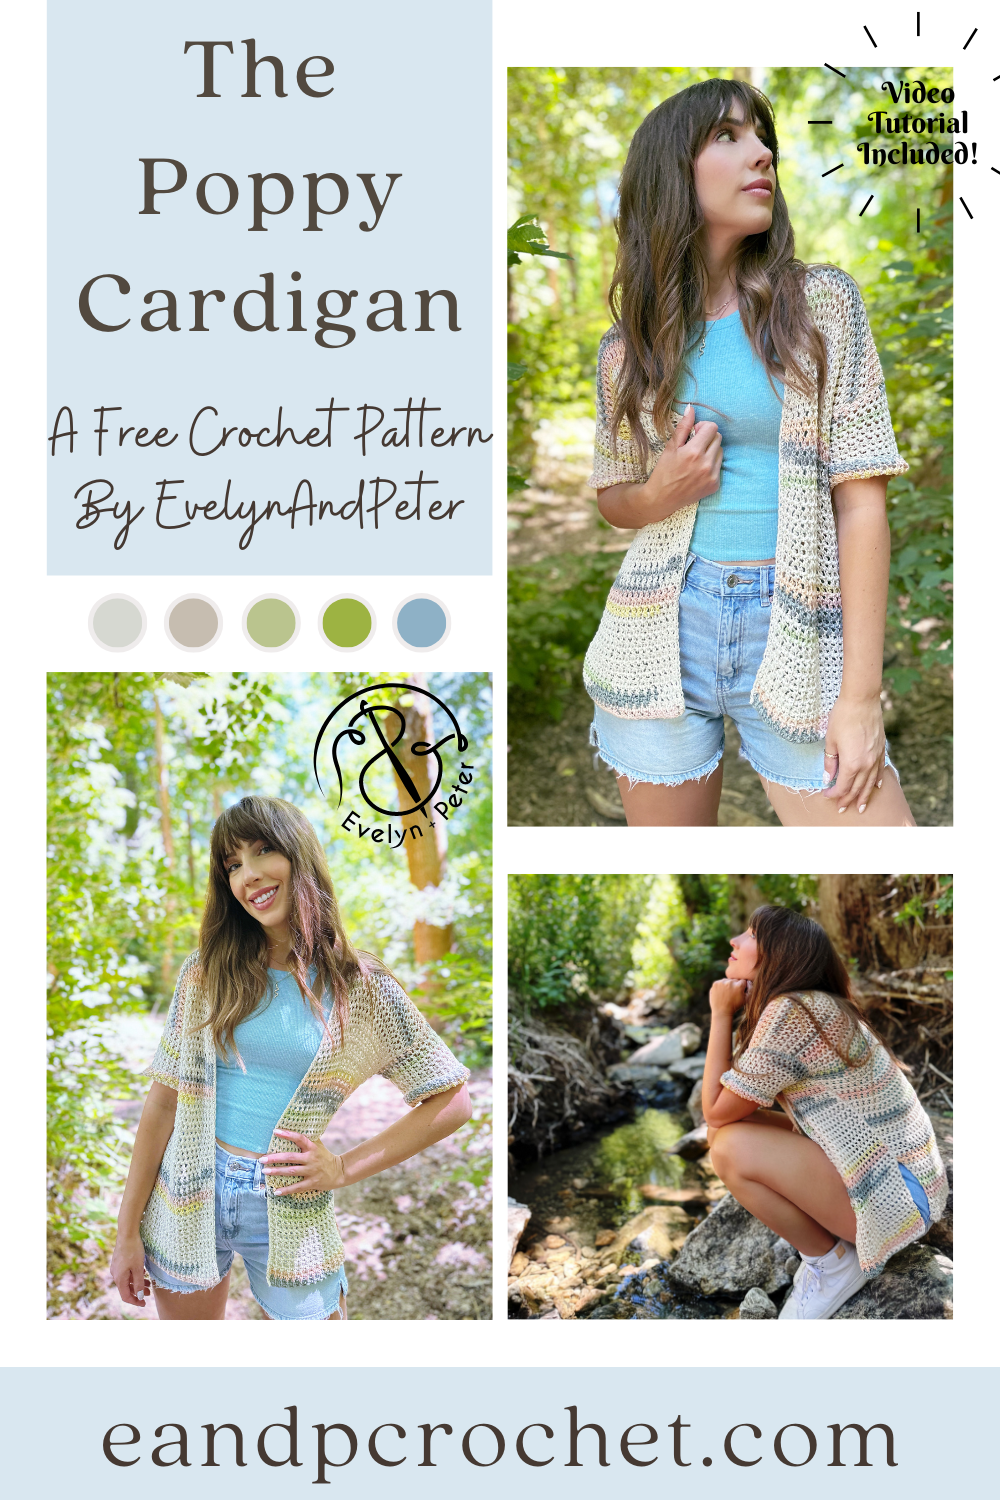
I couldn’t make a Poppy Pullover without making a Poppy Cardigan crochet pattern! The Poppy Pullover was a fan favorite and the Poppy Cardigan has the same design details so I hope you like this one too!
I used the same type of yarn for The Poppy Cardigan- 24/7 Cotton DK, except this time, I used the “prints” version instead of a solid color! I think the prints are so pretty and give it a little bit more pop of color and detail. I wasn’t sure how the yarn was going to work up with the distribution of color but I am loving the result! If you are more of a solid color kind of crocheter you can totally substitute out the yarn, they have lots of options! I used the Seaglass color for mine.
The Poppy Cardigan is worked up the same way as the pullover, from the bottom up. Again, we are using a larger hook than what you normally would use for a DK yarn to give it that loose, mesh look. When you are crocheting, make sure you don’t tug down too tightly on your stitches! If you are prone to a tight tension just make sure to pay attention to that. This is also a really stretchy stitch so when you wear the cardigan it will stretch and has great drape! Once all your panels are made you will give a light block ( I like to steam block mine) and sew together!
If you want to use the same yarn as me make sure you get the Lion Brand kit! It comes with a free copy of my printable pattern and you can choose your yarn color! They also frequently have very good sales! My Poppy Pullover is available on my blog here as well as a Lion Brand kit!
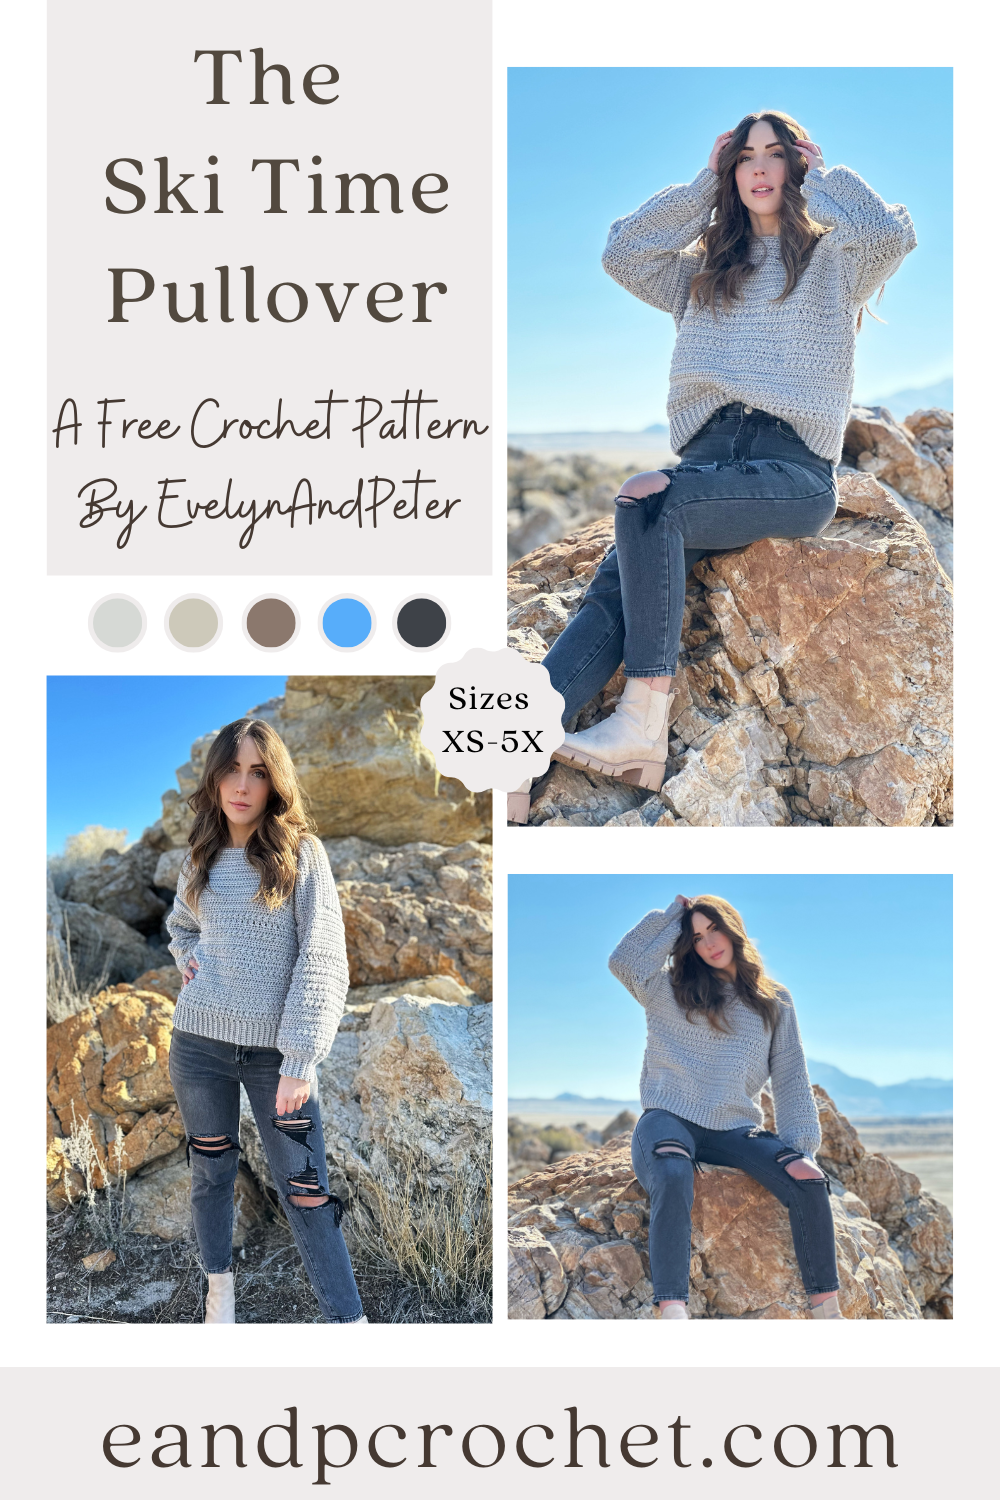
Which do you prefer… Teatime? Or Ski Time? The Ski Time Pullover is the sister design to The Teatime Cardigan! I decided to go with my same stitch pattern but wanted to make this one a solid color for a more subtle look! But…I do reallllly want to see someone make this one with different color stripes! I think it would be so cute!!
I used Heartland yarn for this design which is one of my favorite soft and cozy yarns. It’s the same yarn I used for The Stony Shore Cardigan and The Pemberly Pullover! Be sure to check them out if you want more heartland design! There are a ton of colors in Heartland to chose from and it’s really easy to work with. No snagging or catching on your hook and the sheen is beautiful! If you want a free copy of this PDF pattern and want to use Heartland yarn, then be sure to purchase my kit for the best deal!
The Ski Time Pullover is worked from the bottom up in separate panels. You can easily add more rows if you want a longer sweater! Just add as many rows as you want before the neckline shaping on the front panel, then add the same amount to the back! It’s also written with several inches of positive ease, so no need to size up. I’m wearing a size small in the photos!
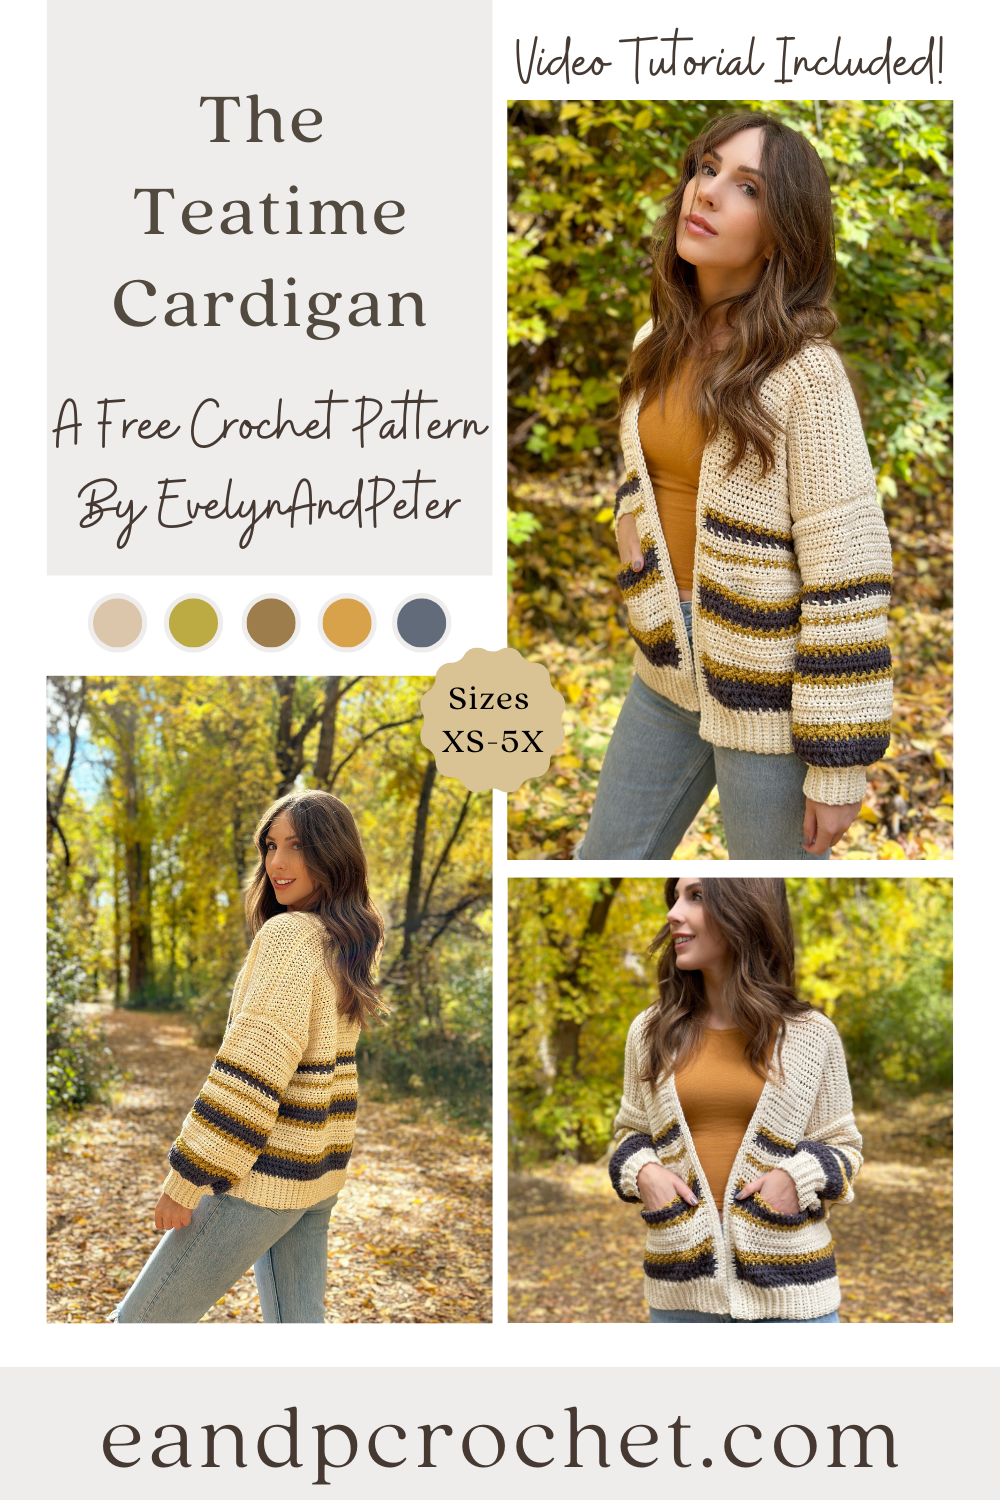
It’s Teatime! So obviously that means you need The Teatime Cardigan crochet pattern! This cardigan pattern gives all the cozy vibes. The Teatime cardigan features fun stripes using a unique blend of stitches, giving it a collegiate look. It has a slightly oversized fit with balloon style sleeves. There are so many color options to fit your style!
The construction of this cardigan is pretty beginner friendly. I do use a few different stitches for the stripes that you may have not used before but don’t be afraid! I have a full video tutorial on how to do these stitches if you need a little bit of extra help. They really are very simple to do once you get them down. The same stitch repeat is used on all of the panels.
One of the fun things about this cardigan is picking out the color combo that you want! There are so many options to do and I can’t wait to see what everyone picks! I used Color Theory yarn for my cardigan and I do have a kit available! You can customize the yarn colors if you purchase the kit. I have a couple of tips when working with stripes. When you change colors at the end of each row, you can crochet the next row directly over the tails of yarn for less ends to weave in! You can also crochet your trim directly over the tails of yarn. I like to tie my tails in a knot first before doing so.
Another great thing about The Teatime cardigan is the length is easy to adjust! You can simply add more rows to both the back and front panels if you want your cardigan longer. If you want it cropped, just remove rows. Do the same amount of rows to all 3 panels before fastening off.
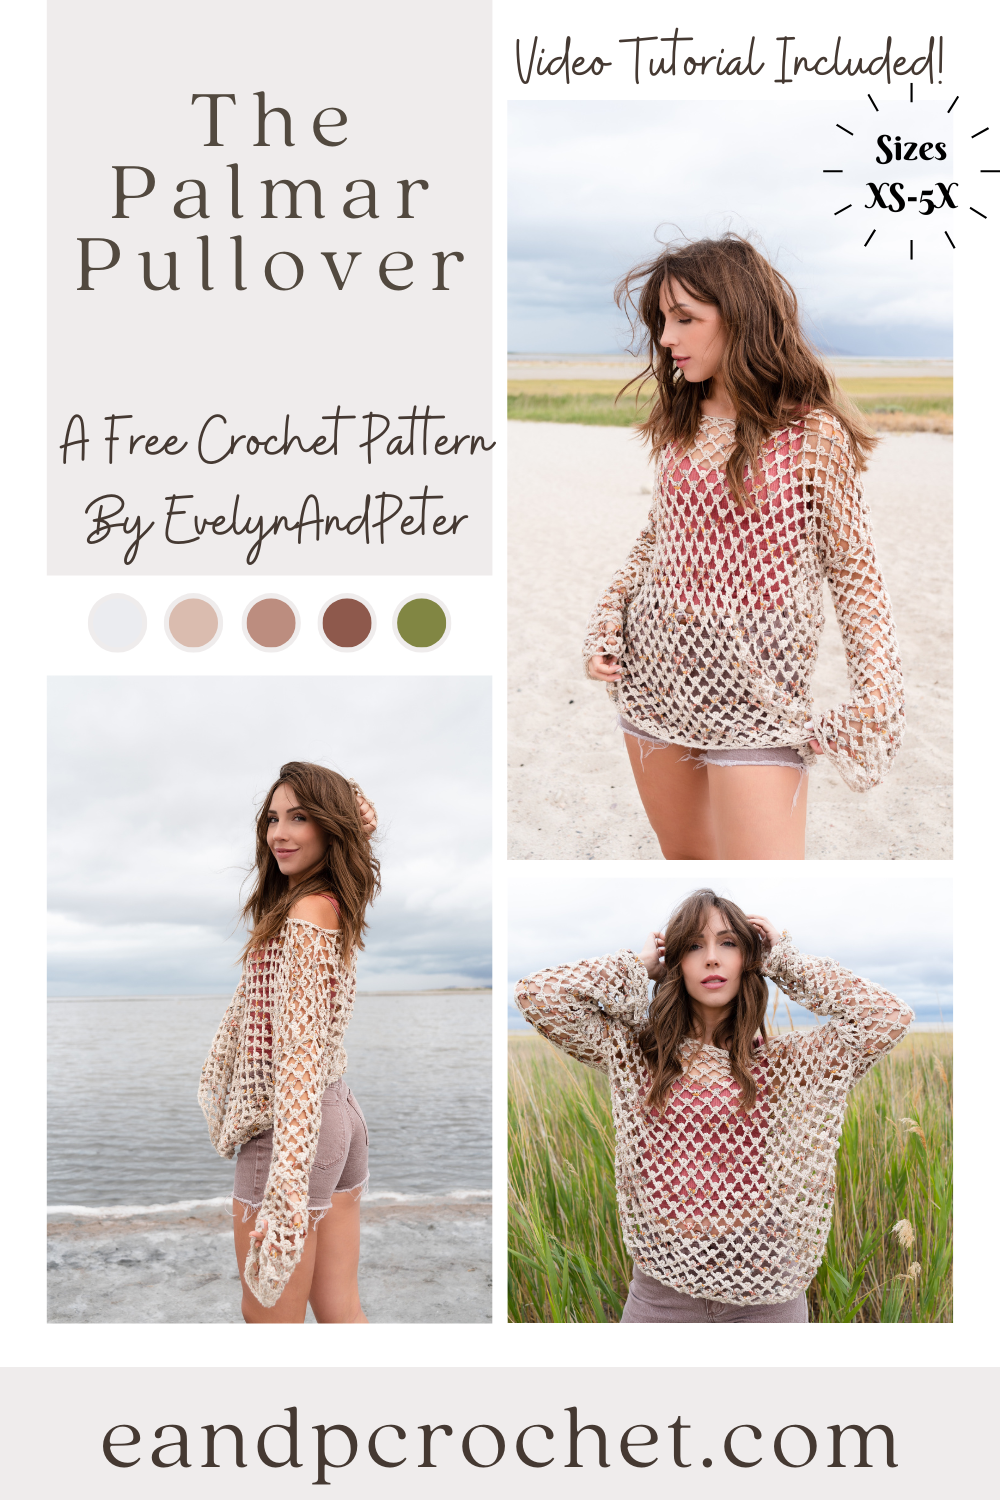
How are we already in this weird in between stage of summer and fall?! The end of summer is looming so that means my summer designs are also coming to an end. Luckily, The Palmar Pullover is perfect for this in between time!
The Picot Mesh stitch is one of my all time favorites for warmer makes! I think it’s one of yours too since The Zahora Cardigan was so loved! I used the Picot Mesh stitch for the Zahora and fell in love with the drape and comfy fit! After a few requests here and there for a pullover version I decided it was time to make one using Pima Cotton yarn! The Zahora used Lion Brand Comfy Cotton which is very similar to the Pima that I used here!
I wanted to give The Palmar Pullover a similar look to the Zahora with the speckled colors throughout a neutral base. Luckily, there is a few super cute options for the Pima yarn! I didn’t want it to be too overwhelming with color so I grabbed a neutral vintage and paired it with a colorful Seaglass! You might not even be able to see the striping, it’s so subtle! If you want to stick to solid stripes you can easily do that by picking 2 solid colors. Or, if you aren’t a fan of the stripes you can even make it in one solid color throughout! I definitely recommend grabbing the Lion Brand yarn kit so you can customize your look!
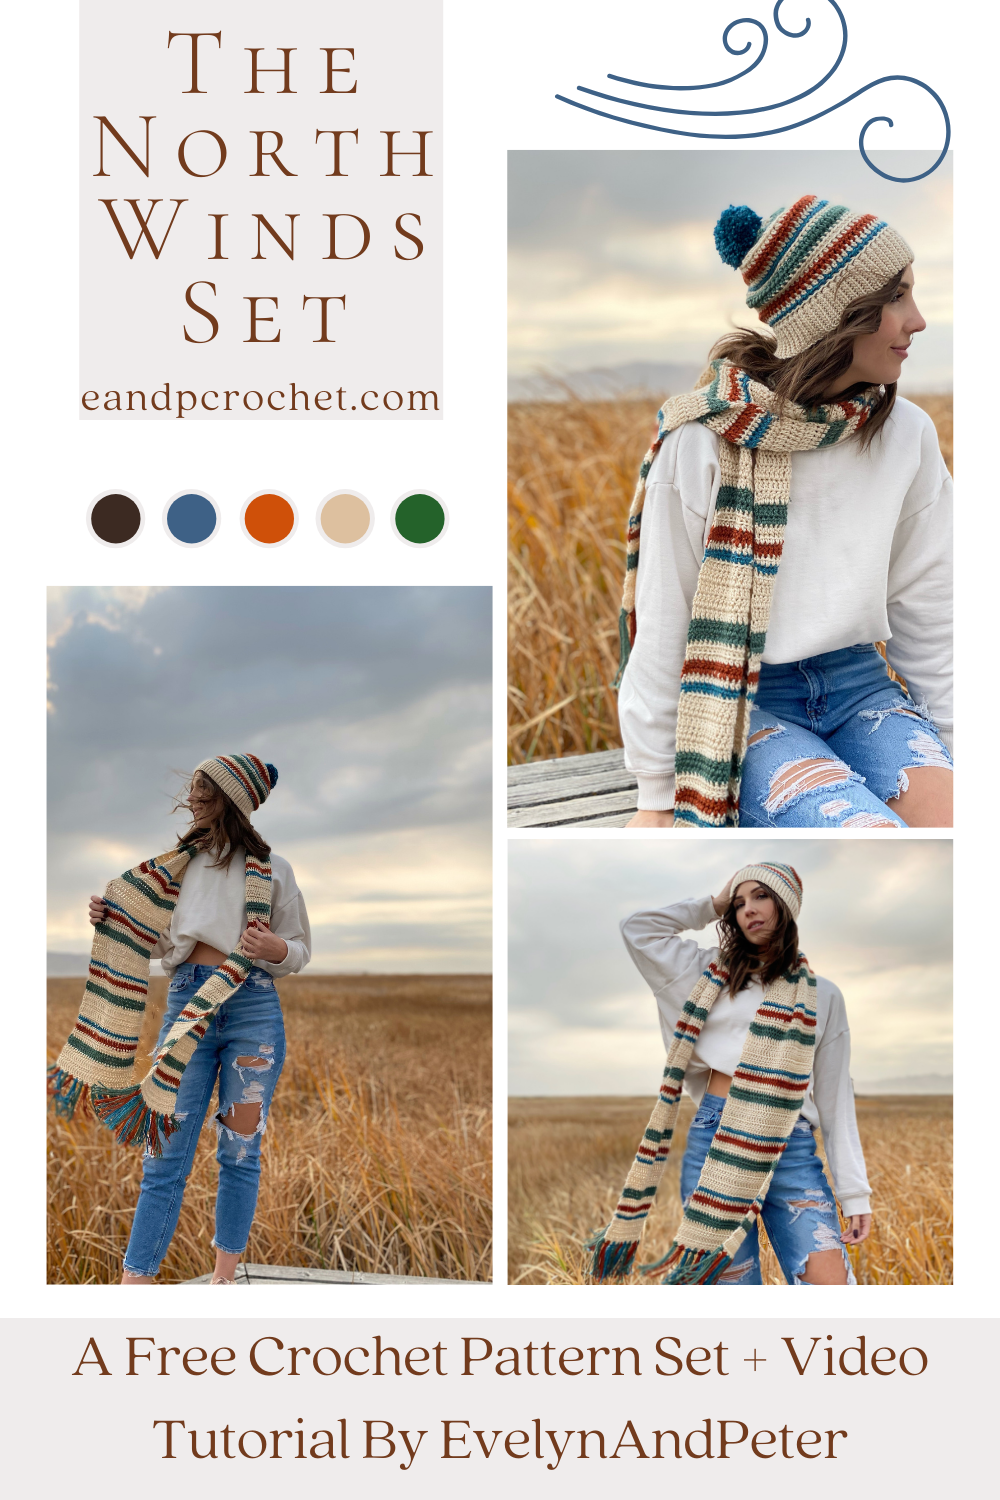
The North Winds Set is here! I’m thinking It’s going to be great for Christmas gifts this year. Beginner friendly and fast to make but also kept my interest throughout with the subtle stitch changes!
The striping on the scarf and beanie are my favorite part. And believe it or not, I had almost no ends to weave in when I was finished! Every time I had a color change for the scarf I cut the yarn, tied a knot and worked my stitches directly over the ends. This worked out amazingly and I’m so glad I did it so I had wayyy less ends to weave when I was done!
Heartland yarn is one of my favorites and It’s what I used for both patterns! The yardage listed below is enough to make at least 1 hat and 1 beanie, including a pom and fringe!
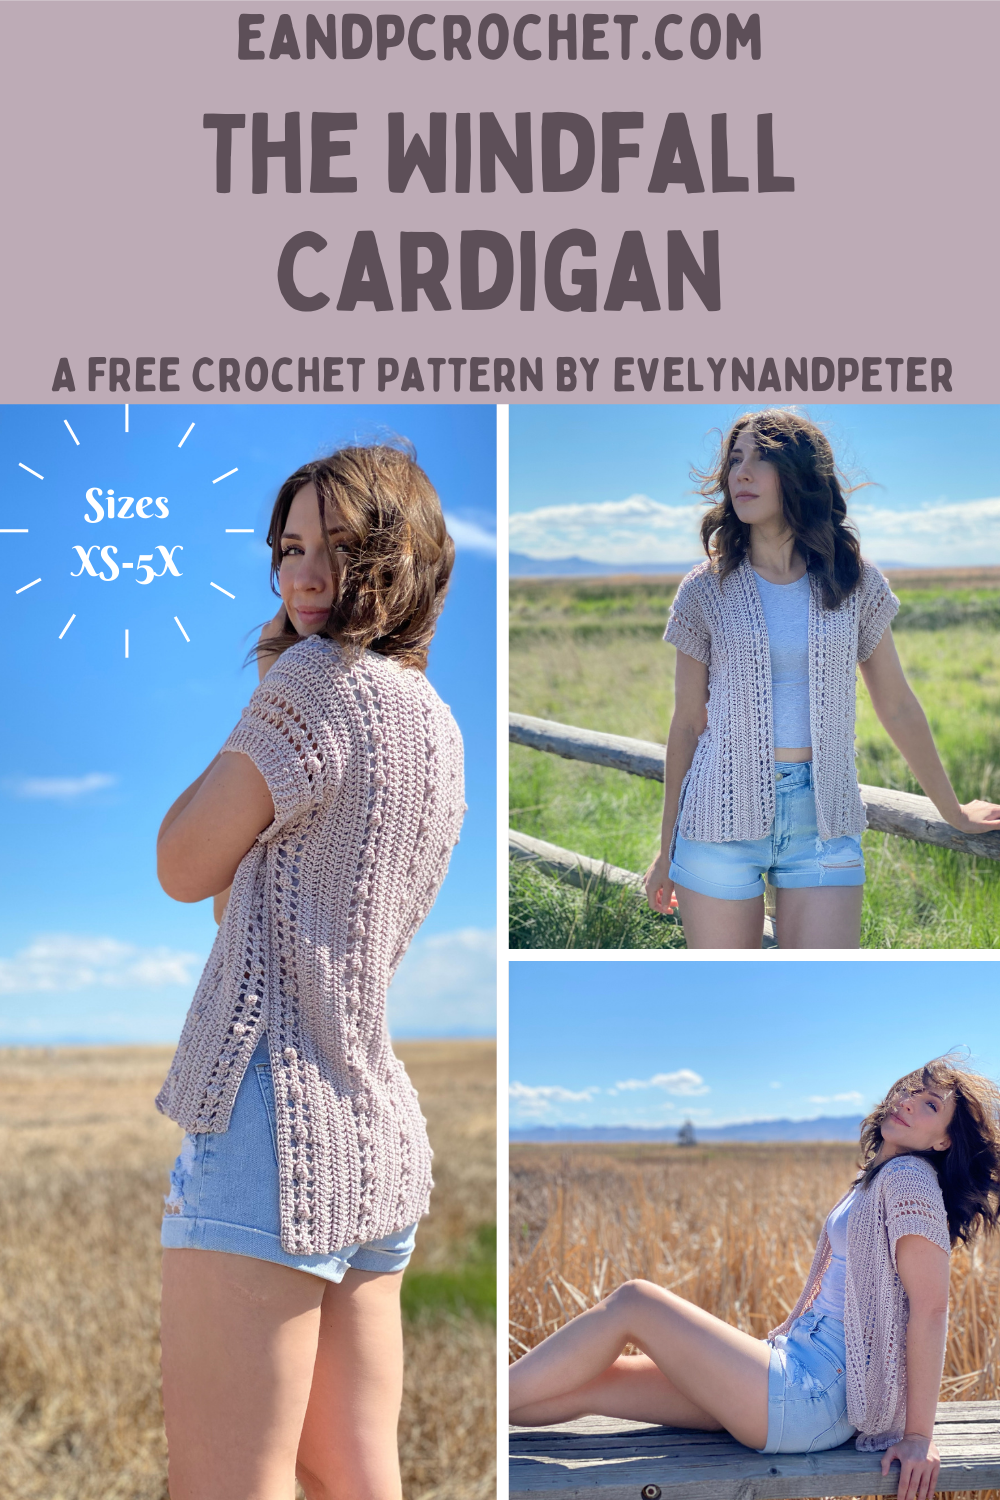
Have you ever crocheted a cardigan in one piece from side to side before? I’ve done a few different designs like this and I’m super excited to introduce The Windfall Cardigan which is made the same way! One of the great things about it is very minimal seaming. There is only one small section on both sides of the cardigan that you need to seam!
I used Lion Brand Nuboo yarn to make this cardigan but I think it would also look great in a cotton yarn! The Nuboo is very silky and smooth. It is similar to Truboo with a bit more of a bounce and a little bit thicker! Can’t find any Nuboo or want to use a different yarn? Check out Yarnsub.com and enter in “Nuboo” in the search. It will bring up a ton of different yarn substitutions for you to choose from.
I have a full video tutorial available for this cardigan. If at any point you get confused or stuck I recommend checking out the video to see if I answer your question there! If you find it helpful I would be so grateful for a thumbs up and subscribe!
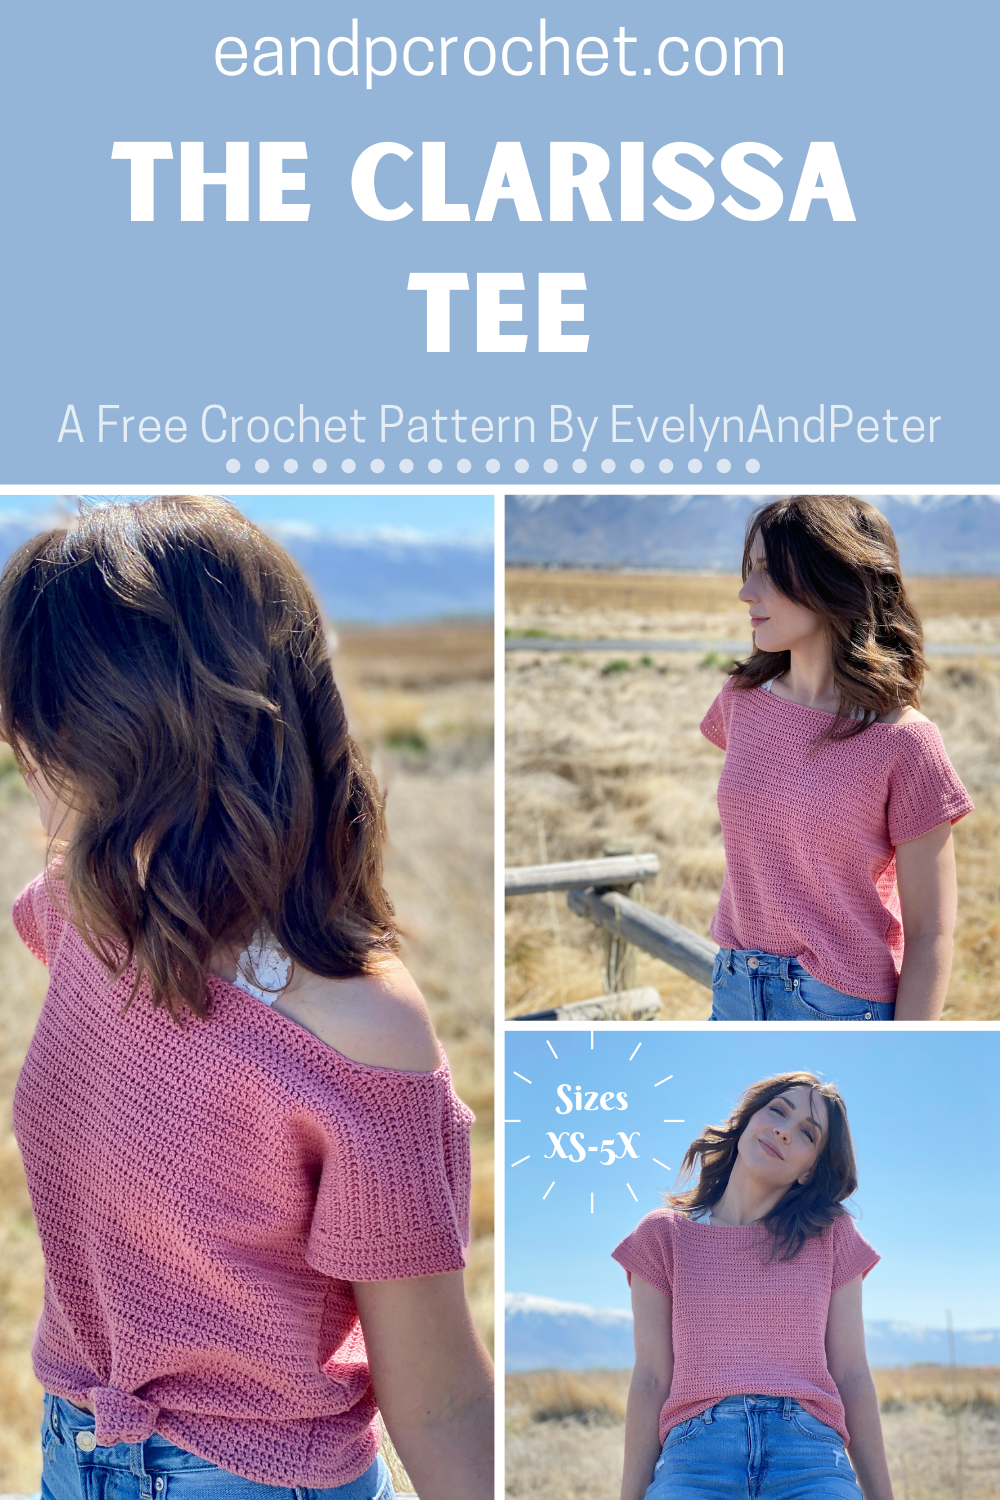
Surprise! I’ve been keeping this pattern a secret for a few months and i’m excited to finally release it into the world! The Clarissa Tee is a super easy and fun pattern. I have been wanting to make an off the shoulder style tee but still be able to be worn on both shoulders if desired!
The Clarissa Tee features a wide boat neck style neckline. I think it looks super cute paired with a lacy bralette underneath. It definitely gives me some retro vibes! I just need a side ponytail and some leggings to go with it now! haha! I tied it up with a little hair tie for some of the photos and just love the look of it!
This top has a mid length cut. If you are the type that likes longer style shirts then I definitely recommend adding some rows in before you start the neckline and shoulder shaping. I’m wearing the size small in photos and do not have any extra length added. Remember, you will need extra yarn if you add rows!
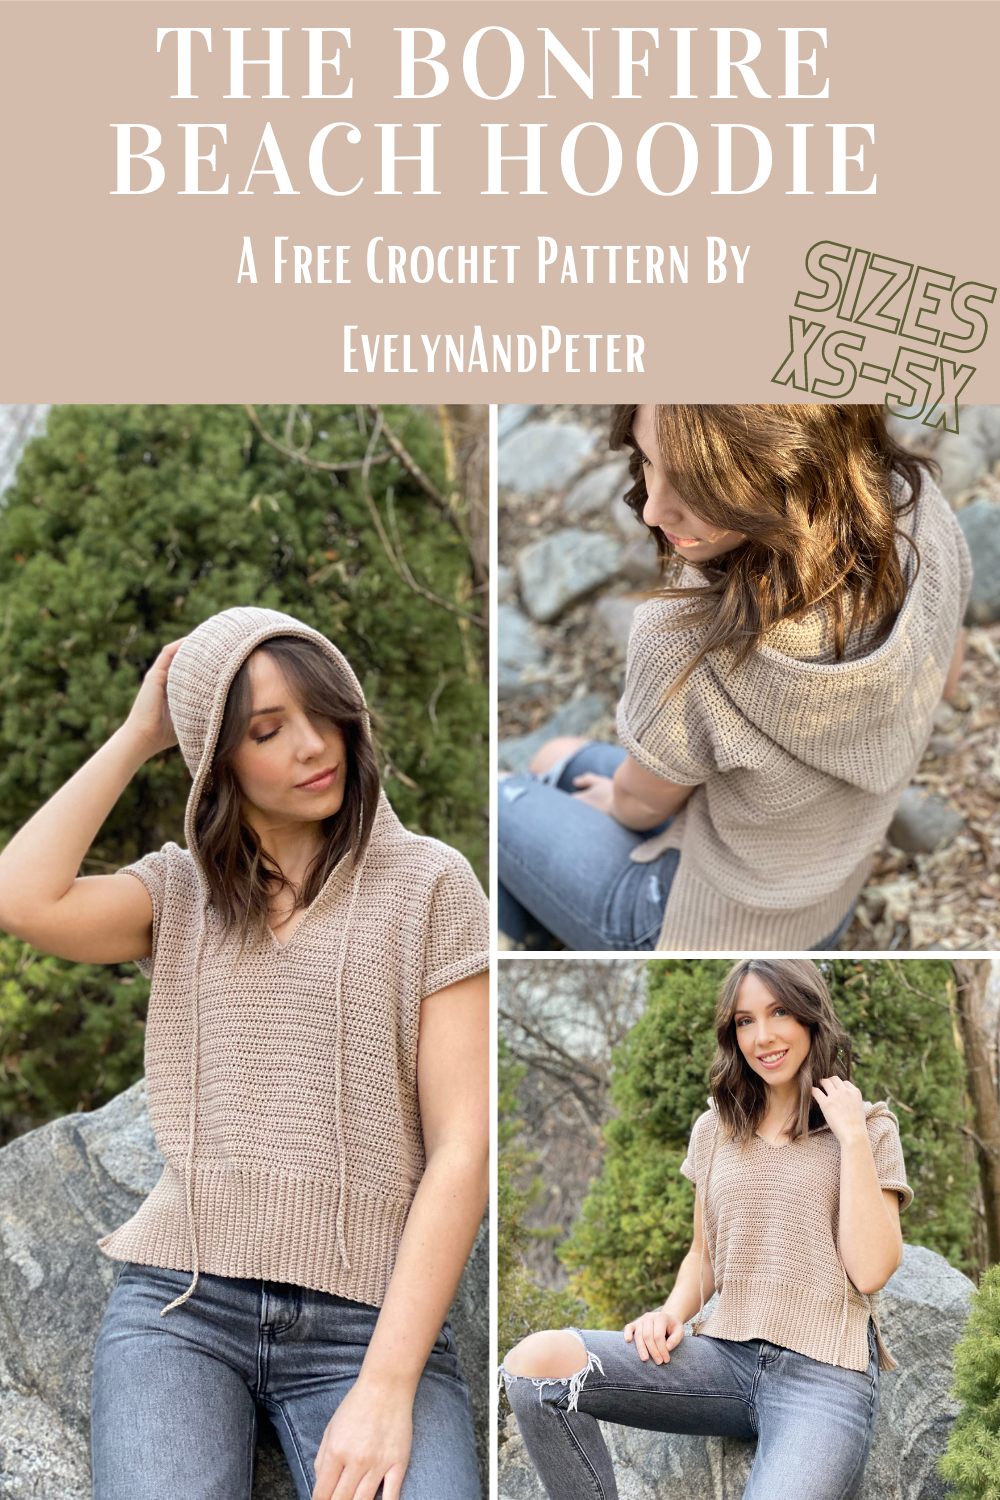
Coming at ya on the first weekend of spring… The Bonfire Beach Hoodie! You might be thinking that this design looks a little bit familiar. Well it should because it’s the sister design to The Happy At Home Hoodie!
The Bonfire Beach Hoodie is shorter and lighter in comparison to The Happy At Home Hoodie. It’s also not quite as oversized. I use the same stitches and the same basic construction for this top.
I left side slits on my Bonfire Beach Hoodie but you can easily sew those up when making your top if you would rather not have them!
Description: The Bonfire Beach Hoodie is perfect to throw on during a warm summer day. It uses Hdc throughout for an easy make. The slightly oversized boxy fit makes it extra comfy to wear all day.
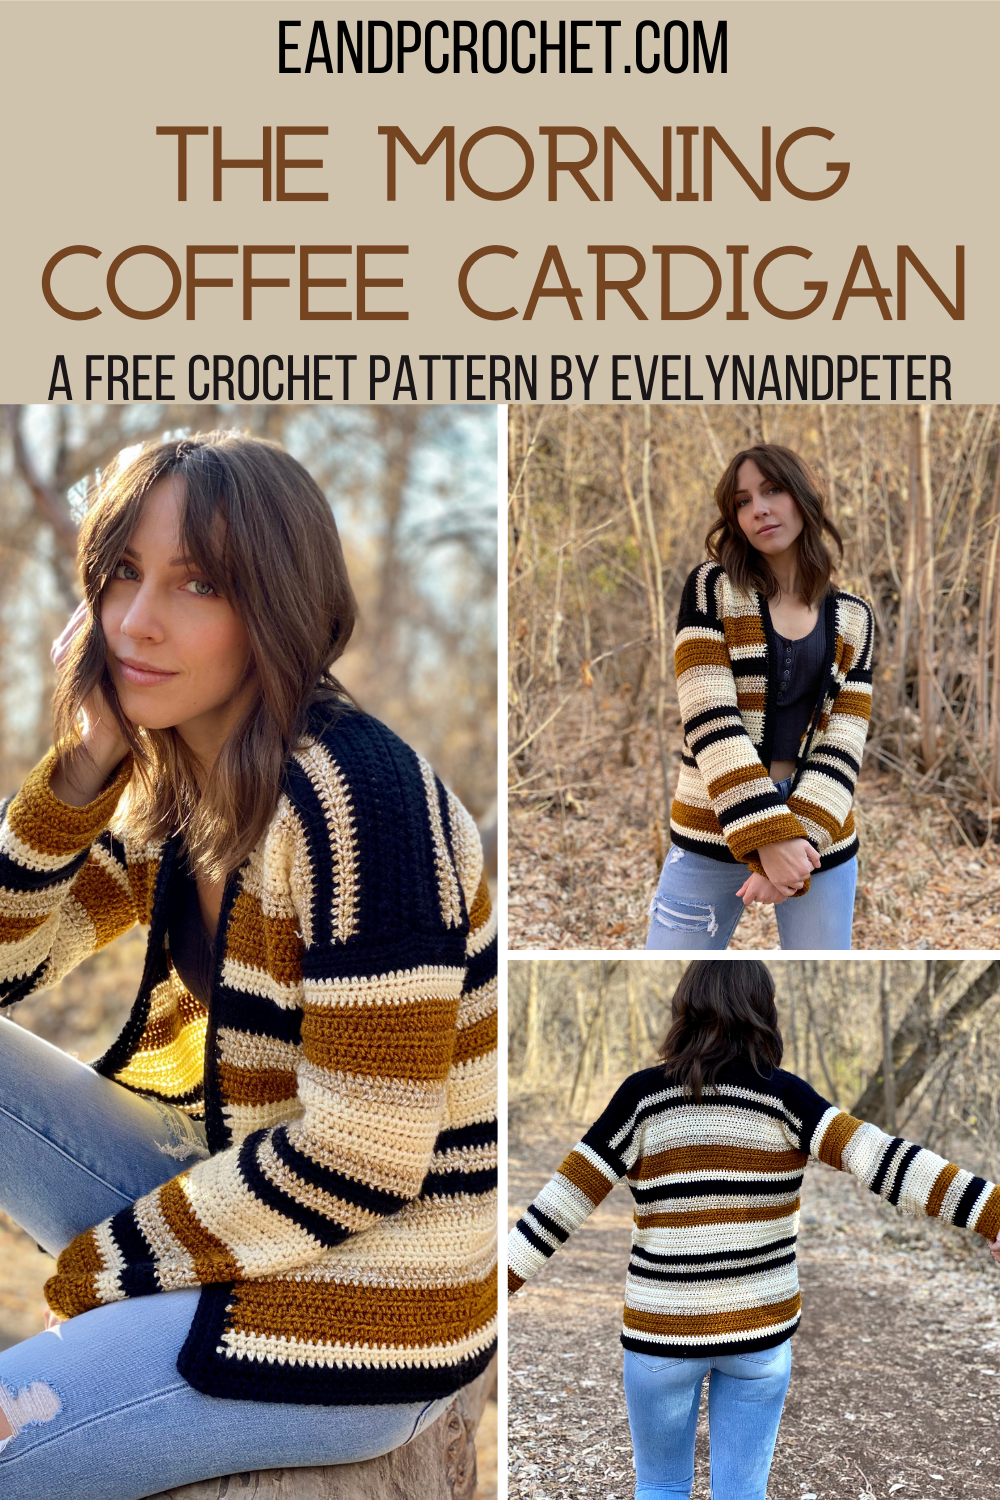
I’ve been making a lot of striped things lately if you haven’t noticed! When I saw a striped blanket at target with a similar color palette I knew I had to get my hands on some yarn and make something with it! I debated between a cardigan and a blanket for a bit but wasn’t a hard choice to go with a cardi! That’s how The Morning Coffee Cardigan came about!
The Morning Coffee Cardigan is a VERY beginner friendly pattern. It has no shaping and minimal seaming. I decided to add in some optional shaping only at the forearms. This cardigan is designed to have loose cuffs/sleeves. I know that some people prefer to have there sleeves tapered so I added that option just in case!
I also recommend leaving the tails of yarn long enough on the sides of the front/back panel so that you can use these to sew your panels together. This will help cut down on the ends you need to weave in. Another tip is when you are crocheting the trim, that you crochet directly over the ends of yarn. This way you can skip the weaving process.