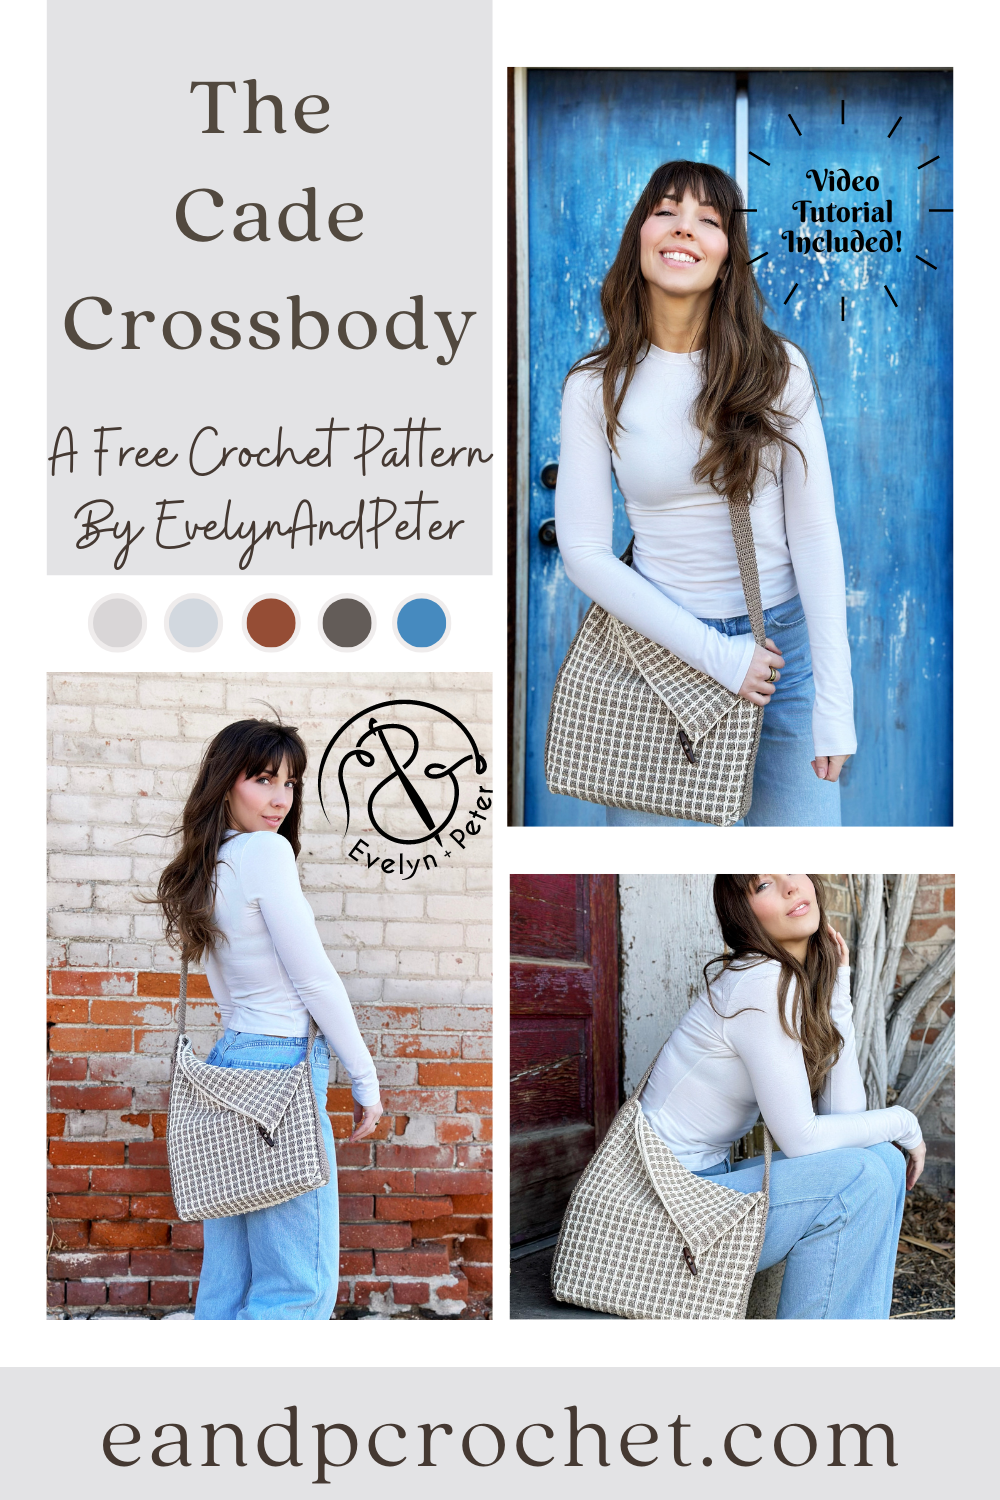
I had so much designing The Cade Crossbody. Why? Because it’s part of a collab with my yarn bestie Meghan from Meghanmakesdo! I made the crochet version and she made the knit version! It’s always nice to have options so maybe if you are seeing this but you are a knitter, than be sure to check out her blog!
The Cade Crossbody crochet pattern is actually pretty simple. It’s 2 rectangles sewn together and a long strap added last! You’ll add the strap on with a unique twist to give it the slanted fold over look. To give your bag some shape, you will be tacking/sewing the corners up into a triangle point when you add the strap. Once side is sewn further up than the other. That’s it!
When Meghan showed me the knit stitch she was going to use for her bag, I knew I would have to do some swatching and figure out how to get my crochet version looking similar! I tried a bunch of different stitch combinations. Finally I settled with a combo of Sc, Sl St and surface stitches to give the look you see here! There will be some ends on your rectangle panels. But don’t worry!! Most of them you will crochet right over, so don’t let the ends scare you! Just check out the notes section or watch the video tutorial!
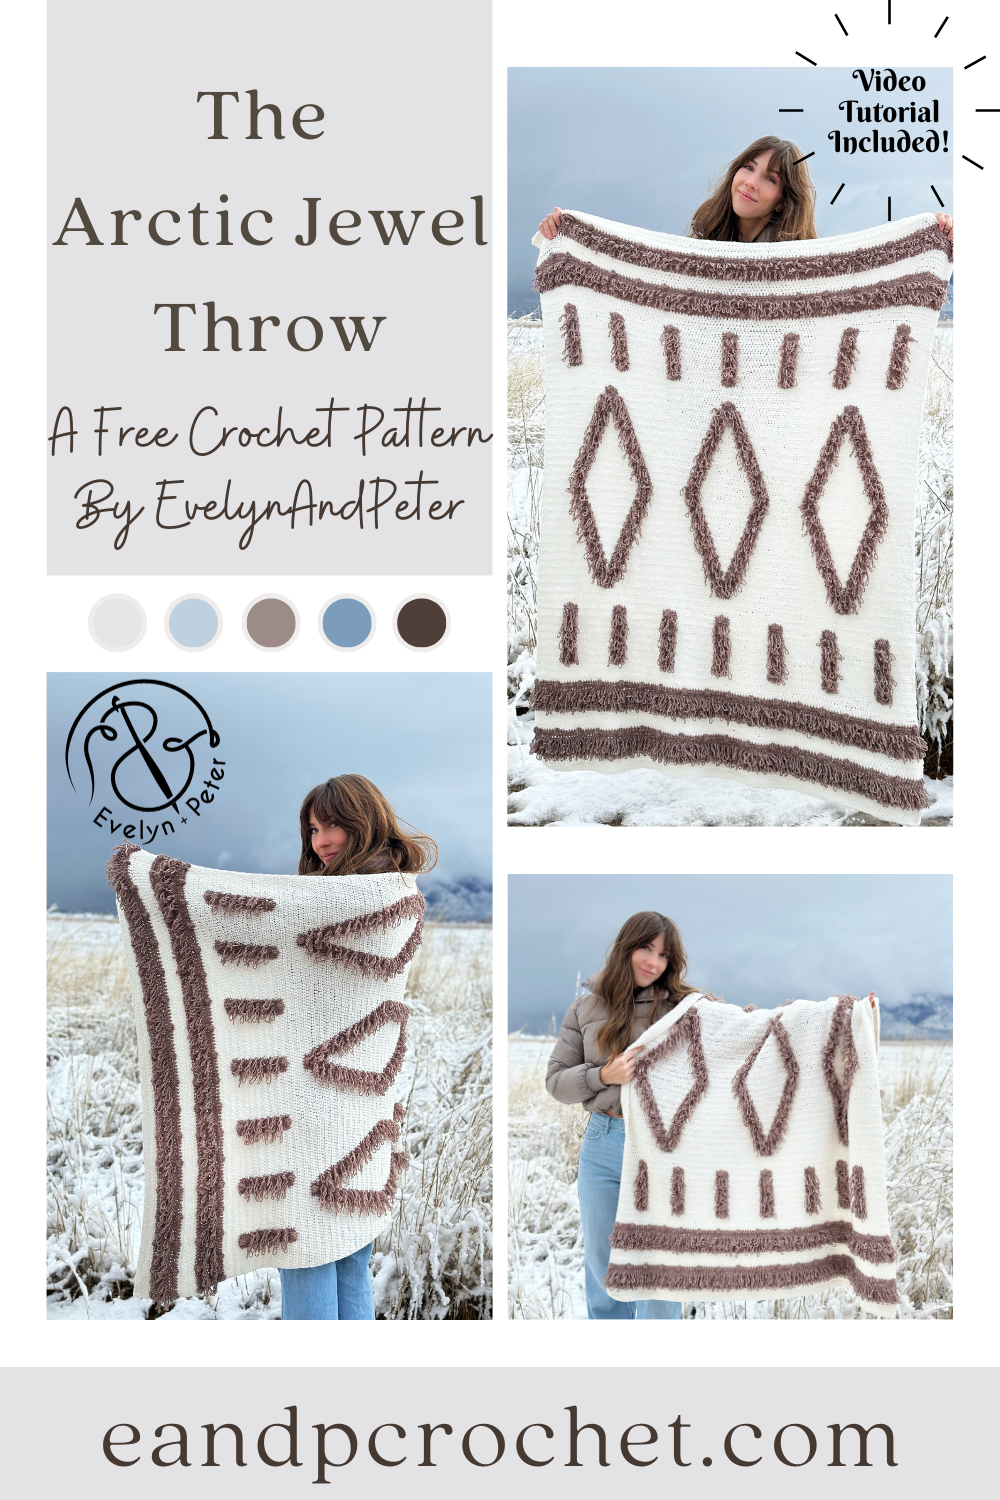
It’s finally time for my last crochet design of the year, The Arctic Jewel Throw! I’m very excited to share this blanket pattern with you guys and I hope you love it just as much as I do!
I was vacuuming my dining room rug one day and instantly got inspired for this project! My rug has different textures where the design is fluffier and sticks out more than the main portion of it. I tried different stitches to achieve a similar look and finally settled on doing a loop stitch. I knew I wanted to do this blanket in Hdc so I ended up altering your typical single crochet loop stitch into a Hdc Loop St. It worked out perfectly after some swatching and I went right into designing what I wanted the blanket to look like.
The Hdc loop St in this blanket takes a tiny bit of practice but I know you can do it! Take a look at my video tutorial where I show you exactly what you need to do! Once you have that stitch down the only other stitches you will be doing are regular Hdc and a small bobble! You do need to know how to change colors at the end of a row, as well as mid row. I show this in my video too!
The best way to make this blanket is to separate your CC (contrasting color- stucco) into multiple balls. That way, you don’t have to cut and join your yarn a million times. You don’t need to worry about doing this until you reach the vertical stripes and diamond portion of the blanket. Once you reach this area you will use 7 separate balls of the brown color. Do not cut and join these, simply work your stitches needed, then drop the color and leave it there for when you need it in the next row, then just pick back up!
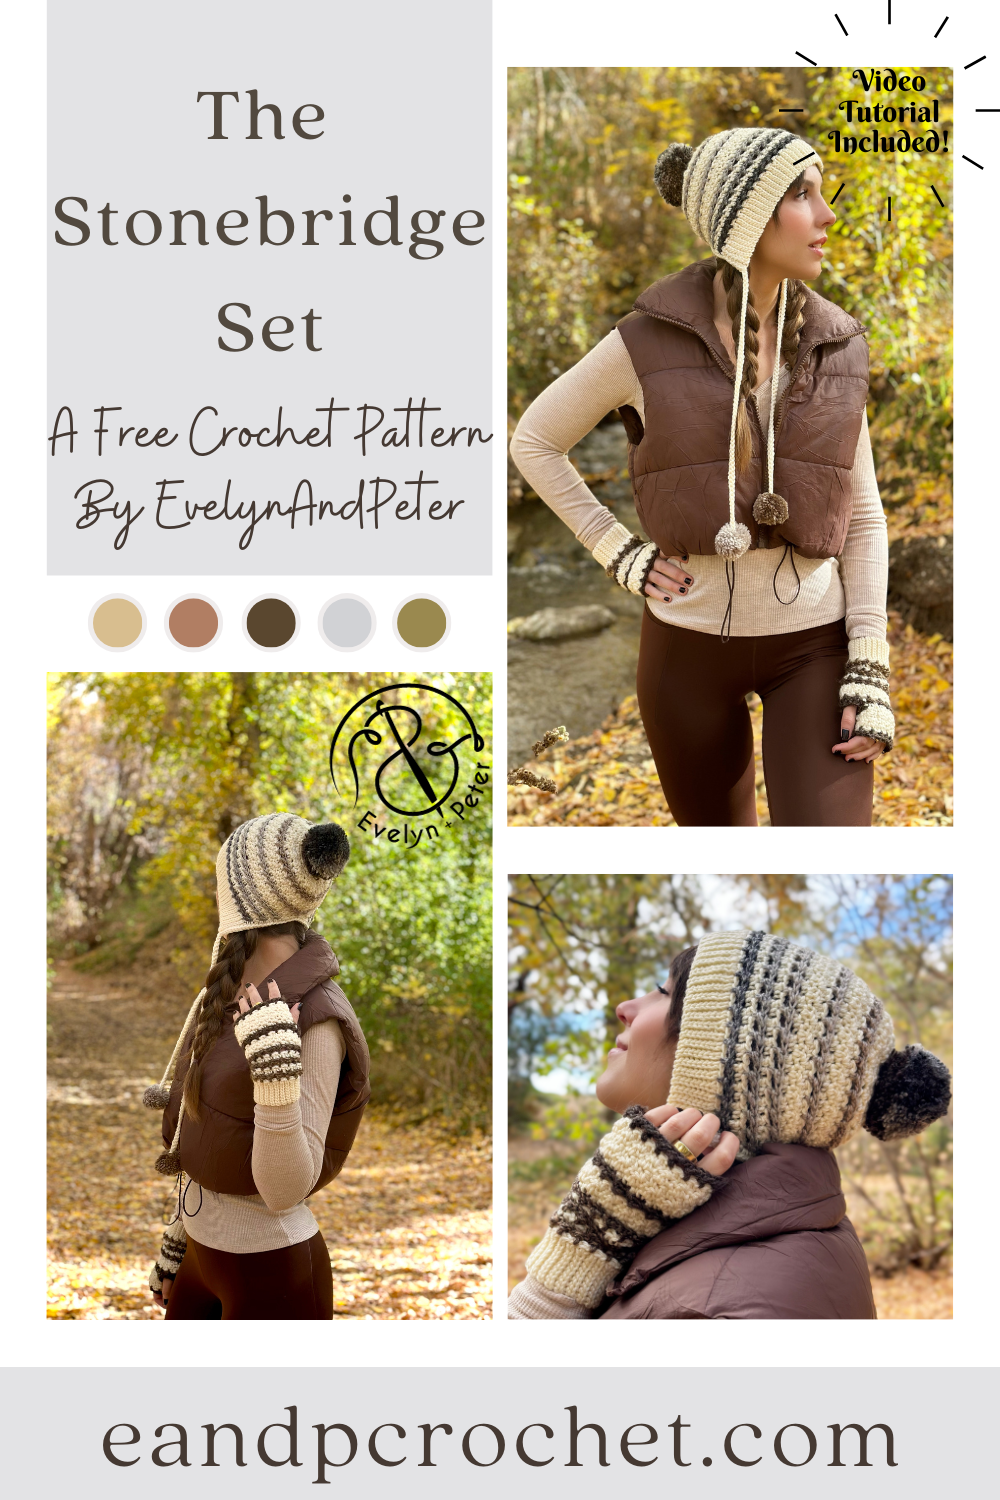
I can’t believe it’s already November and cold enough for my annual Beanie and Mitt set! Last winter I released The Winter Moonlight Set and this year is The Stonebridge Set crochet pattern!
I wanted to do something a little bit different than your typical beanie. I decided to construct it in more of a “bonnet” style and add a tie with little poms on the ends! You’ll start the beanie by creating the ribbing in rows, then crocheting your first row into the sides of the ribbing rows made. You’ll continue the first several rows back and fourth before joining the piece together and crocheting the remaining beanie in joined and turned rounds. Don’t forget the turn! It’s very important to do so within the pattern.
The fingerless mitts uses the same stitches but worked up slightly different. The ribbing is made the same as the beanie but you will immediately join together and worked in turned rounds throughout the entirety of the main body of the mitt. Take note of the thumb hole round! This will be slightly different for the left vs. the right mitt. Other than that, both left and right will be the same!
I used worsted (4) weight yarn for this set. The main color A is Lion Brand Skein Tones in “Ivory or Basic Stitch Anti-pilling in “ecru” (these are the same colors and either one will work) and Color B is Ferris Wheel in “Morning Java”. If you want your fingerless mitts to have the same color stripes, be sure to start on the same color within the ferris wheel skein. You’ll have to pull the yarn out and cut so you can start at the same point! Other than that, no need to worry about rearranging the colors as they stripe on there own! You can find this yarn in the Lion Brand kit along with a free copy of my PDF pattern!
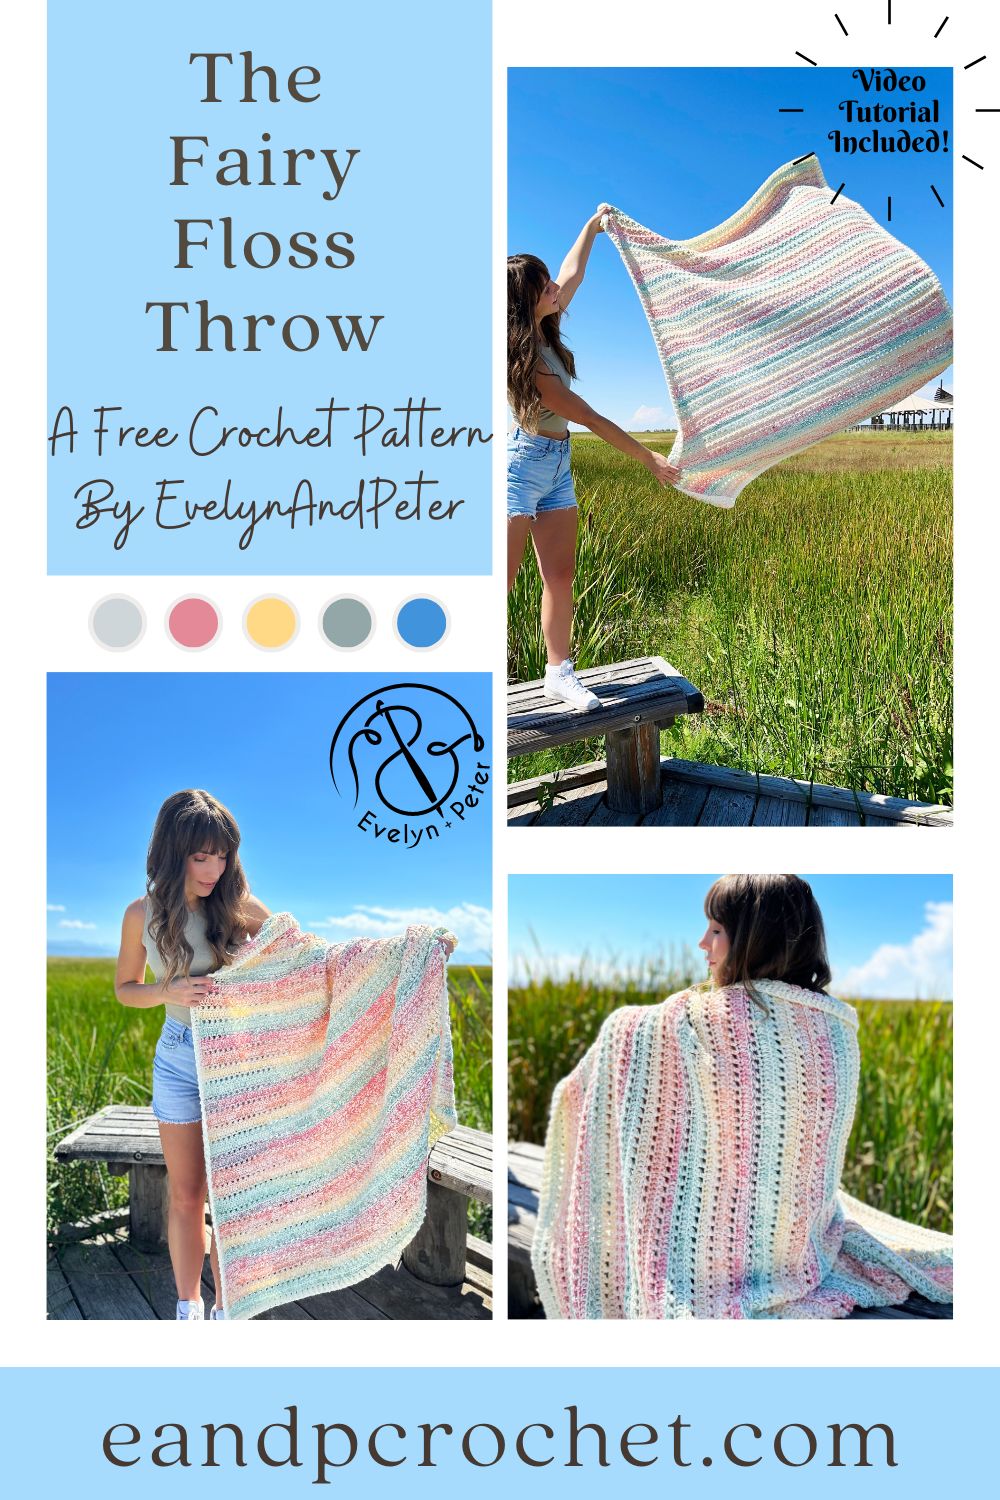
I love a good blanket project that is mindless, don’t you? There is just something about being able to curl up with it, put on whatever current binge worthy show and crochet without having to think about what i’m doing! Even better, The Fairy Floss Throw uses yarn held double. So not only does it work up quicker, it gives a beautiful but effortless look!
The Fairy Floss Throw uses two different yarns, both of them Lion Brand. First is Pound Of Love which is a worsted weight and the second one is Mandala String which is a super fine weight. The Mandala String yarn does allllll the talking in this pattern. It creates a beautiful stripe effect with zero effort on your part.
There are so many different color combinations for this blanket. I used vintage white (but you can also use Vanilla or White for the same look) and Jazz for the mandala yarn. I wanted to see what it would look like with a darker yarn and I totally love it just as much!! Check it out below! You can use Charcoal or Black to achieve this look.
If you want more of a neutral look you can swap out the Jazz color for the color Ballad. I think this would look amazing! I’m so excited to see everyones blankets! If you plan on getting yarn I recommend grabbing the kit from lion brand which comes with a free copy of the printable pattern!
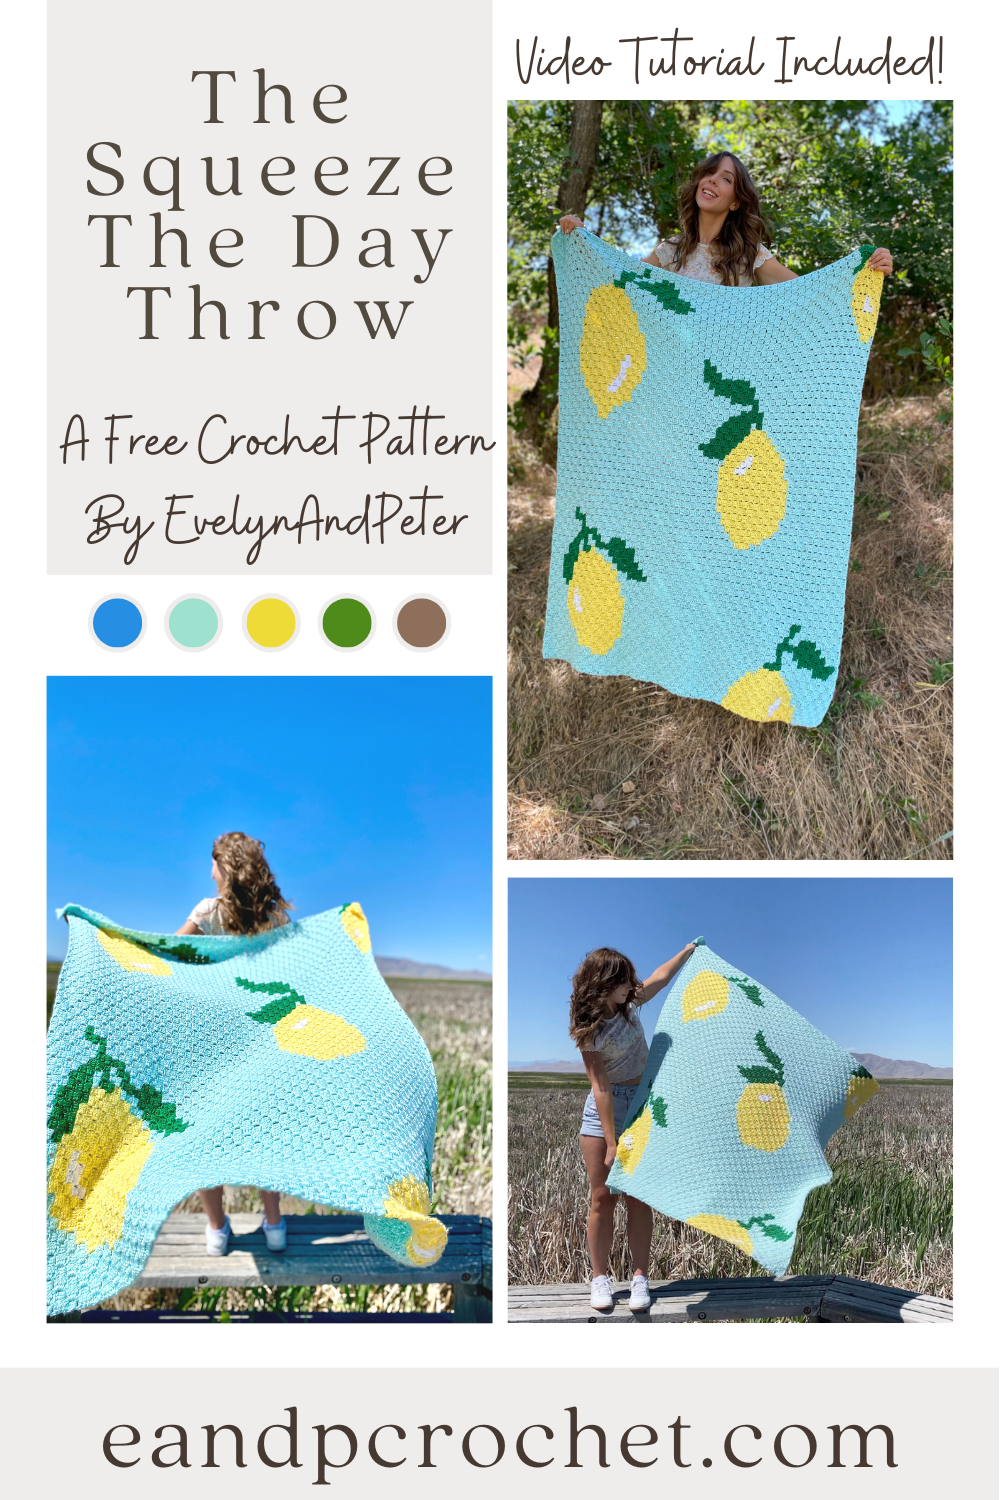
You guys already know I have a slight addiction to making fun C2C crochet patterns. Well, here’s another one for ya… The Squeeze The Day Throw crochet pattern! What’s better than bright happy lemons on a beautiful frosty background? I just love how it turned out so much! It totally reminds me of warm summer days in the middle of July. Perfect timing, right?!
This one has a similar style to The Daisy Day Throw. That one was a HUGE hit. My top performing pattern of the last few months, that’s for sure! You guys loved it so much and I hope you love this one too! Once again, I used Lion Brand Basic Stitch Anti-Pilling yarn to make it. And I can attest to the fact that it really is anti-pilling! My blanket was stuck in some prickers that I had to carefully pull off and then had to wash some dirt off. It definitely is anti-pilling to say the least!
This blanket is Corner 2 Corner (C2C) style. If you’ve never heard of that, it’s exactly what it sounds like! You work from the bottom right corner to the top left corner to create this blanket! Each block on the graph below is made up of a square. Each Sq is a Ch 3 and 3 Dc. I have the full written pattern down below as well as the graph. I always recommend cross referencing the graph if you think you made a mistake. The graph is EXACTLY how your blanket should look. If you think you have 1 too many yellow squares in a row, look at the graph, then look at your blanket! Do they match? If not you can go back and pull out your mistake!
If you need a little extra help with this blanket or your new to C2C I recommend checking out my video tutorial to get going! Once you learn the basics of the squares it’s easy breezy from there on out. If you need some extra help learning how to organize your yarn or keep it from tangling there are a ton of helpful videos and blog posts out there!
I hope you guys enjoy this pattern and I can’t wait to see all of your Squeeze The Day Throws!
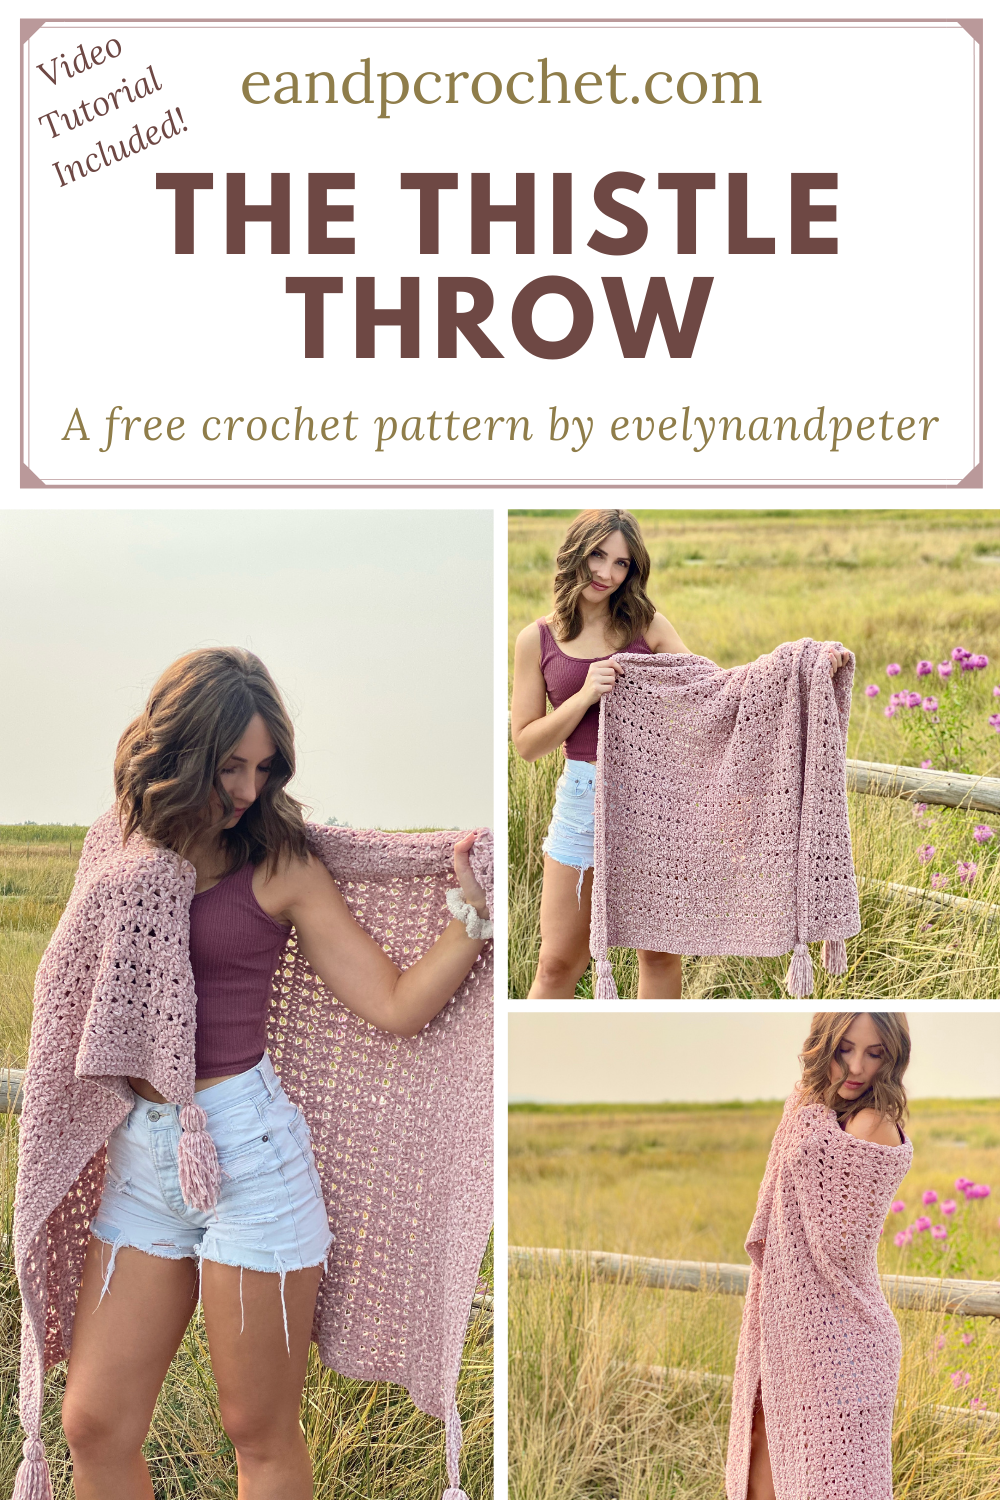
Do you like crocheting quick and easy blankets? I do! They are one of my favorite things to do when I want a mindless project to work on. The Thistle Throw is the perfect size so that it doesn’t take too long to finish but it’s still looks great thrown on the back of a couch!
The Thistle Throw is worked from the bottom up, with a fun row repeat! It’s made entirely of double crochet and chain stitches, so it’s perfect for beginners.
The Vel-Luxe yarn is super soft and easy to work with. I used the Dusty Pink color and think it’s beautiful! They have lots of other colors to chose from as well.
I know that you guys have been loving the video tutorials that i’ve been including with my new designs and The Thistle Throw has one too! I’ll walk you through step by step on how to make the blanket, the border and the tassels! Be sure to check it out and subscribe!
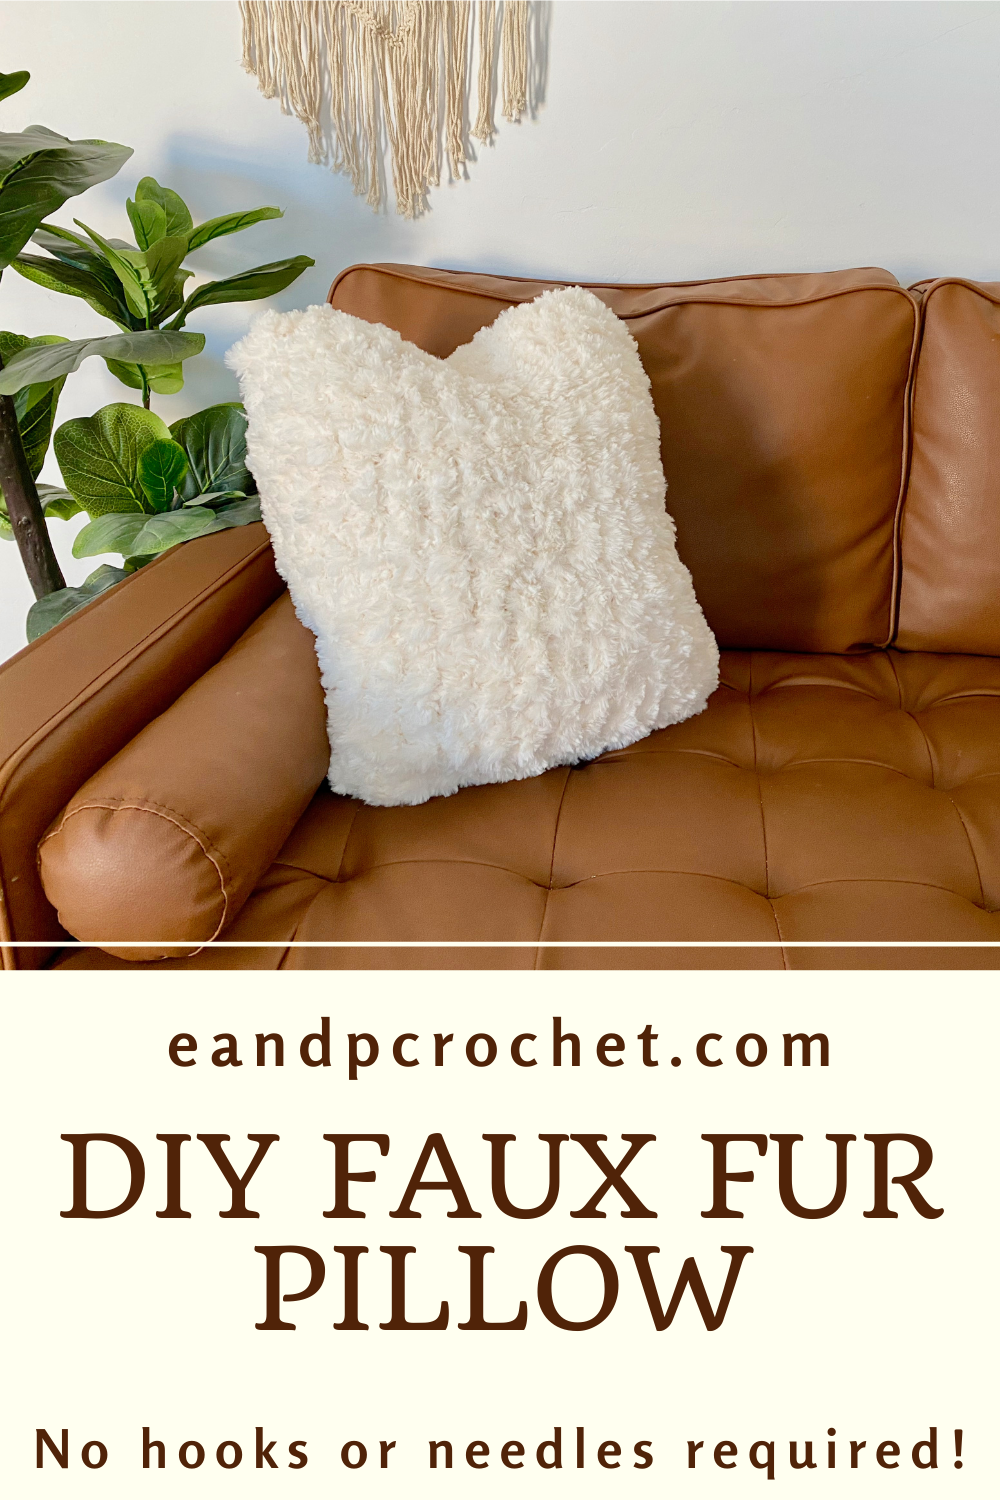
I know i’m not the only one who likes the faux fur yarn, right? I know that the normal fur yarn can be super intimidating because it can be hard to see your stitches! Luckily, I have a solution for you! This yarn is called “off the hook” yarn which means you don’t need to use any hooks or needles! I designed a super easy tutorial to make a DIY Faux Fur Pillow for you!
You may be asking yourself, “How will we make something without a hook?!” Well, the answer is using our hands! The off the hook yarn has little loops all along the strand. You take these loops and pull another loop through to create your stitch.
I wanted to have a super easy tutorial so you guys could get a feel for it. I created the DIY Faux Fur Pillow tutorial! You can watch the full video where I walk you through making the pillow step by step!