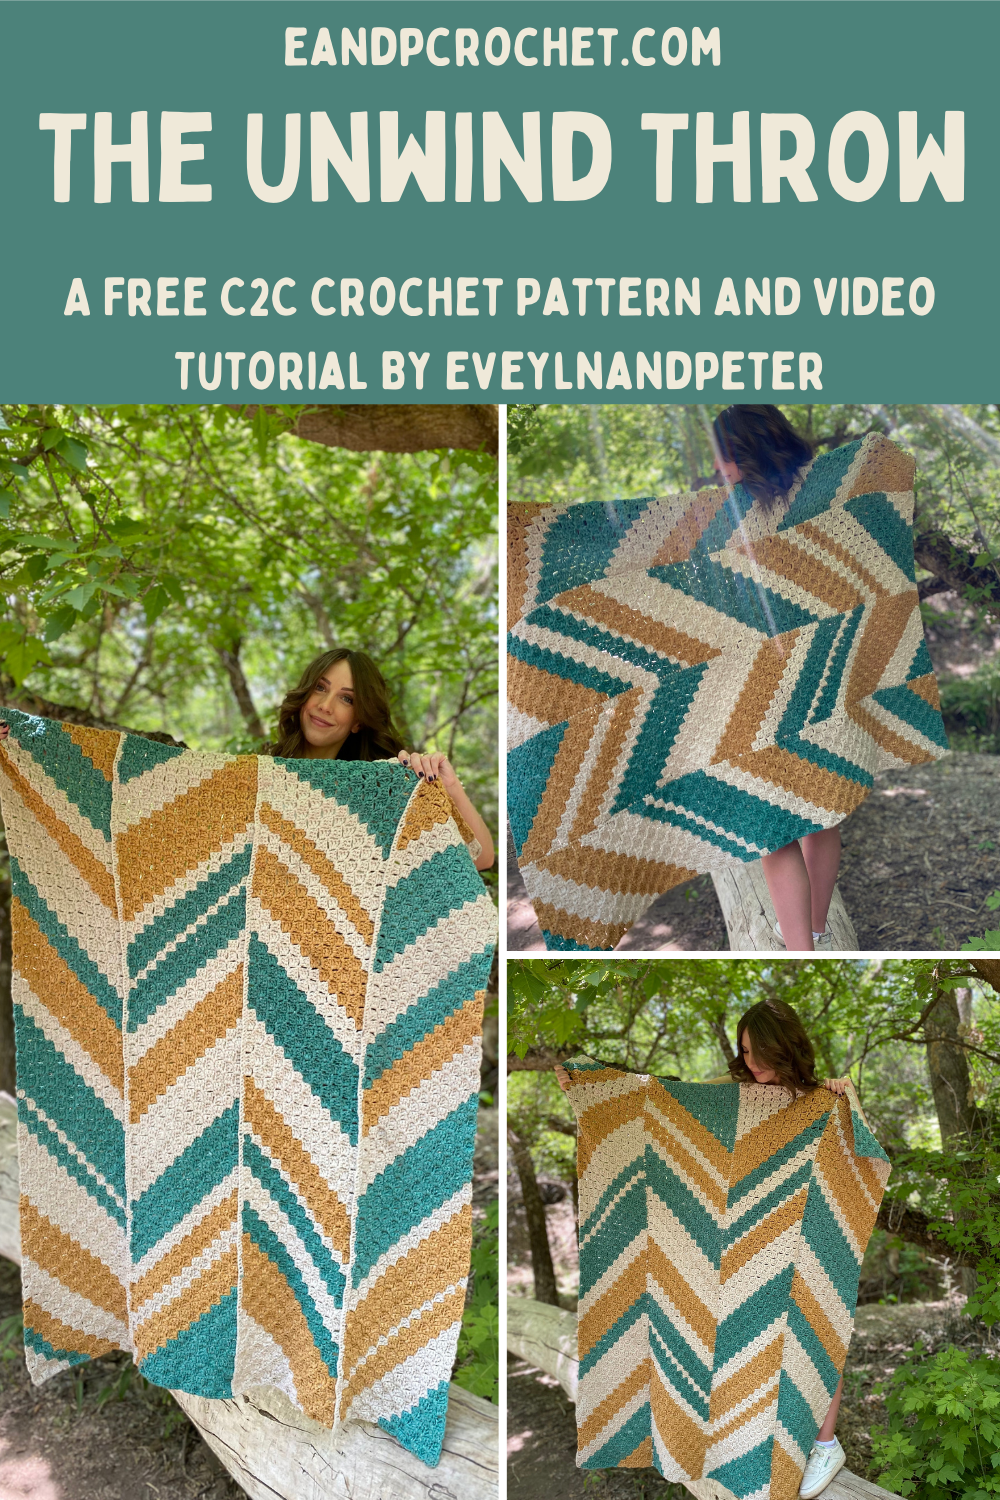
The Unwind Throw Blanket

A while back I was browsing wayfair for home decor ideas (as one does) and came across the wallpaper section. One of them immediately caught my eye. Not to actually wallpaper my house with…but as a crochet project, obviously! I’m constantly on the lookout for inspiration and this one came easily!
Right away I knew I was going to do a C2C blanket design- The Unwind Throw blanket! Usually I make my C2C blankets in one large piece. For this design I split it into 4 separate rectangular panels. It actually made it feel like the crocheting went by a lot quicker! Breaking it up into easily manageable sections worked out great.
I know what your thinking… look at all those ends to weave in!! Well, it actually wasn’t very many at all! When you crochet the 4 panels together, you crochet right over the knotted tails! So the only ends to weave in on The Unwind Throw Blanket were from some of the color changes on the outside perimeter of the blanket. You could make it even easier on yourself and crochet a border too and not have a single end to weave!
If you like The Unwind Throw Blanket be sure to check out some of my other C2C blankets!
Links:
-
The Unwind Throw blanket is available as a kit with Lion brand! The kit includes all the yarn needed to make your blanket + the PDF digital download of the pattern! You can even switch out your yarn color choices!
-
I made a full video tutorial for The Unwind Throw blanket! If you are new to C2C crochet be sure to check it out!
-
You can find the low cost ad-free PDF digital download for The Unwind Throw blanket in both my Etsy and Ravelry shops.
Description: This quick and easy Unwind Throw Blanket C2C is worked up in 4 panels that are joined together. You can mix and match how you want to lay your panels to make your blanket unique! Includes graphs, written instruction and a video tutorial!
Materials:
-
Bulky (5) weight yarn, Lion Brand Rewind in Elm (Color A- 4 skeins, 805 yards), Capri Breeze (Color B- 3 skeins, 640 yards) and Citronella (Color C- 3 skeins, 645 yards)
-
K/6.5mm Crochet Hook
-
Yarn Needle
Notes:
-
This is a Corner 2 Corner (C2C) crochet pattern. You will be making 4 separate panels and joining them together at the end.
-
Each panel is worked diagonally from the bottom right corner to the upper left corner.
-
You can arrange the panels however you would like before joining them together if you chose to go with a different look then the photo shown.
-
Each block on the graph is 1 square. 1 square consists of a Ch 3 and 3 Dc.
-
When you reach the first corner you will no longer be increasing on that side of your panel. Work a decrease square instead.
-
Once you are familiar with C2C I recommend just following the graph to see where your color changes are.
-
Each time you change a color and tie off, be sure to tie the 2 ends into a knot. When you join your panels together you will work a row of Sc stitches directly over these ends so that you have less to weave in at the end.
Links:
New to C2C crochet? Check Out The Full Video Tutorial
Gauge:
4X4”= 4.25 Sq by 4.25 Sq
Finished Size:
45X57”
Stitches and Abbreviations (US Terms):
Square (Sq)- Join to next Ch Sp with a Sl St. Ch 3. Work 3 Dc into same space.
Increase square- Ch 6, work 1 Dc in 4th Ch from hook. Work 1 Dc in each of the next 2 Ch. (This is the square you start with)
Decrease Square- Join to previous row with a Sl St. Turn. Work 1 Sl St into the top of each of the 3 Dc across square. Sl St into the CH 3 Sp. Ch 3. Work 3 Dc into Ch Sp.
Dc- Double Crochet
Sl St- Slip Stitch
Ch- Chain
RS- Right Side
WS- Wrong Side
Sc- Single Crochet
Color Chart:
Color A- Elm
Color B- Capri Breeze
Color C- Citronella
Pattern:
Panel A
← Row 1 [RS]: B1 (1 square)
→ Row 2 [WS]: B2 (2 squares)
← Row 3: B3 (3 squares)
→ Row 4: B4 (4 squares)
← Row 5: B5 (5 squares)
→ Row 6: B6 (6 squares)
← Row 7: B7 (7 squares)
→ Row 8: A8 (8 squares)
← Row 9: A9 (9 squares)
→ Row 10: A10 (10 squares)
← Row 11: A11 (11 squares)
→ Row 12: A12 (12 squares)
Corner
← Row 13: C12
→ Row 14: C12
← Row 15: C12
→ Row 16: A12
← Row 17: C12
→ Row 18: C12
← Row 19: C12
→ Row 20: C12
← Row 21: C12
→ Row 22: C12
← Row 23: A12
→ Row 24: A12
← Row 25: B12
→ Row 26: B12
← Row 27: B12
→ Row 28: B12
← Row 29: B12
→ Row 30: B12
← Row 31: B12
→ Row 32: B12
← Row 33: A12
→ Row 34: A12
← Row 35: A12
→ Row 36: A12
← Row 37: A12
→ Row 38: C12
← Row 39: C12
→ Row 40: C12
← Row 41: C12
→ Row 42: B12
← Row 43: B12
→ Row 44: B12
← Row 45: B12
→ Row 46: A12
← Row 47: A12
→ Row 48: A12
← Row 49: A12
→ Row 50: A12
← Row 51: A12
→ Row 52: B12
← Row 53: B12
→ Row 54: B12
← Row 55: B12
→ Row 56: B12
← Row 57: B12
→ Row 58: B12
← Row 59: A12
→ Row 60: A12
Corner
← Row 61: A11 (11 squares)
→ Row 62: C10 (10 squares)
← Row 63: C9 (9 squares)
→ Row 64: C8 (8 squares)
← Row 65: C7 (7 squares)
→ Row 66: C6 (6 squares)
← Row 67: C5 (5 squares)
→ Row 68: C4 (4 squares)
← Row 69: C3 (3 squares)
→ Row 70: C2 (2 squares)
← Row 71: C1 (1 square)
Tie off.
Panel B
← Row 1 [RS]: A1 (1 square)
→ Row 2 [WS]: A2 (2 squares)
← Row 3: A3 (3 squares)
→ Row 4: A4 (4 squares)
← Row 5: A5 (5 squares)
→ Row 6: A6 (6 squares)
← Row 7: A7 (7 squares)
→ Row 8: A8 (8 squares)
← Row 9: A9 (9 squares)
→ Row 10: C10 (10 squares)
← Row 11: C11 (11 squares)
→ Row 12: C12 (12 squares)
Corner
← Row 13: C12
→ Row 14: C12
← Row 15: C12
→ Row 16: C12
← Row 17: B12
→ Row 18: B12
← Row 19: B12
→ Row 20: A12
← Row 21: A12
→ Row 22: A12
← Row 23: B12
→ Row 24: B12
← Row 25: B12
→ Row 26: A12
← Row 27: C12
→ Row 28: C12
← Row 29: C12
→ Row 30: C12
← Row 31: A12
→ Row 32: A12
← Row 33: A12
→ Row 34: A12
← Row 35: A12
→ Row 36: A12
← Row 37: B12
→ Row 38: B12
← Row 39: B12
→ Row 40: B12
← Row 41: B12
→ Row 42: B12
← Row 43: B12
→ Row 44: A12
← Row 45: A12
→ Row 46: A12
← Row 47: C12
→ Row 48: C12
← Row 49: C12
→ Row 50: C12
← Row 51: C12
→ Row 52: A12
← Row 53: A12
→ Row 54: C12
← Row 55: C12
→ Row 56: A12
← Row 57: A12
→ Row 58: A12
← Row 59: A12
→ Row 60: A12
Corner
← Row 61: B11 (11 squares)
→ Row 62: B10 (10 squares)
← Row 63: B9 (9 squares)
→ Row 64: B8 (8 squares)
← Row 65: B7 (7 squares)
→ Row 66: B6 (6 squares)
← Row 67: B5 (5 squares)
→ Row 68: A4 (4 squares)
← Row 69: A3 (3 squares)
→ Row 70: A2 (2 squares)
← Row 71: A1 (1 square)
Tie off.
Panel C
← Row 1 [RS]: B1 (1 square)
→ Row 2 [WS]: B2 (2 squares)
← Row 3: B3 (3 squares)
→ Row 4: B4 (4 squares)
← Row 5: B5 (5 squares)
→ Row 6: B6 (6 squares)
← Row 7: B7 (7 squares)
→ Row 8: B8 (8 squares)
← Row 9: B9 (9 squares)
→ Row 10: B10 (10 squares)
← Row 11: B11 (11 squares)
→ Row 12: C12 (12 squares)
Corner
← Row 13: C12
→ Row 14: C12
← Row 15: C12
→ Row 16: A12
← Row 17: A12
→ Row 18: C12
← Row 19: C12
→ Row 20: C12
← Row 21: A12
→ Row 22: A12
← Row 23: B12
→ Row 24: B12
← Row 25: B12
→ Row 26: B12
← Row 27: B12
→ Row 28: B12
← Row 29: A12
→ Row 30: A12
← Row 31: A12
→ Row 32: A12
← Row 33: A12
→ Row 34: A12
← Row 35: A12
→ Row 36: C12
← Row 37: C12
→ Row 38: C12
← Row 39: C12
→ Row 40: C12
← Row 41: A12
→ Row 42: A12
← Row 43: A12
→ Row 44: B12
← Row 45: B12
→ Row 46: B12
← Row 47: B12
→ Row 48: A12
← Row 49: B12
→ Row 50: B12
← Row 51: B12
→ Row 52: A12
← Row 53: A12
→ Row 54: C12
← Row 55: C12
→ Row 56: C12
← Row 57: C12
→ Row 58: C12
← Row 59: C12
→ Row 60: C12
Corner
← Row 61: C11 (11 squares)
→ Row 62: A10 (10 squares)
← Row 63: A9 (9 squares)
→ Row 64: A8 (8 squares)
← Row 65: A7 (7 squares)
→ Row 66: A6 (6 squares)
← Row 67: B5 (5 squares)
→ Row 68: B4 (4 squares)
← Row 69: B3 (3 squares)
→ Row 70: B2 (2 squares)
← Row 71: B1 (1 square)
Tie off.
Panel D
← Row 1 [RS]: A1 (1 square)
→ Row 2 [WS]: A2 (2 squares)
← Row 3: A3 (3 squares)
→ Row 4: A4 (4 squares)
← Row 5: B5 (5 squares)
→ Row 6: B6 (6 squares)
← Row 7: C7 (7 squares)
→ Row 8: C8 (8 squares)
← Row 9: C9 (9 squares)
→ Row 10: A10 (10 squares)
← Row 11: A11 (11 squares)
→ Row 12: A12 (12 squares)
Corner
← Row 13: A12
→ Row 14: C12
← Row 15: C12
→ Row 16: C12
← Row 17: C12
→ Row 18: C12
← Row 19: A12
→ Row 20: A12
← Row 21: A12
→ Row 22: A12
← Row 23: A12
→ Row 24: A12
← Row 25: B12
→ Row 26: B12
← Row 27: A12
→ Row 28: B12
← Row 29: B12
→ Row 30: B12
← Row 31: B12
→ Row 32: B12
← Row 33: B12
→ Row 34: B12
← Row 35: A12
→ Row 36: A12
← Row 37: A12
→ Row 38: C12
← Row 39: C12
→ Row 40: C12
← Row 41: C12
→ Row 42: C12
← Row 43: C12
→ Row 44: B12
← Row 45: B12
→ Row 46: B12
← Row 47: A12
→ Row 48: A12
← Row 49: A12
→ Row 50: A12
← Row 51: A12
→ Row 52: A12
← Row 53: A12
→ Row 54: C12
← Row 55: C12
→ Row 56: C12
← Row 57: C12
→ Row 58: A12
← Row 59: A12
→ Row 60: A12
Corner
← Row 61: B11 (11 squares)
→ Row 62: B10 (10 squares)
← Row 63: B9 (9 squares)
→ Row 64: B8 (8 squares)
← Row 65: B7 (7 squares)
→ Row 66: B6 (6 squares)
← Row 67: C5 (5 squares)
→ Row 68: C4 (4 squares)
← Row 69: C3 (3 squares)
→ Row 70: C2 (2 squares)
← Row 71: C1 (1 square)
Tie off.
Join Panels-
Lay out your panels in front of you. My panels are lined up A, B, C, D from left to right. Panel A will be WS up, Panel B will be RS up, Panel C will be WS up and panel D will be RS up. You can arrange your panels however you would like and it won’t be an issue in the pattern. You can have them upside down or flip them either way. One side of the blanket will not have a visible seam and the other side will have a visible row of Sc stitches joining the panels. So decide on which side of the blanket you prefer to be seamless before moving on. For the sake of clarity my RS is the seamless side and my WS is the side with the Sc stitches.
Once you have your panels arranged to your liking, take panel A and panel B. Place the RS of Panel A and the WS of panel B together. Join your yarn to the bottom inner corners of the panels with a Sl St. Sc up the side working your hook through both panels to join. I worked approximately 3 Sc into the side of each Sq on the panel. When I reached the Ch Sp’s on the sides of the blocks I worked my Sts into the actual Sp. As you go, be sure to Sc directly over the ends of the tails so you have less to weave in when you are finished (make sure your tails are tied in a knot). If you want a visual on exactly where I put my hook be sure to view the video tutorial. Exact St count is not crucial here, just be sure to distribute your Sts evenly. When you reach the end, tie off. Repeat the same thing with Panel B and C. Be sure your Sc stitches are on the same Side as the first join. Repeat again with panel C and D.
Finish Up-
Make sure all of your remaining loose ends from the color changes are tied together in a knot. Weave in remaining ends.
Graphs-
Panel A

Panel B

Panel C

Panel D


