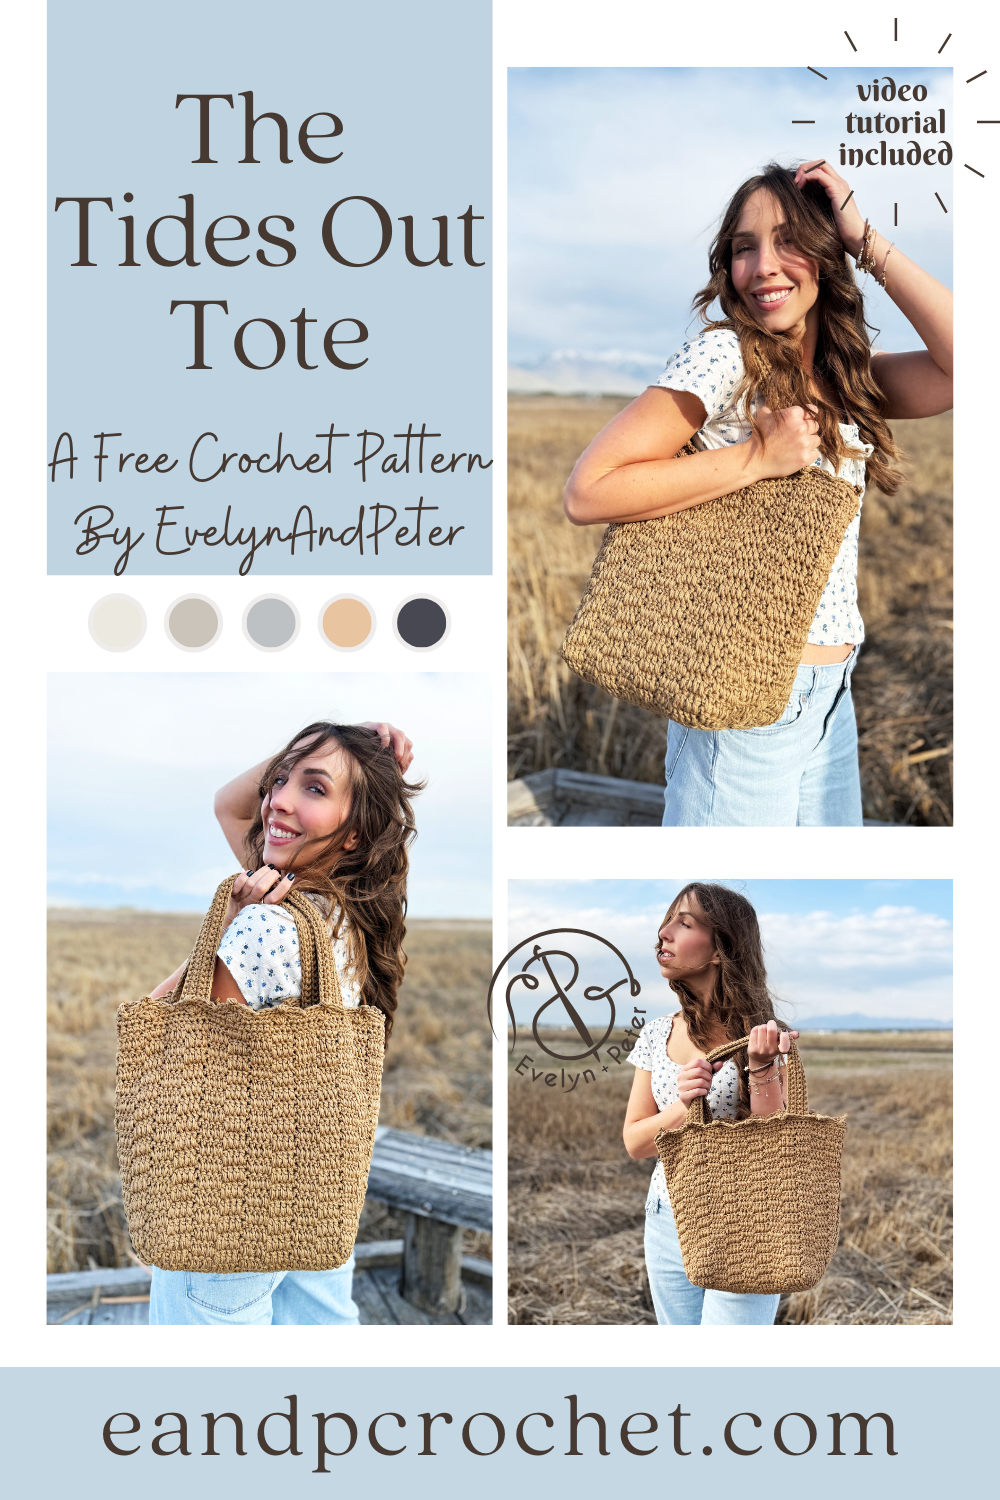
I love a good summer bag. I love 24/7 Cotton yarn. Put them together and you get The Tides Out Tote crochet pattern!
I absolutely have to make a summer bag every year and this year I ended up with The Tides Out Tote! You will be holding 24/7 cotton yarn double stranded throughout to create this beauty. It uses a bunch of double crochet stitches for an easy and fun texture.

Several months ago I designed the Starlight View Throw using a super fun yarn carrying technique to give it a very pretty and unique look. I loved working it up so much that I made a top using the same technique! The Sleepy Seaside Sweater crochet pattern turned out just as I imagined!!
I wanted my top to be long sleeve but still have a light and breathable wear to it. I used a double crochet offset V-St to give it a bit of a mesh look. It has a loose and boxy fit with a wide neckline to be worn off the shoulder! It is sooo cozy too! If you want a more fitted neck instead of “off the shoulder” you can add more rounds to your trim for an easy adjustment.
To give the Sleepy Seaside Sweater its mixed yarn look, you will be carrying a secondary yarn throughout. You will only ever be making your stitches with Yarn A and bringing along Yarn B as you go. Be sure to check out my video tutorial if you are new to this technique, I show you exactly how to do it! For my secondary yarn I used a “prints” version of the 24/7 Cotton Dk. This has random colors added throughout the skein so if you use the same yarn, each sweater will have its own unique look! Check out the kit here!
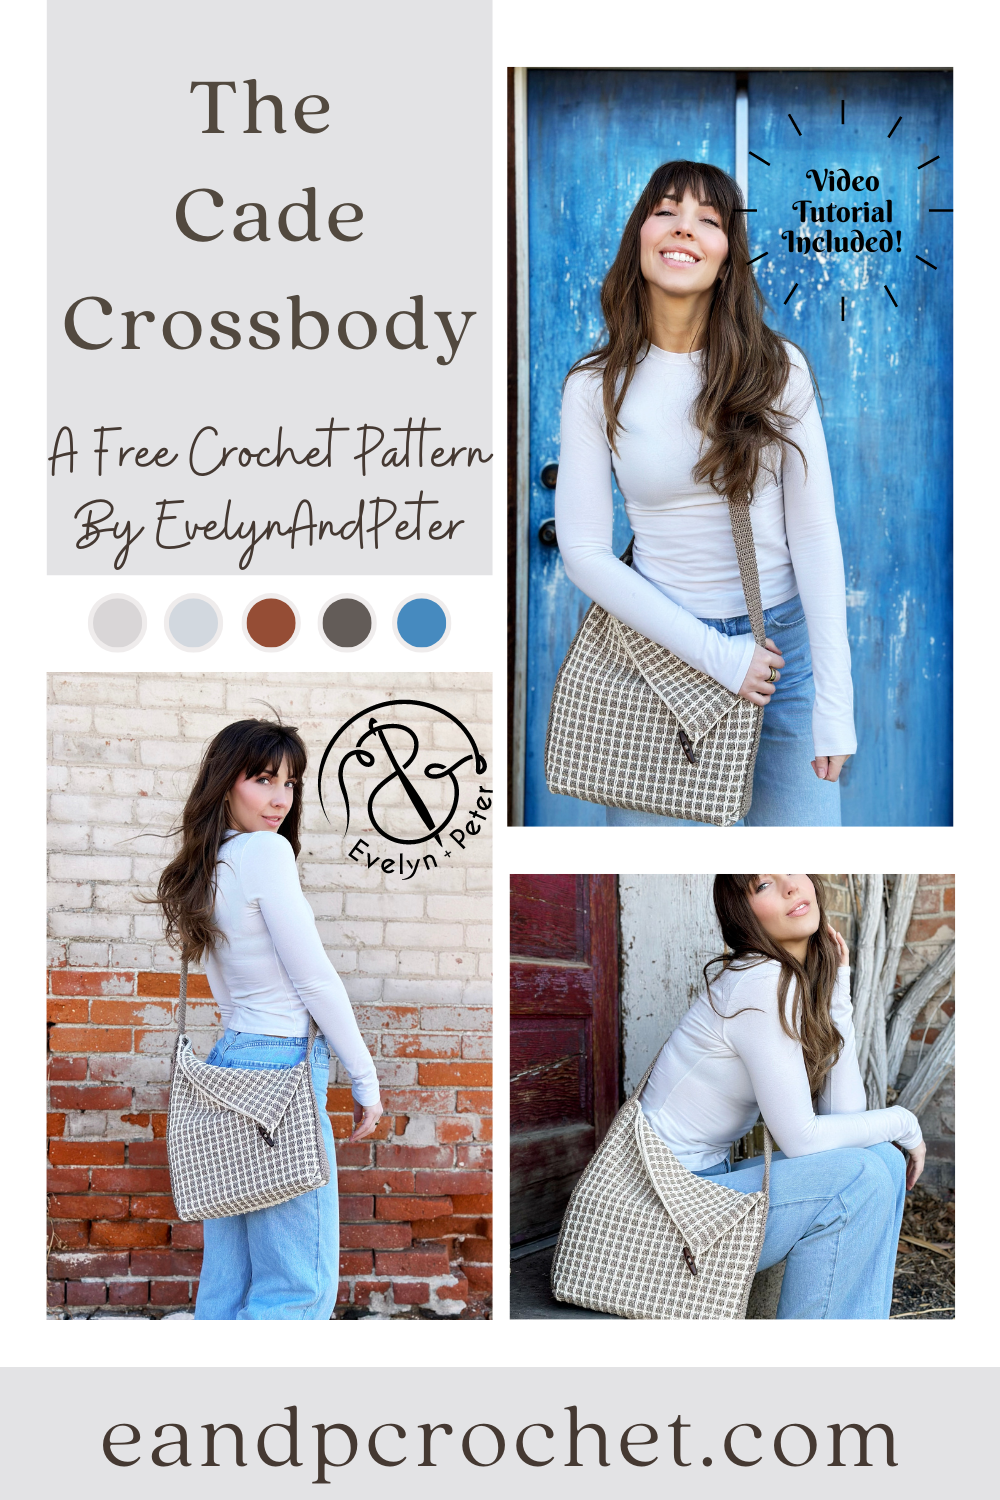
I had so much designing The Cade Crossbody. Why? Because it’s part of a collab with my yarn bestie Meghan from Meghanmakesdo! I made the crochet version and she made the knit version! It’s always nice to have options so maybe if you are seeing this but you are a knitter, than be sure to check out her blog!
The Cade Crossbody crochet pattern is actually pretty simple. It’s 2 rectangles sewn together and a long strap added last! You’ll add the strap on with a unique twist to give it the slanted fold over look. To give your bag some shape, you will be tacking/sewing the corners up into a triangle point when you add the strap. Once side is sewn further up than the other. That’s it!
When Meghan showed me the knit stitch she was going to use for her bag, I knew I would have to do some swatching and figure out how to get my crochet version looking similar! I tried a bunch of different stitch combinations. Finally I settled with a combo of Sc, Sl St and surface stitches to give the look you see here! There will be some ends on your rectangle panels. But don’t worry!! Most of them you will crochet right over, so don’t let the ends scare you! Just check out the notes section or watch the video tutorial!

I was sooooo excited to see that shrug and bolero style sweaters were starting to become popular again! They are one of my favorite styles so I knew I had to design one, which is exactly what I did! I’m so excited to share The Tilda Shrug crochet pattern with you all!
I stepped out of my comfort zone a bit with this one in terms of shaping. You’ll find some short rows around the opening of the shrug as well as increase shaping within the rows of the sleeves! The Tilda Shrug is worked in 2 separate mirrored panels. You will then do a small seam up the back as well as under the arms.
I used wool ease recycled yarn for this project and loved it! This was my first time using it and it worked up so well. The Tilda Shrug crochet pattern is a kit so if you need yarn I recommend checking it out! If you are intimidated with making the Tilda Shrug crochet pattern be sure to check out the video tutorial! Thank you guys so much for subscribing!
If you love this design be sure to check out some of my other cardigans and sweaters free here on my blog!
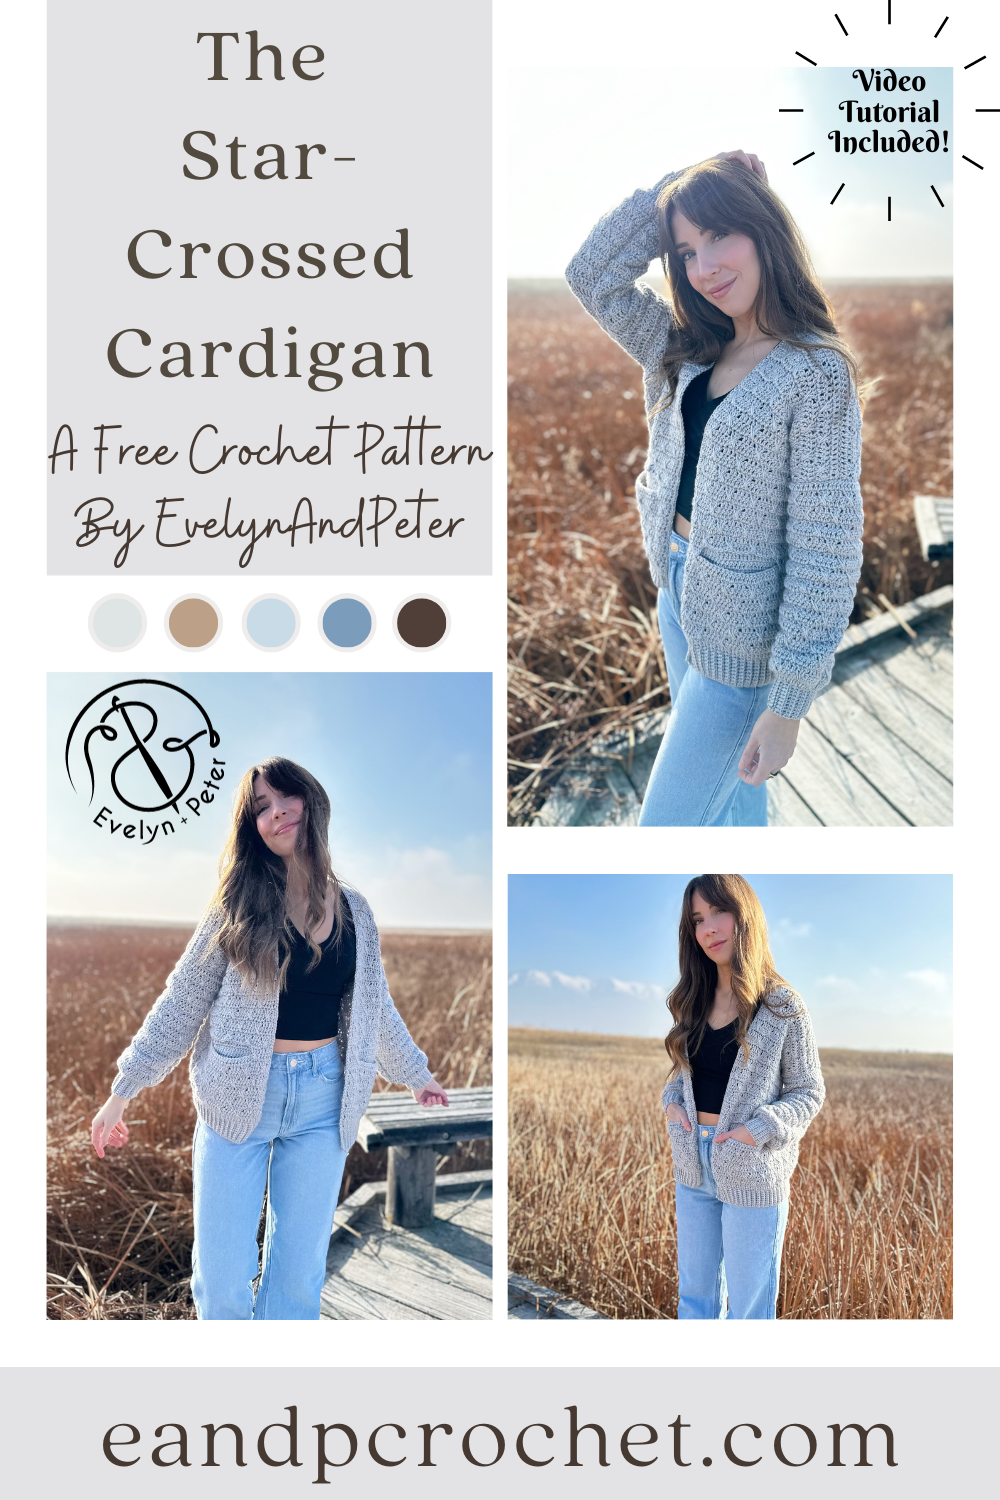
Let’s kick off the new year with a brand new crochet design, The Star-Crossed Cardigan Crochet Pattern! I wanted to start off strong with a cardigan design using Heartland yarn. You might remember my Stony Shore Cardigan and my Kiah Cardigan, both are very popular and well loved and both use Heartland yarn! I knew I needed something to add to the collection of my popular cardigans!
The Star-Crossed Cardigan crochet pattern is very beginner friendly and uses basic shapes. Once you nail the “double crosses spike” stitch you will work this cardigan up easy peasy! It’s basically a combination of all double crochet stitches with the ribbing using single crochet. You will work the panels from the bottom up and sew together.
Did you notice the Star-Crossed Cardigan crochet pattern has pockets?! The best part is that the pocket swatch is your gauge swatch. So feel free to jump ahead in the pattern and make a pocket swatch before starting. You will then use that swatch to measure 4×4″ within. Save it for later when you are required to seam to the inside of your cardigan!
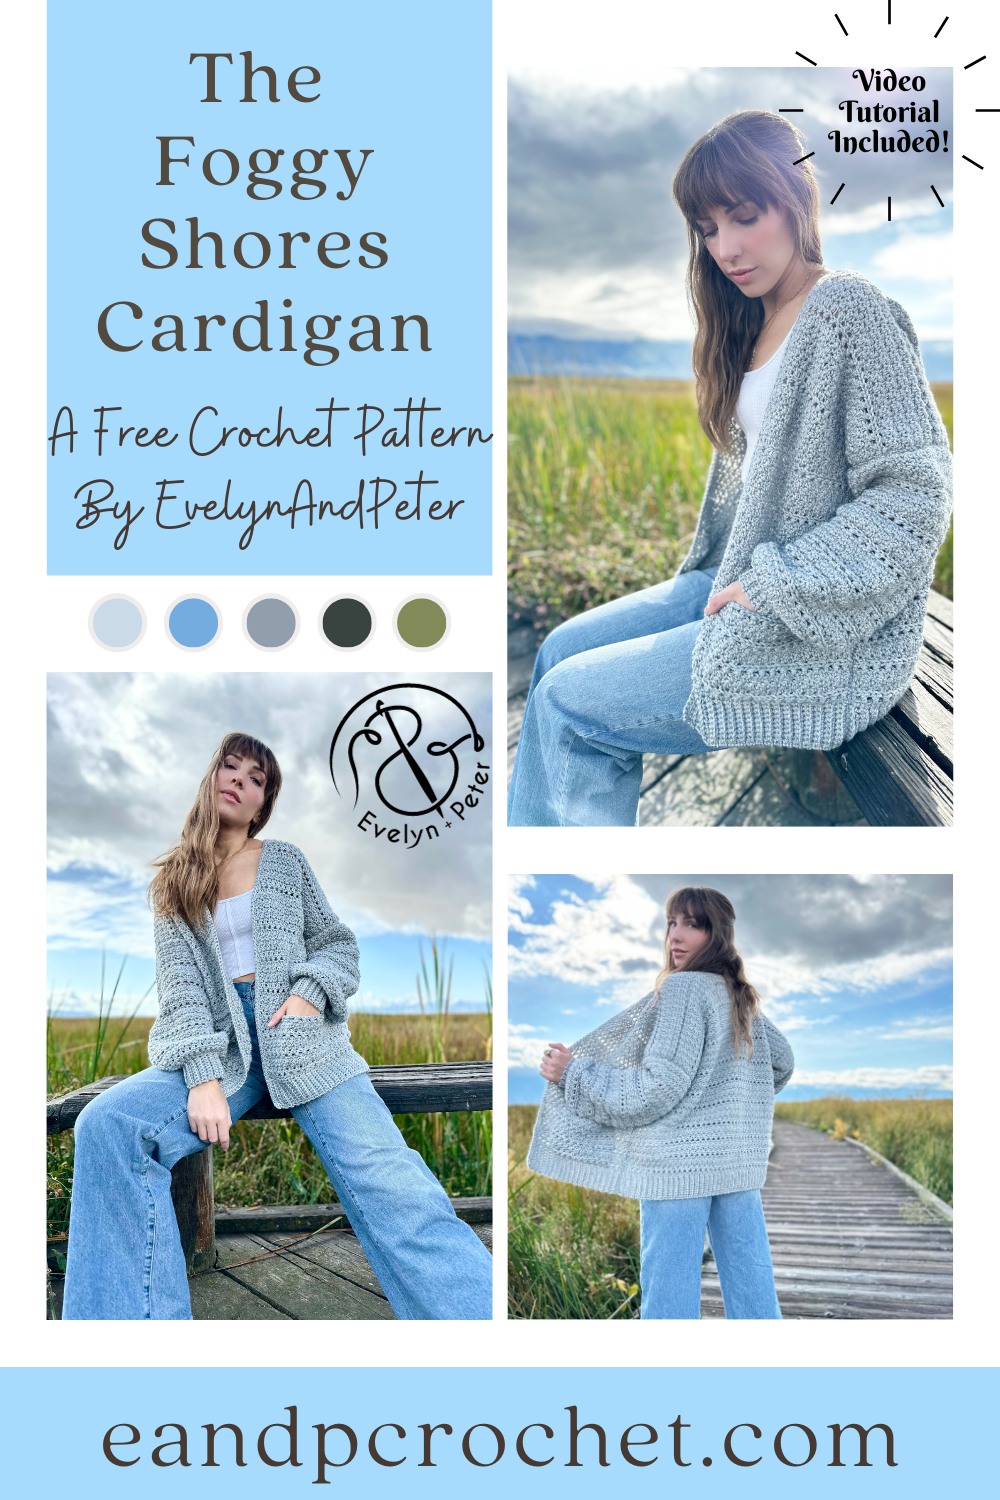
A new version of the Foggy Shores Pullover is now available! This updated pattern uses a currently available yarn and includes a fresh video tutorial. You can find the new version here. This post remains up for reference and includes the original version made with the discontinued yarn.
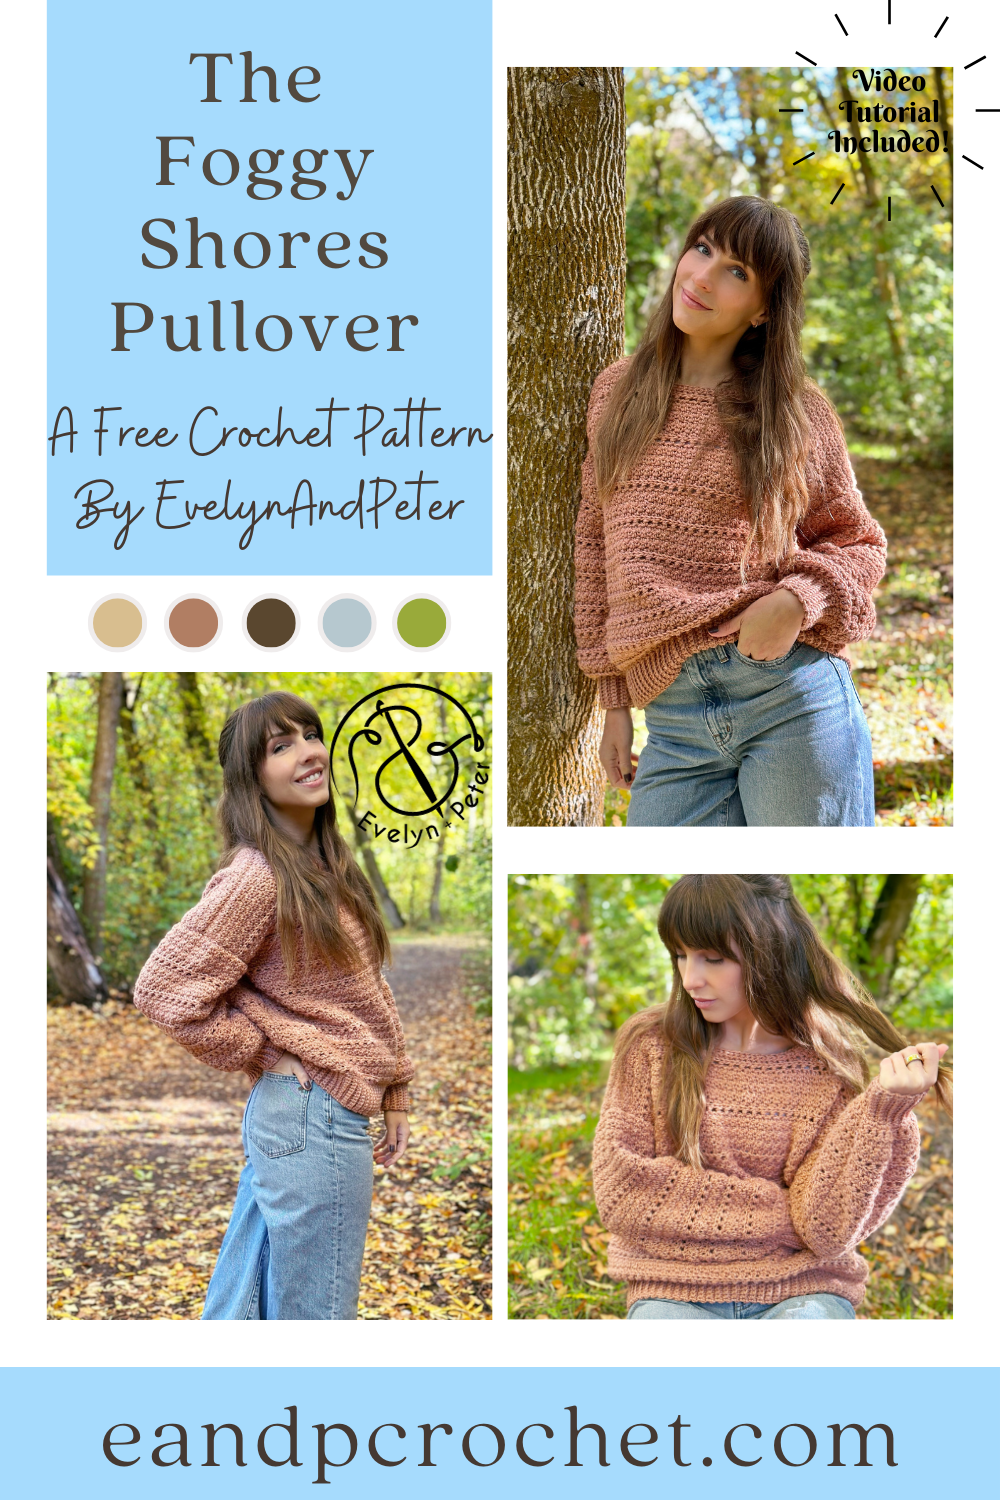
You know I wasn’t going to leave you hanging! The Foggy Shores Pullover crochet pattern is here! One of my biggest requests I get when I make a popular cardigan design is to make a pullover version or vice versa. So when I released The Foggy Shores Cardigan a couple weeks ago I already had the pullover ready and waiting!
I did use a different yarn for the pullover version, Lion Brands Basic Stitch Anti-Microbial(DISCONTINUED)! It has some really cute colors and was very easy to work with! This is an Anti-Allergen yarn which I thought was pretty cool. It has long-lasting freshness for your projects while preventing odor, bacteria and allergens. You can grab this yarn as part of the kit with Lion Brand!(new version with Heartland yarn) The kit comes with all the yarn you need to make your Foggy Shores Pullover plus a FREE copy of the printable PDF pattern! You can also swap out your yarn colors.
The Foggy Shores Pullover crochet pattern is worked in separate panels from the bottom up. You can easily adjust the length of your pullover by adding or removing rows to the front and back panel. If you made the cardigan than you should already have the easy row repeat memorized! You’ll be using a mix of lemon peel stitch and hdc stitches!
I had to sneak in one more crochet cardigan using Heartland yarn before the end of the year! The Foggy Shores Cardigan crochet pattern turned out exactly how I wanted. I love the style of my Stony Shore Cardigan and Kiah Cardigan and I think you guys do too! I wanted to keep the style similar but decided I needed something a bit more oversized and cozy! I think The Foggy Shores Cardigan is the perfect addition to my Heartland collection!
The Foggy Shores Cardigan is worked from the bottom up and is easily customizable. It has cozy pockets worked into the front panels. You can easily skip this part if you want if you prefer no pockets! Instead of working the chain length, just continue across the row with your regular stitch repeat. If you prefer your cardigan longer or shorter just add or remove rows to both the back and front panels until its the length you desire. If you don’t want your cardigan as oversized you can follow a size smaller than you normally would!
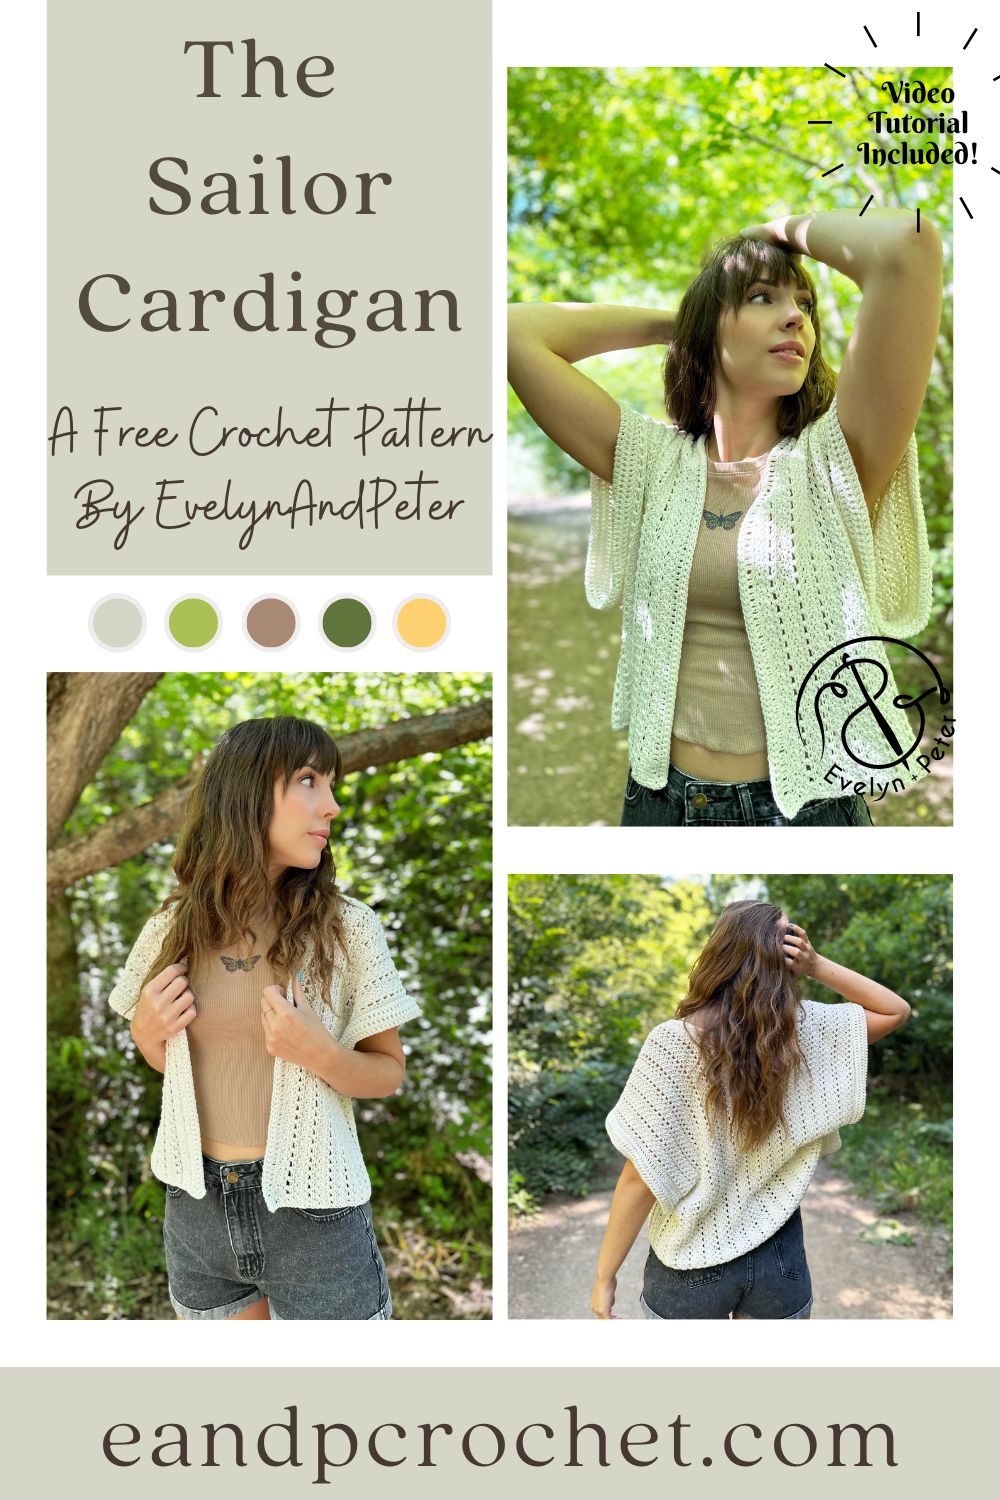
You already know I had to make ONE more summer design before the chilly weather arrives. The great thing about The Sailor Cardigan is that it’s perfect for layering! Toss it on while in the office or better yet, while relaxing out on a boat in the ocean with the cool breeze blowing in your hair…one can dream right?!
My favorite thing about The Sailor Cardigan is that it is made from side to side! It only requires one tiny section of seaming on each side of the cardigan. The vertical rows give it a really pretty striped look. The sleeves are super oversized, they remind me of a sail! See what I did there? haha!
If you are a beginner and need a little extra help or you just prefer a visual, be sure to check out my video tutorial on YouTube! I’ll walk you through step by step on how to crochet your Sailor Cardigan.
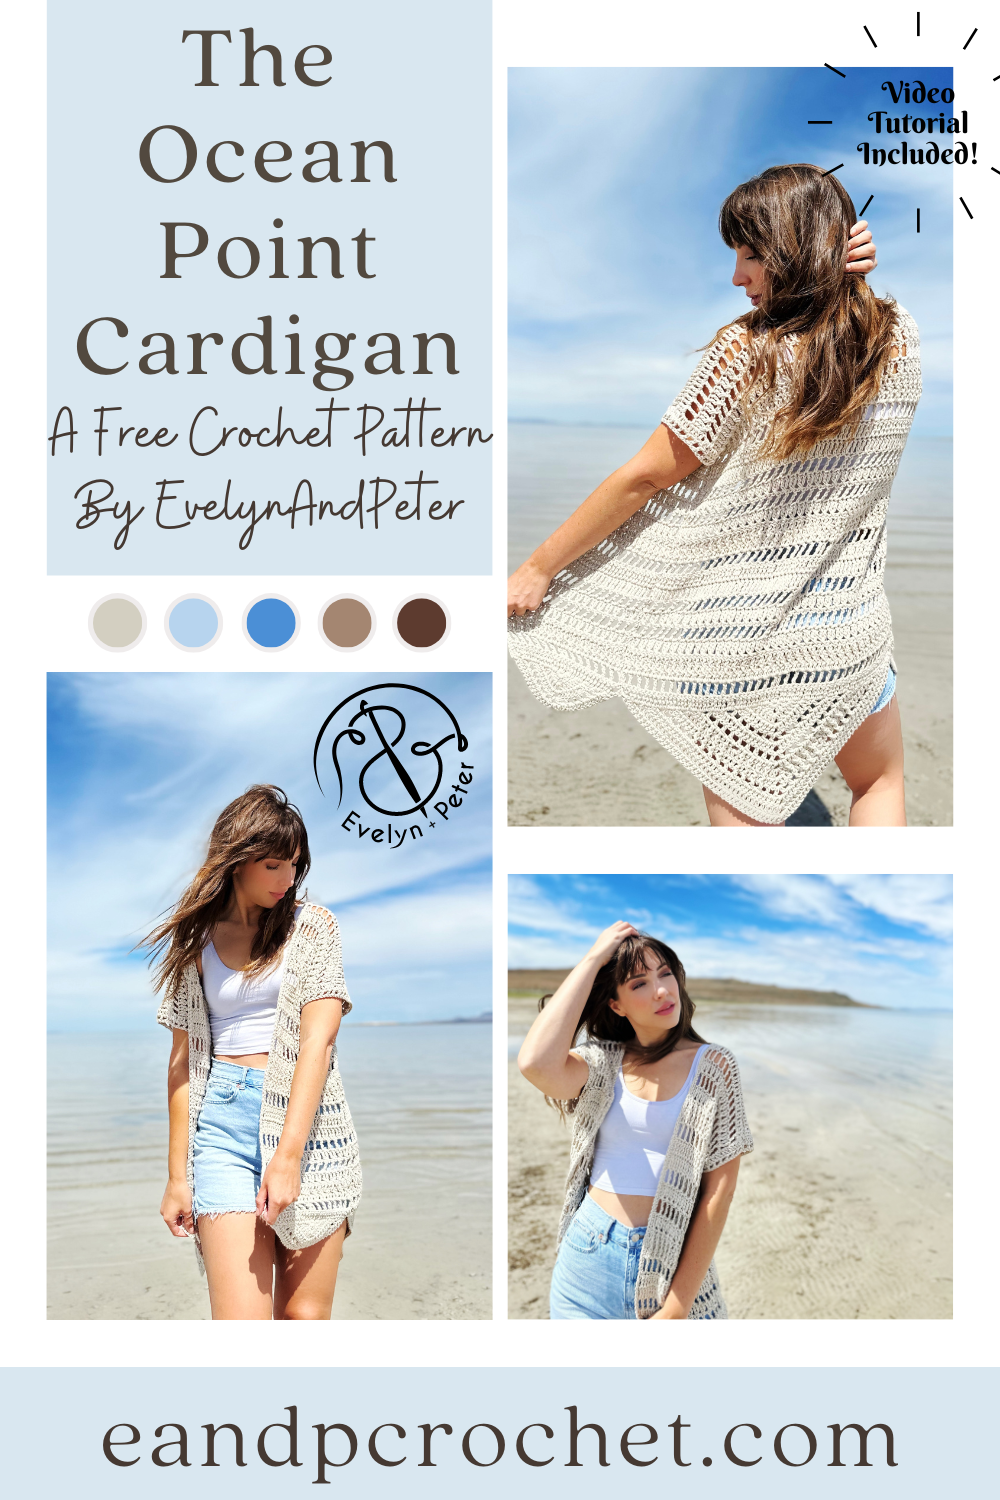
Are you nose deep in summer crochet patterns right now like I am?! Can I add another one to your “must make list”? Summer crochet patterns have always been one of my favorite things to spend time on. There is just something about the open stitches, the cotton yarn and also the fact that you don’t have to make long sleeves! haha! Summer makes usually work up quickly just like my new cardigan design, The Ocean Point Cardigan crochet pattern!
Is it weird that I have never designed a triangle shawl before? I have definitely crocheted a few in the past but never designed my own! I have been wanting to lately but I did not want to make a shawl in the middle of summer! I got the idea to somehow incorporate the shape of a triangle shawl into a cardigan and I am SO glad I did!! After a lot of math and a little bit of frogging I finally came up with the final result!
To create The Ocean Point Cardigan crochet pattern you start at the bottom, creating the triangle shape. If you are familiar with triangle shawls you will have no problem jumping right in. Once you have the triangle complete, you will rotate your work and create the first row of the main body into the ends of the rows you made in the triangle. After you get set up it’s just row repeats with no more shaping there on out! I used tall stitches like double crochet, treble crochet, and treble X St. There is also plenty of Ch 1 Sk 1 sprinkled in for an airy and lacy feel.
Because of the very specific St count and math going on in this cardigan there are 3 separate combo sizes written in the pattern. This cardigan is oversized and has a loose, flowy fit. Each size provided can fit a wide range of body shapes and sizes! To find your size, just locate your bust size on the size chart.
I used a worsted weight yarn for The Ocean Point Cardigan pattern- Pima Cotton from Lion Brand. This is a very soft cotton yarn! I have no trouble with this yarn. It works up beautifully and does not split or snag if you have to frog! They have lots of pretty colors available as well. If you end up purchasing the kit, you can swap out the color if you want to!
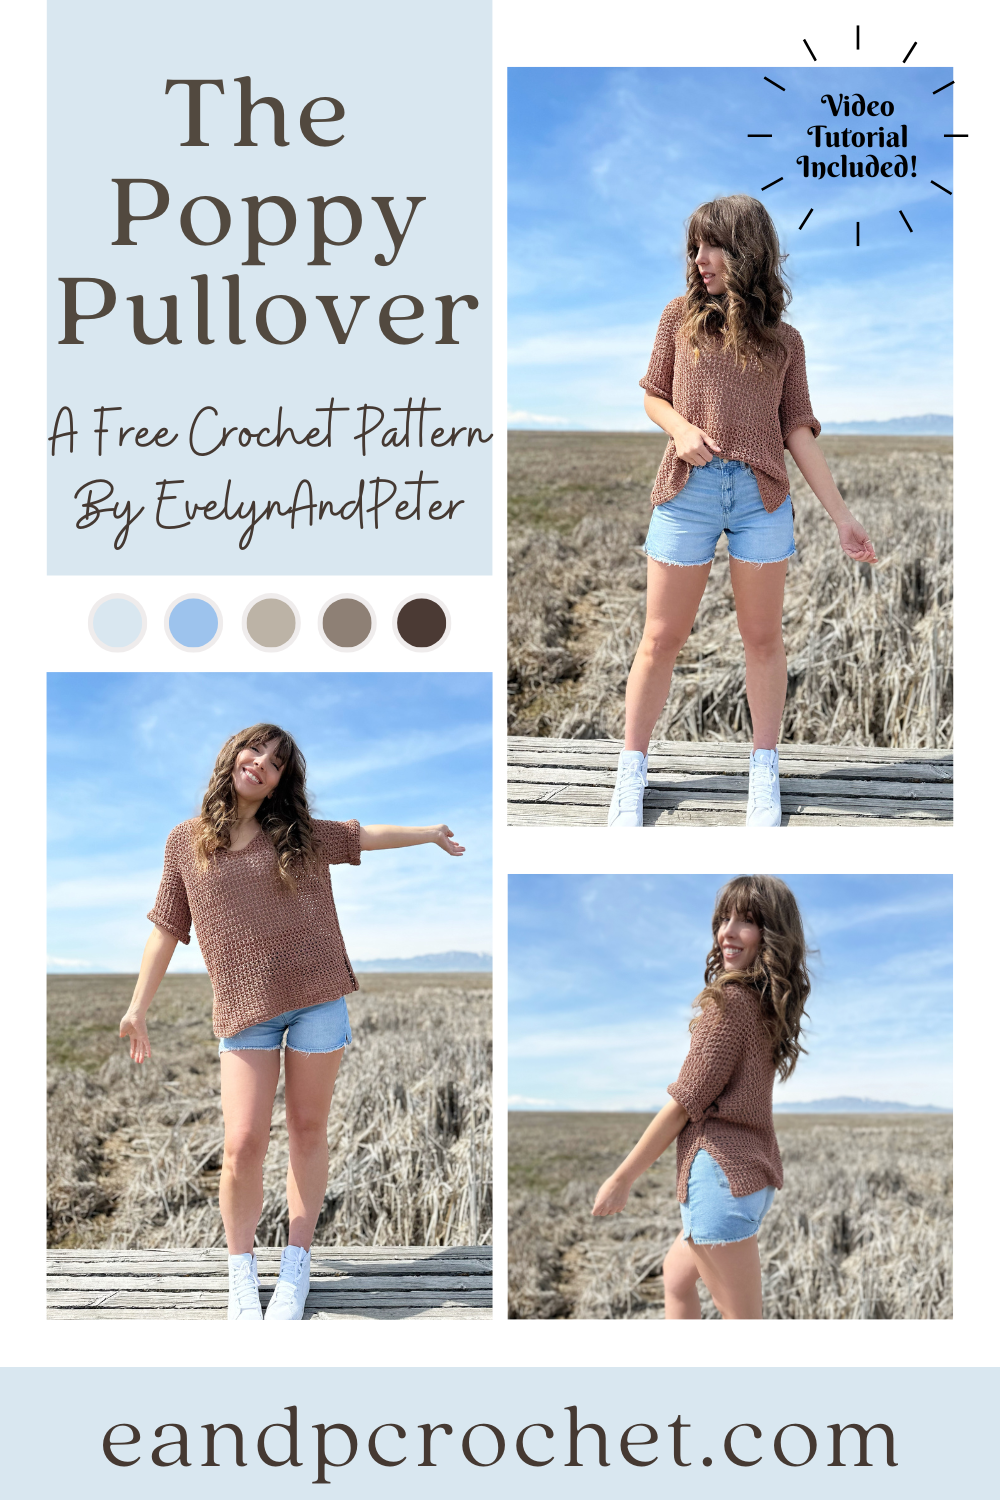
Did I just find my new favorite cotton yarn? I think I did. Be prepared for so many designs using this yarn because I am obsessed! My first make using this yarn is called The Poppy Pullover!
I used Lion Brand 24/7 cotton DK for the Poppy Pullover crochet pattern. Don’t get it confused with the worsted weight version! The DK weight is obviously thinner and much more soft. It had no splitting and no tangles as I crocheted. I’m absolutely in love with it! I used the color Cacao for mine but they have a lot of pretty choices.
The Poppy Pullover is crocheted in separate panels from the bottom up. You’ll be using a larger hook in comparison to the yarn to give it more of a mesh look. It’s important to not pull your stitches tight. You want a relaxed and even tension so you can give it the perfect drape. Feel free to go up in hook size if you normally have a tight tension and/or your gauge is off. Once you have all your panels complete you will sew them together.
The Poppy Pullover is easy to make adjustments to. You can add or takeaway as many rows as you want on the back panel to adjust the length. Just be sure to make the same adjustments on the front panel as well, right before you split the neckline.