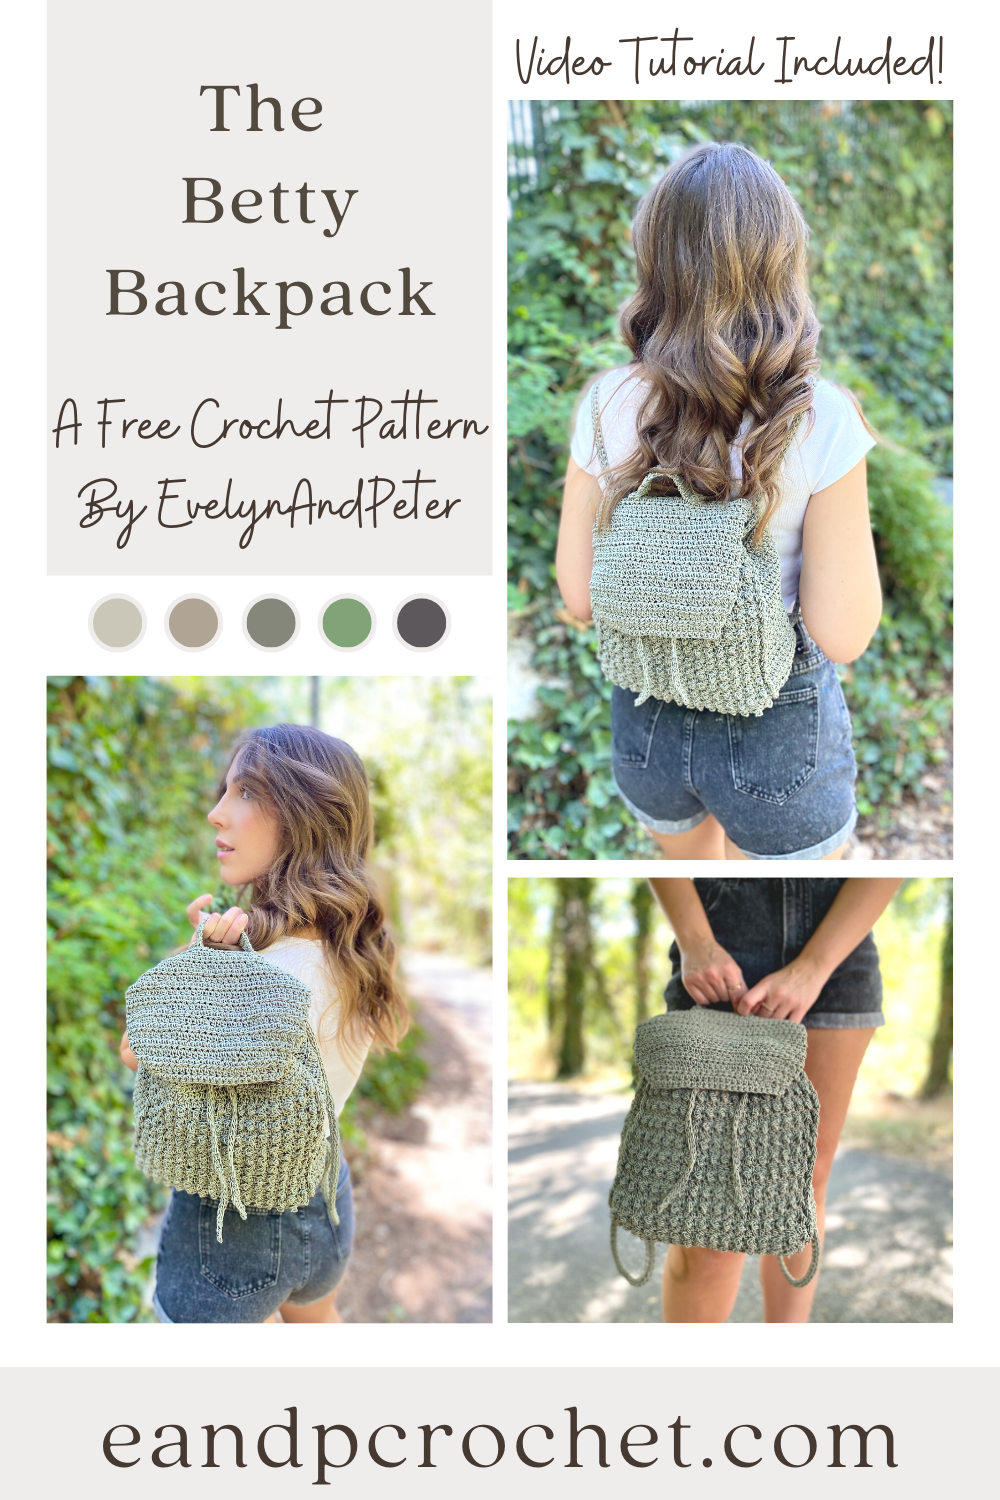
Have you tried out the new For The Home Cording by Lion Brand? I saw it and immediately knew I had to create some sort of bag with it. The Betty Backpack was the perfect outcome!
The Betty Backpack is worked flat and all in one piece! If you’ve made my Aspen Loop Bag, then you will be familiar with this construction. Once you get the main body of the backpack done, you fold it together and join on both sides. After that, you will add the upper trim in the round (don’t forget to join and turn!) and add the flap! Finally, the straps, drawstring and handle are added last.
The stitches used in this backpack are so simple but they create such a beautiful texture! You will use a combination of Hdc stitches throughout and alternating Tr/Sc stitches! Doesn’t it look like tiny puffs or bobbles? Well they aren’t! It’s just the Tr St being pushed to the front of your work! So simple and so cute.
I highly recommend using the yarn I used for this pattern or something similar. This is a cording yarn so it is very sturdy and has no stretch. It might feel a little strange and stiff to work with at first but I promise it’s worth it! If you don’t want to use a cording yarn then make sure you get a sturdy cotton or something with no stretch. The cording helps keep the shape of the backpack and is more secure for heavier weight.
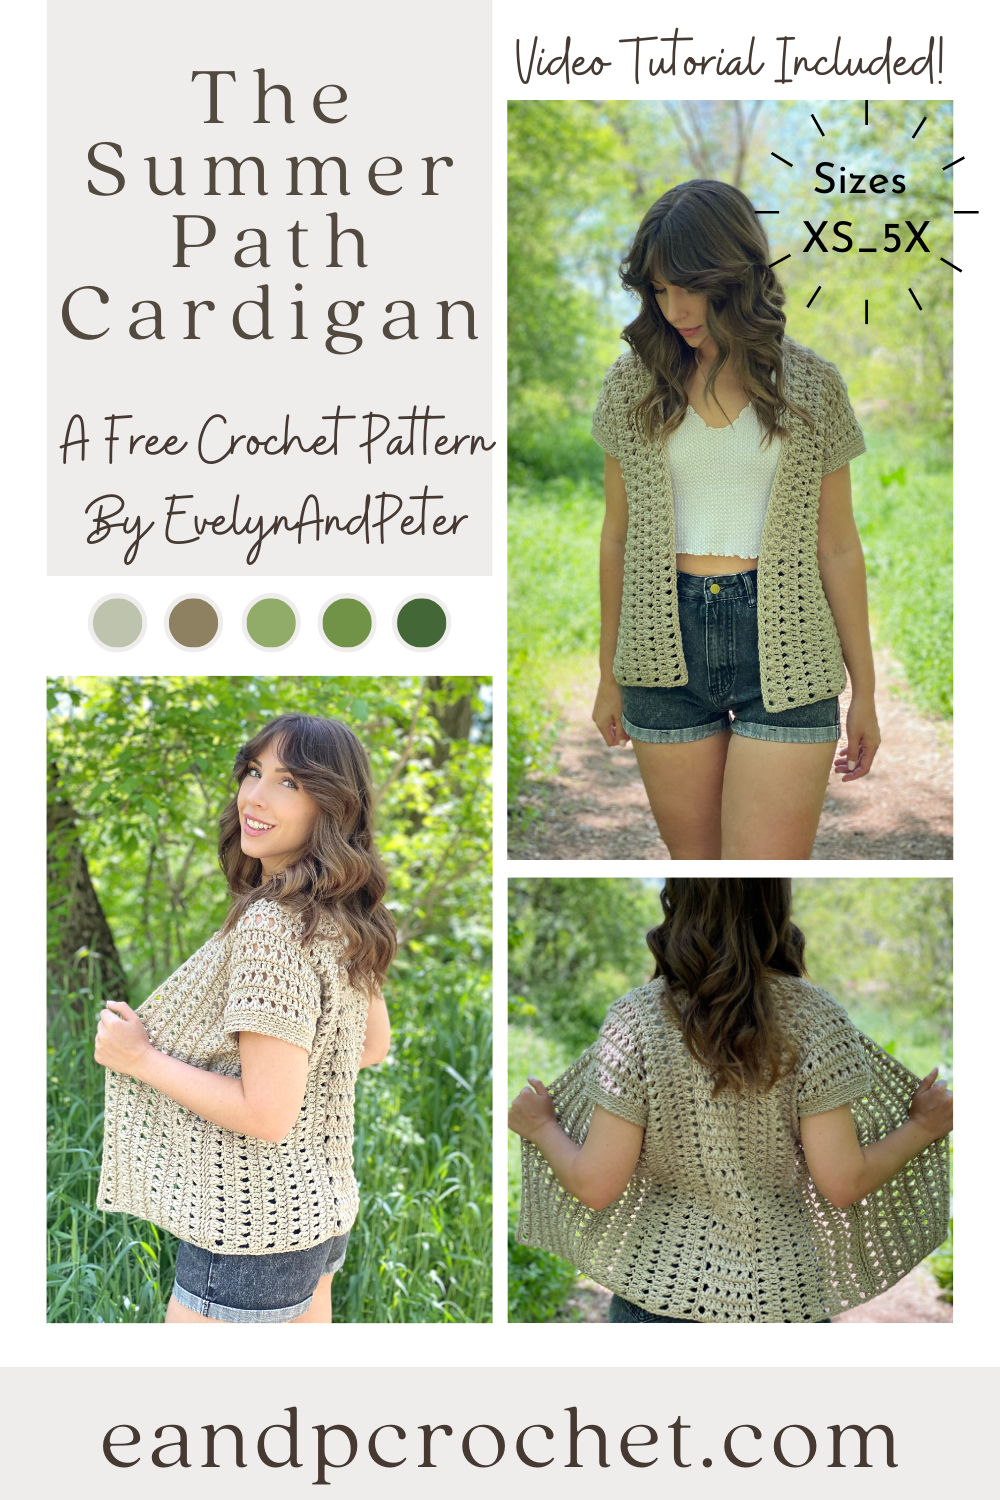
Is there anything better than exploring the woods on a warm summer day? It’s quiet and peaceful, nowhere to be and no responsibilities. You can hear the birds chirping and the creek trickling. That’s what I picture when I wear The Summer Path cardigan at least. 🙂
This cardigan is worked in 3 separate panels. The 2 main panels are worked side to side and the last one is worked bottom up. The one that is worked from the bottom up is the back detail of the cardigan that will be sewn in between the 2 main panels half way up. I’ve made a couple other things are worked side to side. Check them out here and here!
I absolutely love the Triad Stitch that I used in this design! It works up quickly and gives it an open stitch look, perfect for summer! Make sure you pay close attention to where you are sticking your hook for the Triad! I have a video tutorial available for those that need a little extra help. Be sure to check it out!
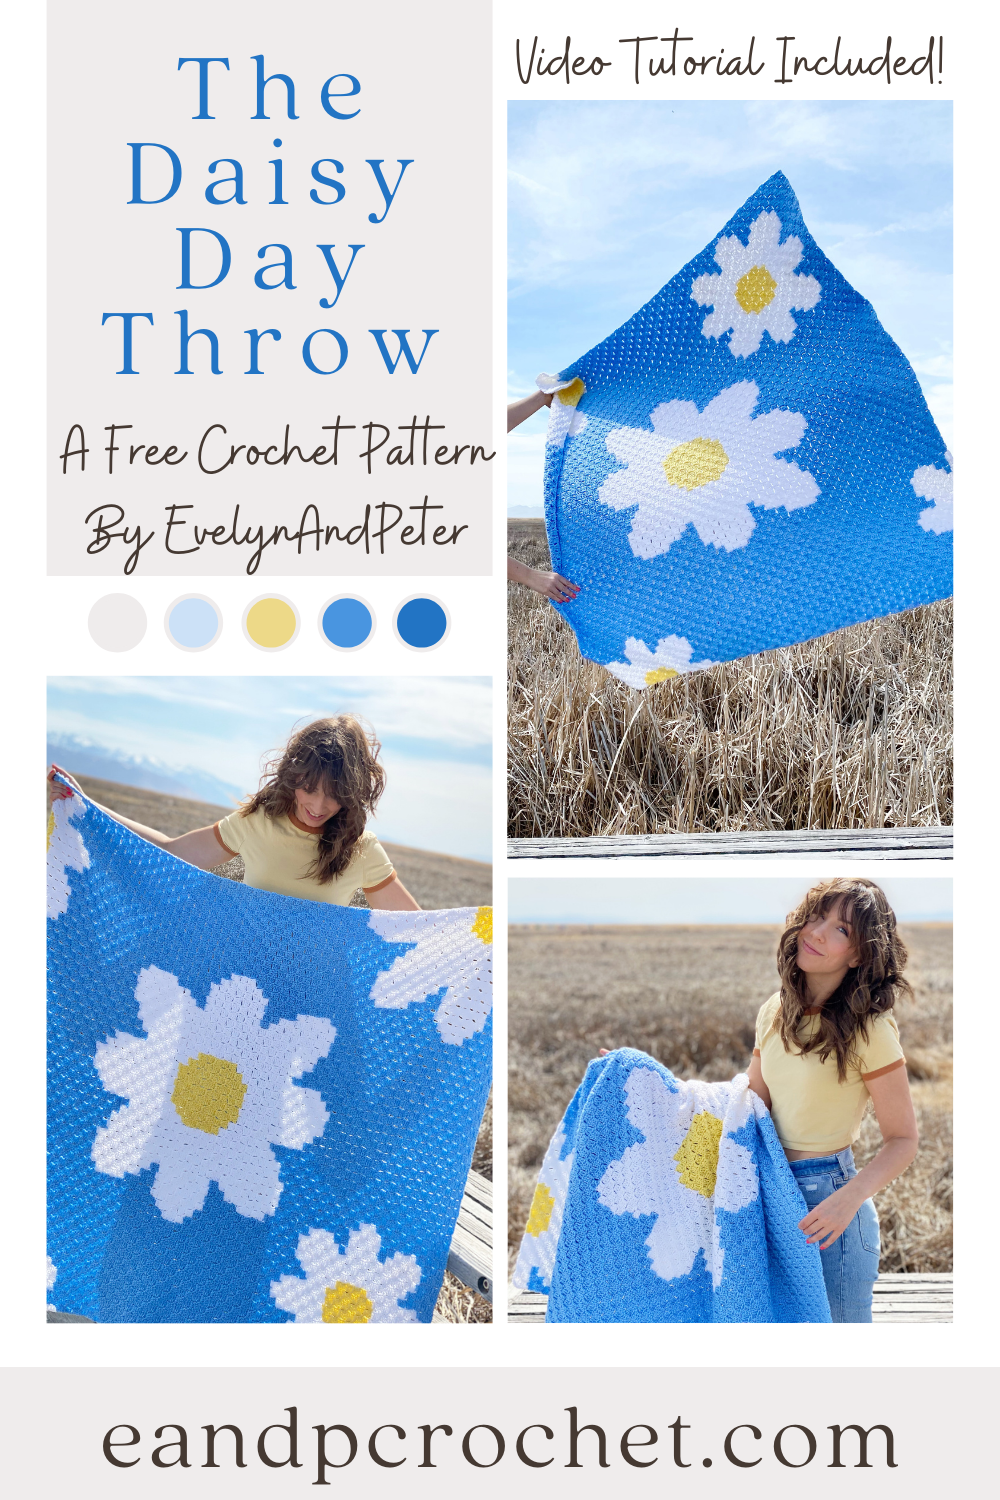
Every few months I get the urge to make a C2C crochet blanket and it never disappoints. The Daisy Day Throw was perfect to make on these cloudy spring days, to bring some happiness. I don’t know if you guys have noticed but the 90s are making a big comeback in design and fashion! I think that the Daisy Day Throw fits in perfectly with 90s vibes. It reminds me of my childhood and I love it!
The Daisy Day Throw is a Corner 2 Corner (C2C) blanket which means it’s made from the bottom right corner, diagonally to the top left corner. If you’ve never made a C2C then I recommend checking out my video tutorial as you create the blanket. You could even work up a practice swatch before diving into the project.
I also recommend making separate balls of yarn to help prevent cutting and joining your yarn with each color change. For example, when you get to the petal sections you will want a separate ball/skein of yarn for each petal and a separate ball for the blue sections in between. That way you don’t have to cut and join the yarn each time. Now, at some points there will be NO avoiding the cutting of the yarn. You will have to do it and you will have ends to weave in. I found with this blanket that it wasn’t too overwhelming and I got them all weaved in within an hour or so. If you need some visuals on how to keep your yarn organized there are lots of tutorials available out there!
If you love C2C make sure you check out some of my other free patterns!
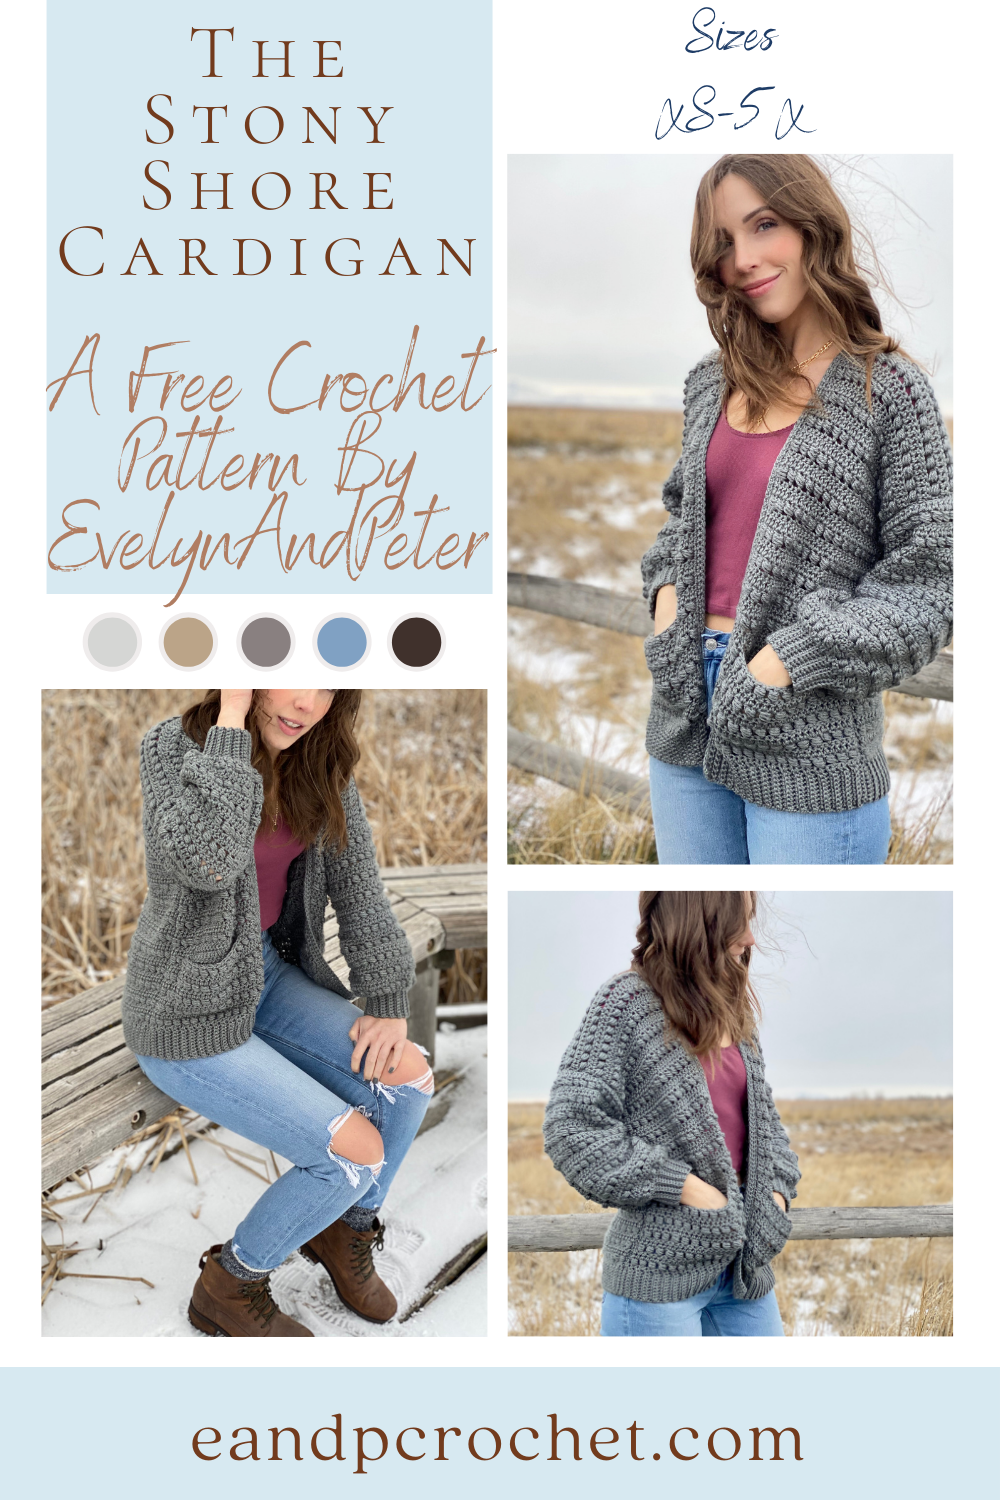
The Stony Shore Cardigan Crochet Pattern is here! I’ve been wanting to make something with this stitch for a long time and I’m glad I finally did it! I also knew immediately I would be doing a loose balloon style sleeve. I actually attempted it on my Sunset Bomber but it just didn’t go with the style. I’m sooooo happy that it worked out that way because they look AMAZING on this cardigan.
I’ve been posting sneak peeks of this sweater on TikTok and Instagram. The amount of crocheters that told me they couldn’t wait for this pattern was kind of insane. I can’t even begin to tell you all how much I appreciate the love and support on this design. It’s also a bit nerve wracking because I hope it lives up to the hype. I just want you all to love it as much as I do. Even my husband said this was his favorite sweater of mine and he is my toughest critic when it comes to crochet!! lol.
The Stony Shore Cardigan Crochet Pattern is worked in separate panels from the bottom up and is beginner friendly. Once you get the bead stitch nailed down it’s a breeze to make. You will alternate bead stitch rows and double crochet rows throughout. You can easily make your sweater longer or shorter by adding/taking away rows in multiples of 2 before tying off. Same with the sleeves!
If you are a complete beginner and need a little extra help then be sure to check out my full video tutorial!
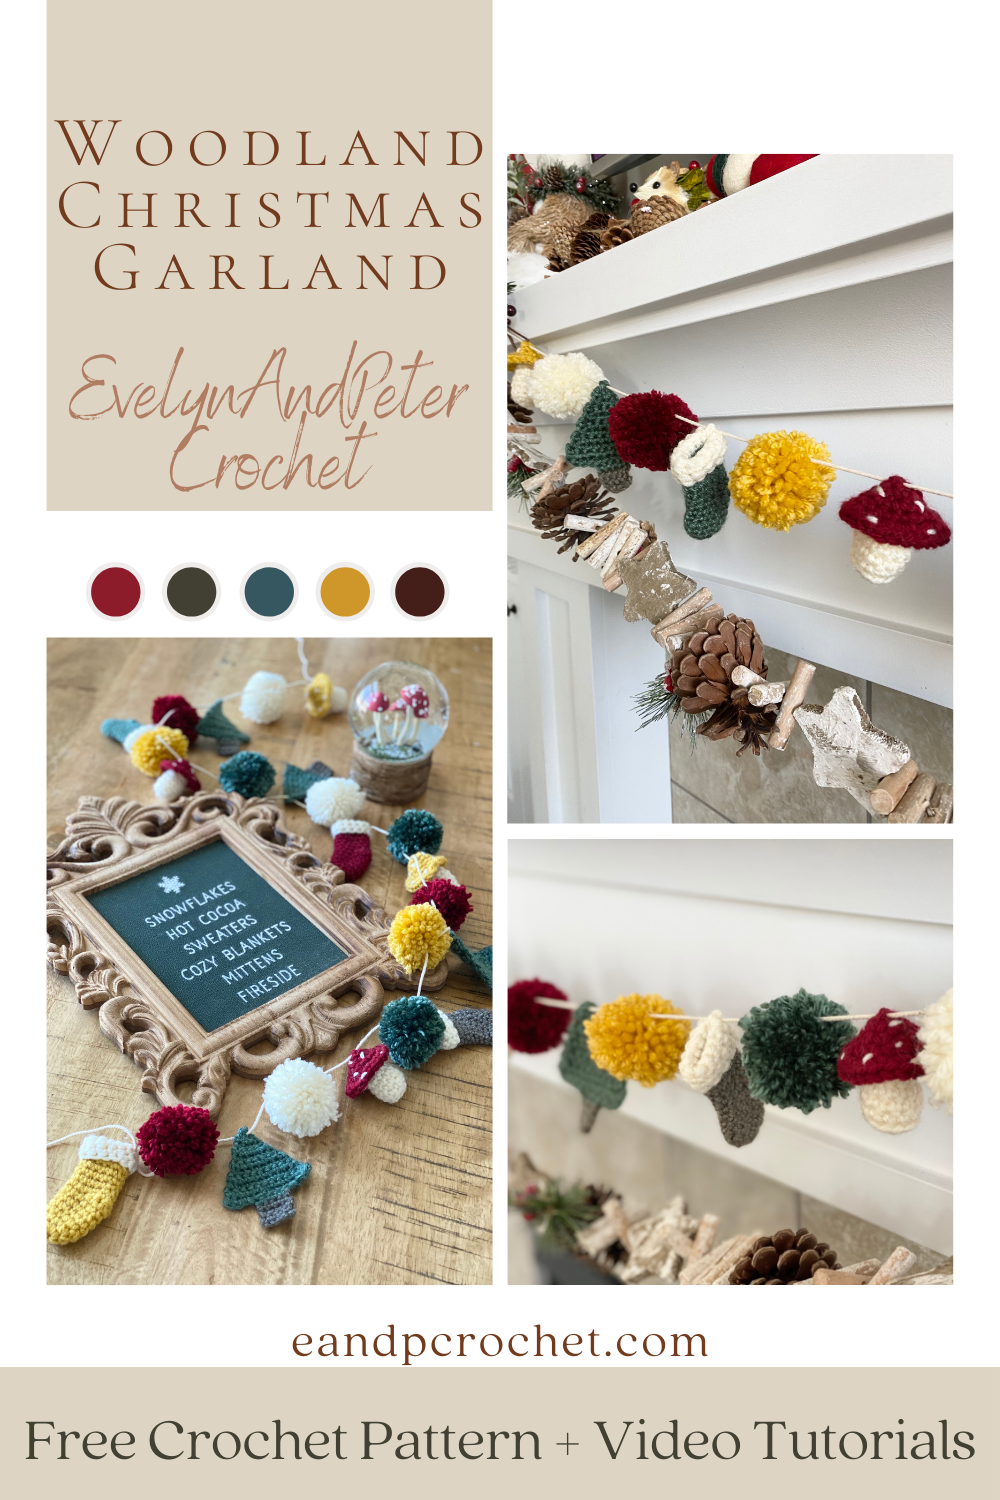
It’s the most wonderful time of year! Well…almost!! But you can never start preparing too early! I don’t know about you guys but I love having a bit of handmade Christmas in my home. I always wanted to make a garland for my fireplace so I thought The Woodland Christmas Garland would be the perfect project to share with you all!
The Woodland Christmas Garland is a combination of mushrooms, trees, stockings and pompoms! I’ve been seeing mushroom decor all over the place lately so that is kind of what inspired this theme for my garland! I added some really cute woodland animals from JOANN, a cute mushroom snowglobe, some floral picks, and a really cute sign too! Along with that I draped a second garland from JOANN on my mantle with my crochet version for a double garland look!
Making the garland is really simple. You can mix and match any worsted weight yarn colors that you like. I went with the classic red, green, cream, brown and a pop of mustard! You only need small amounts of yarn for each pattern. Be sure to check out my video tutorials linked below if you need some extra help!
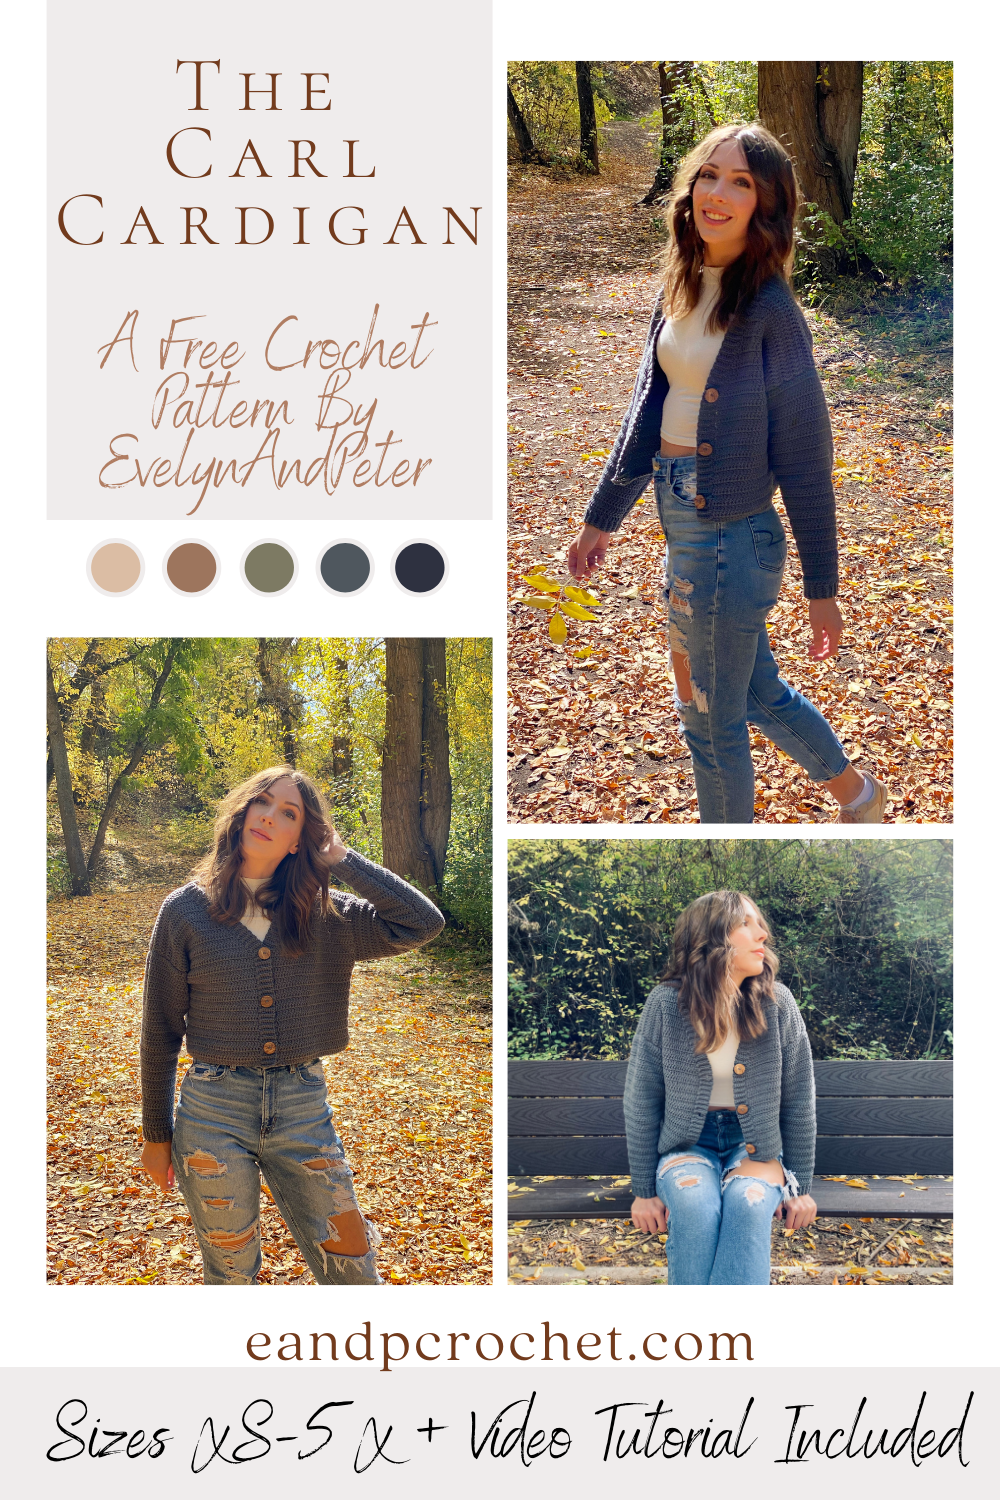
I love the look of oversized V-neck button up cardigans. There’s just something about them that I find so appealing! They give me such comforting “grandpa” vibes haha. I knew I had to make one but put my own trendy spin on it. The Carl Cardigan is my cropped and a bit more girly version of this!
The Carl Cardigan is worked in separate panels from the bottom up. When you break it down into each piece tackling this sweater is a breeze. I used the same stitch throughout and have very beginner friendly shaping. I used Feels Like Butta which is one of my favorite soft yarns. It’s very smooth to work with and frogs back easily if you make a mistake!
I know some of us prefer to have our cardigans longer instead of cropped. Good news, it is super easy to make this longer! Just add as many rows as you would like to the back panel (in multiples of 2). Then, when you make the front panels, add the same amount of rows before you start decreasing! Remember, you will need extra yarn!
You might recognize the ribbing technique around this cardigan. I did the cuffs from The Pemberly Pullover the same way! You will be working the trim of the cardigan directly off the sides of the front panel. It might look a little intimidating at first, but when it comes down to it, you are just slip stitching to the panels as you go! If you are new to this technique be sure to check out my video tutorial where I show you exactly how to do it.
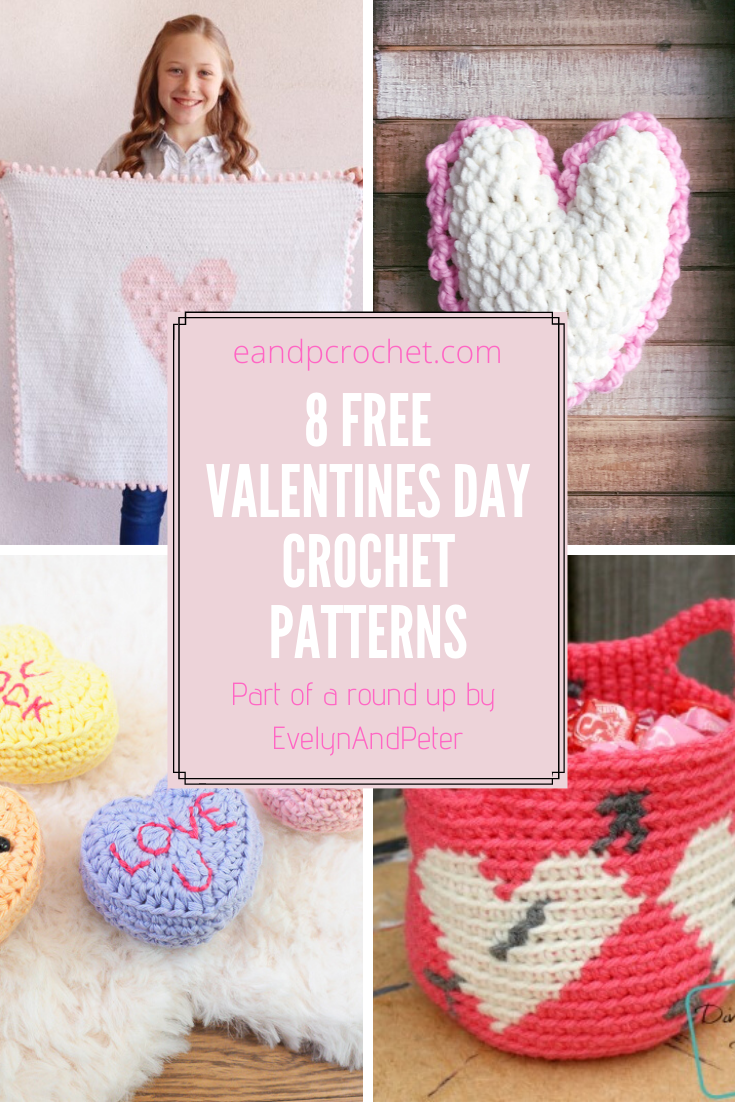
Valentine’s Day is on it’s way so I thought I would put together a fun round up of free crochet patterns and tutorials! I don’t normally go all out with V-Day decorations but every single one of these patterns is making me want to pull out my pink yarn and get to hookin’!
To start us off I found this SUPER adorable Fuzzy Love Monster from Spin A Yarn Crochet. I really want to make one of these for each of the girls to give them on Valentine’s Day morning!

Have you ever tried a mandala yarn before? I’m sure the answer to that question is probably a yes, right? 😉 Well, when I saw the Mandala Tweed Stripes from Lion Brand I knew I had to check it out. I don’t normally gravitate towards striping yarns but something about these colors were calling to me. I’m a sucker for tweed! Somebody mentioned in my Instagram comments that the colors remind them of strata layers and I have to say, I definitely agree! The Strata Beanie pattern is fun and quick to make.
I incorporated some surface stitching which I think gives it the perfect finishing touch. Plus there are so many different colors you can use for different holidays! Red and green for a christmas beanie, white and pink for Valentines day, or maybe even make it in your school colors! I think it would be great in your team’s colors too!
Shop the ad-free PDF digital download in my shops on Etsy and Ravelry.
Description: This Strata Beanie Pattern is worked from the bottom up. The brim incorporates slip stitching for the perfect amount of stretch. The surface stitches add just enough detail for a fun and unique look. It’s also super easy to adjust length for your desired fit.
Tag me on Instagram and use #stratabeanie to be featured.
Materials:
-
Worsted Weight (4) yarn. Lion Brand Mandala Tweed stripes “Knock On Wood”. 190(200,215) yards
-
5.5mm Crochet Hook
-
Yarn Needle
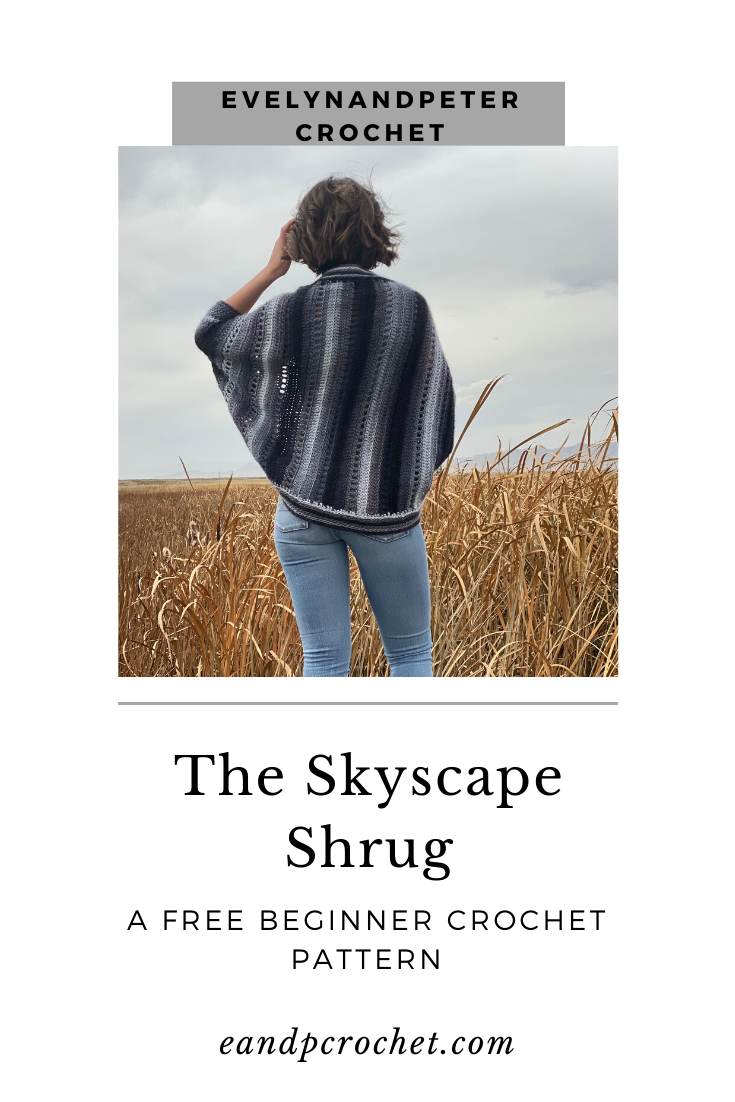
Have you ever tried Landscapes yarn by Lion Brand? I remember buying some a few years ago to make a hat but never designed anything on a bigger scale with it. I’m so excited to finally share the Skyscape Shrug with you all! Its very simple. If you can make a rectangle then you can make this sweater! It’s the perfect project to work on while binging your favorite show on Netflix because you repeat the same few rows over and over! It is also super easy to customize. You can make it longer by starting with more foundation single crochet stitches. If you want a shorter wingspan, just take out a row repeat!
Kit and PDF’s-
You can find the kit to make this shrug HERE! It includes all the yarn you need (in 5 different color options) plus the ad-free printed PDF pattern!
You can find the ad-free printable PDF pattern HERE on Etsy or HERE on Ravelry.
Description: This cardigan was inspired by the beautiful striped serape style blankets. It’s constructed in one large rectangle with a fun group of repeats. It’s perfect for beginners and works up quickly.
Materials:
-
Worsted Weight (4) yarn. Lion Brand Landscapes. Amount needed- 6(6,6,6,7,7,7,8,8) Skeins. 775(800,835,875,925,950,1015,1090,1110) Yards.
-
6.00mm (J) crochet hook
-
Yarn Needle
Sizes: XS(S,M,L,XL,2X,3X,4X 5X)
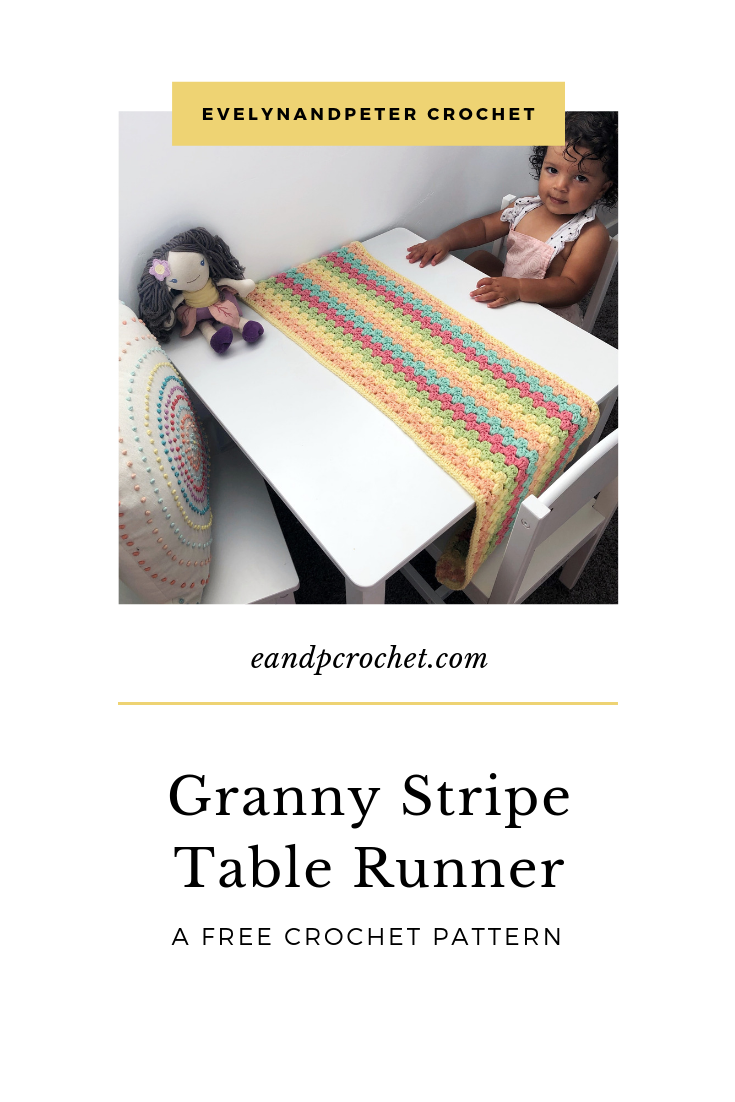
I was recently given some gorgeous rainbow cotton yarn from Hobbii Yarn! I decided something with granny stripes would look super cute with all of the colors! This mini table runner fits perfectly on the playroom table. You can easily adjust the width and length to make it any size! I was soooo close to changing my mind and making a little blanket but I didn’t have enough yarn. 🙂
Materials:
- Hobbii Cotton Yarn- Weight of (3). I used less than 1 skein of each color. (about 160 yards of 5 different colors)
- 4.00mm Crochet Hook
- Yarn Needle