search results for
c2c
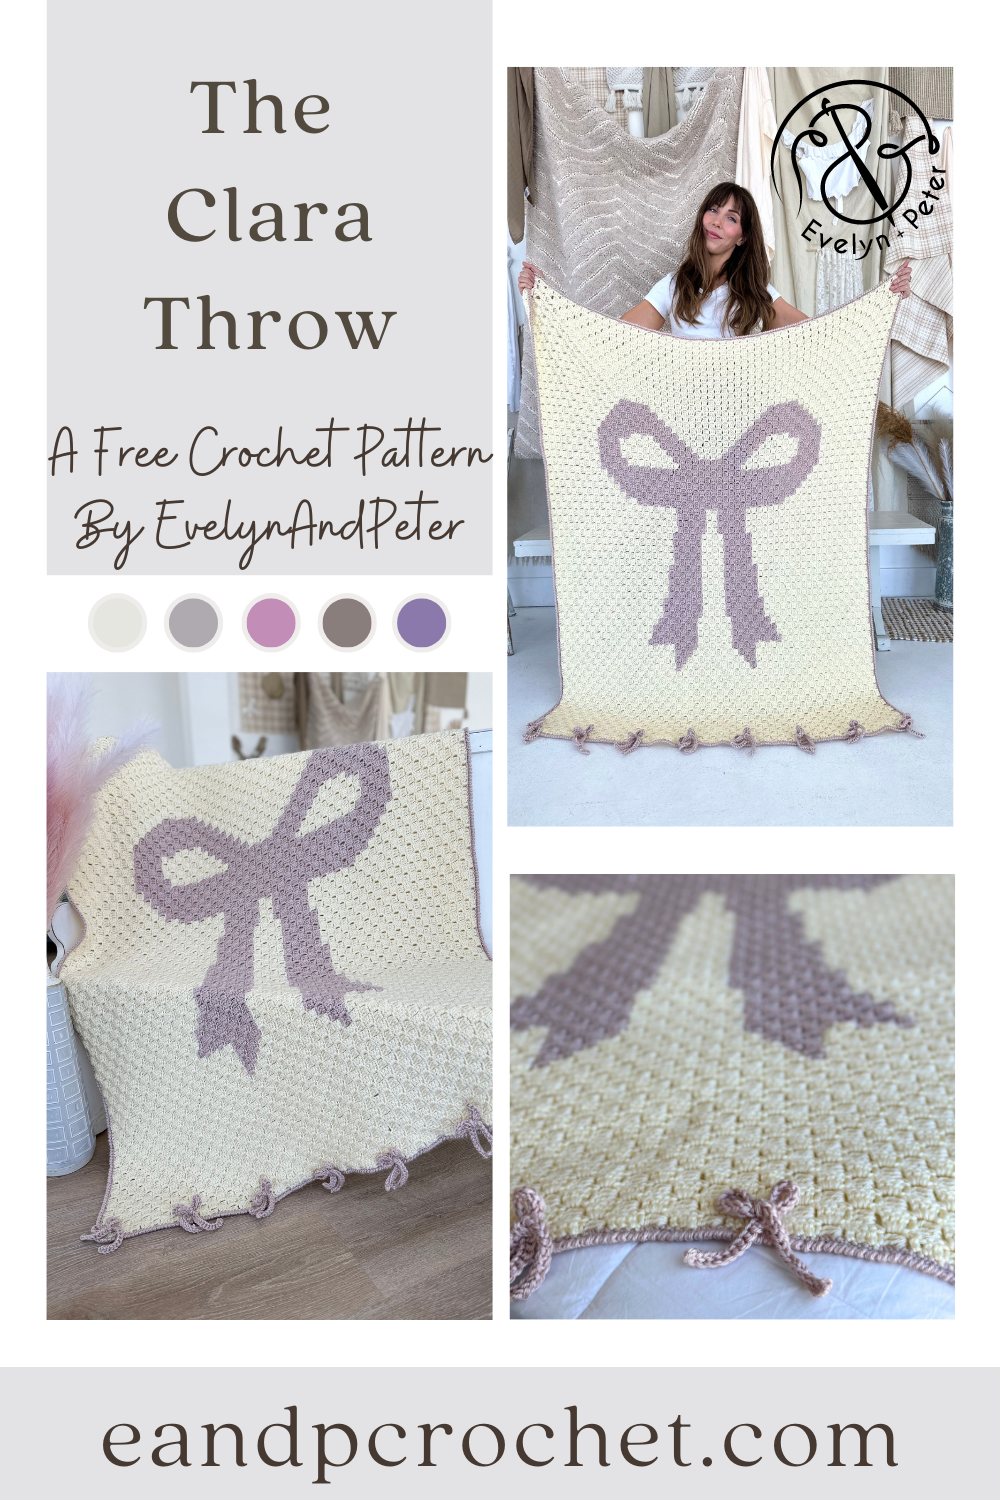
Give me all the cute little bows!! This blanket is perfect for all the girly bow fans out there! The Clara Throw crochet pattern is a C2C design and so fun to work up.
I’ve been seeing so many cute bow sweaters and beautiful bow hair clips recently and I knew I had to make a bow C2C design. The Clara Throw is worked from the bottom right corner to the top left corner. The pattern below includes both the written rows and the graph for easy stitching.
If you aren’t familiar with C2C it’s basically crocheting little squares out of Dc stitches over and over again, working diagonally! It is super addicting in my opinion and you can make so many fun things! Check out some of my past C2C designs like The Daisy Day Throw and The Mushroom Medley Throw!
Time to wrap up and get extra cozy in The Woodlands Blanket Wrap crochet pattern! The Woodlands Blanket Wrap, is oversized and easy to make. I wanted to be able to wear a big ol’ blanket wrap around the house but still have my hands available to do things, like crochet! Haha!
This wrap is made in one piece. You’ll start on the bottom of the back side and work in rows up, split the neckline and work the first front side. Then you’ll go back and attach your yarn to the other side to make the second front panel. The pockets can easily be left out if you prefer not to have them. Simply continue with the normal stitch repeat.
You will be using an entire 2 skeins of Pound Of Love yarn from Lion Brand. If you make any adjustments to the wrap (like adding rows) you will need to get a third skein of yarn. I used the color Sugar Cookie for mine but there are soooo many cute colors to chose from. This yarn is also very soft and easy to work with. Even better, you have less ends to weave in because you only use 2 skeins! You can find the kit here, which includes all the yarn and a free copy of the pdf digital download of the pattern.
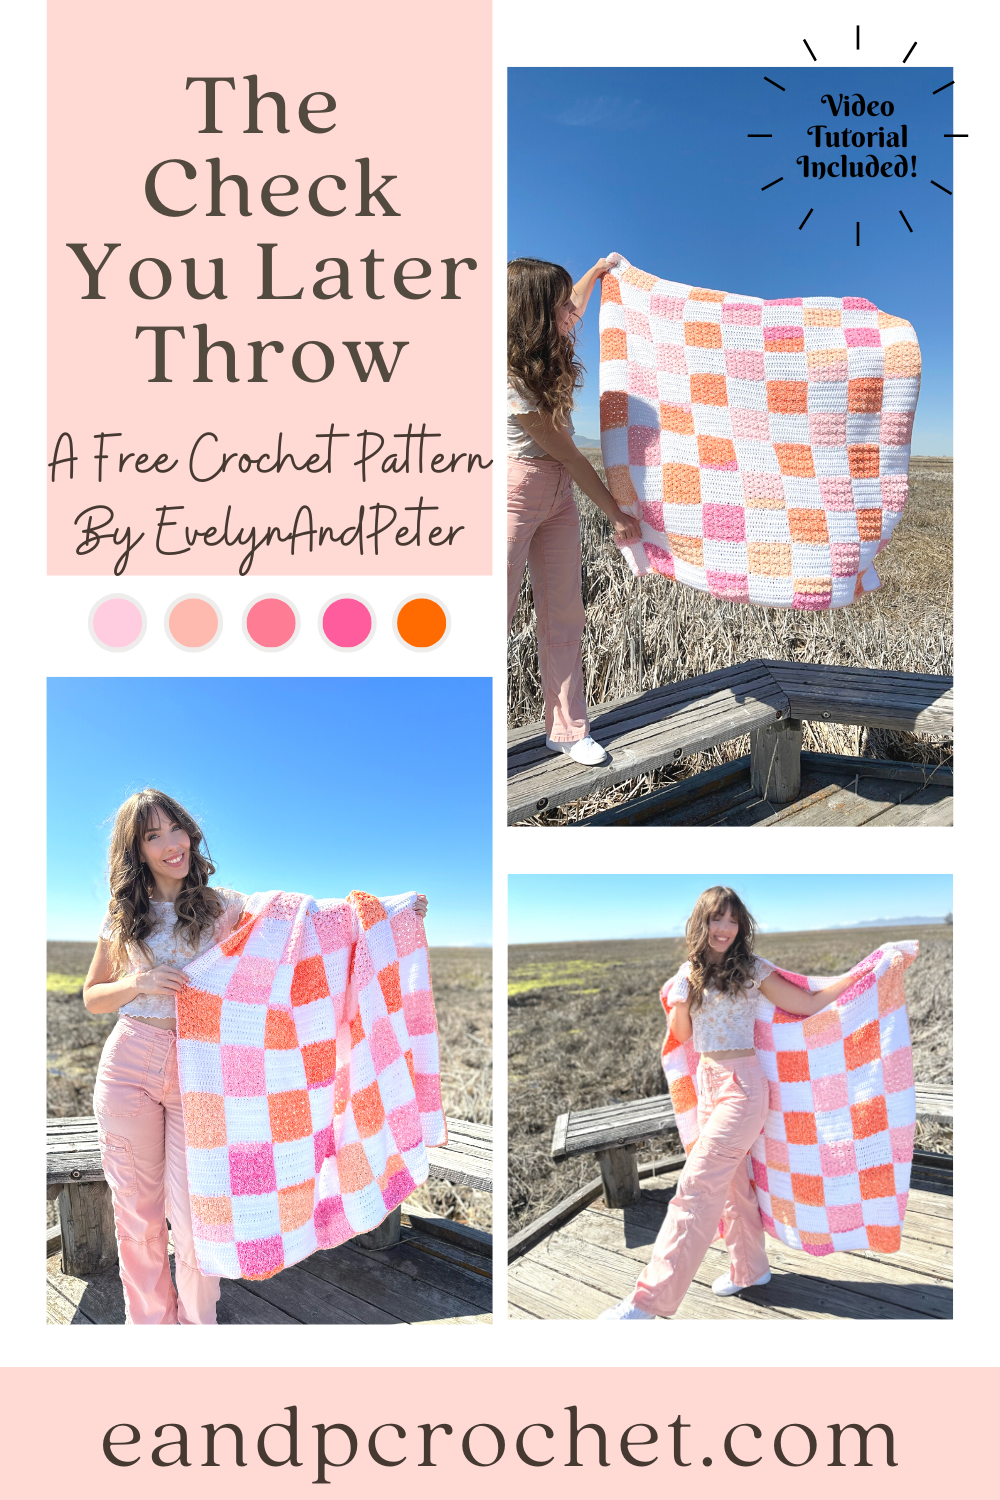
I don’t know about you but I’ve been seeing checkers everywhere this season! On shirts, shoes, hats, rugs, bags and of course, blankets!! I wanted to put my own spin on the trend and came up with The Check You Later Throw!
After testing out different ways to make a checkered design I finally settled on working it up in strips. I know doing separate squares is more time consuming and can be intimidating so I got rid of that idea. I swatched a bit with C2C but ultimately decided that there would be too many skeins of yarn going at once for the amount of squares I wanted. I also thought about working in rows but that would still require too many balls of yarn at once for me. I wanted something a bit easier for a beginner to do! After I did a test working it from the bottom up in separate strips I knew I found the winner!!
There are 2 separate strip patterns, Panel A and Panel B. You will be making 5 Panel A and 4 of Panel B. They are made from the bottom up. You will have to cut and join yarn each time you change colors for the squares but don’t worry! Tie the tails together in a secure knot. Then, you can crochet over the tails for less ends to weave. I only did this when changing from color B to Color A. I would work my Dc stitches over half the tail. Then after I was done I weaved them back the other way to make it extra secure. I did not crochet over the tails when making the Color B square. I found that because of the stitch I used it didn’t hide the tails well enough and you could see it peaking through. I save those to weave in at the end.
When I made my strips, I kept my colors in order as they came. I did not do any special cutting and rearranging of yarn colors. I worked my panels from let to right starting with the first Panel A and picked up each skein where I left off in the previous square. That does not mean you have to do the same though! You can join in your colors from the Mandala however you would like.
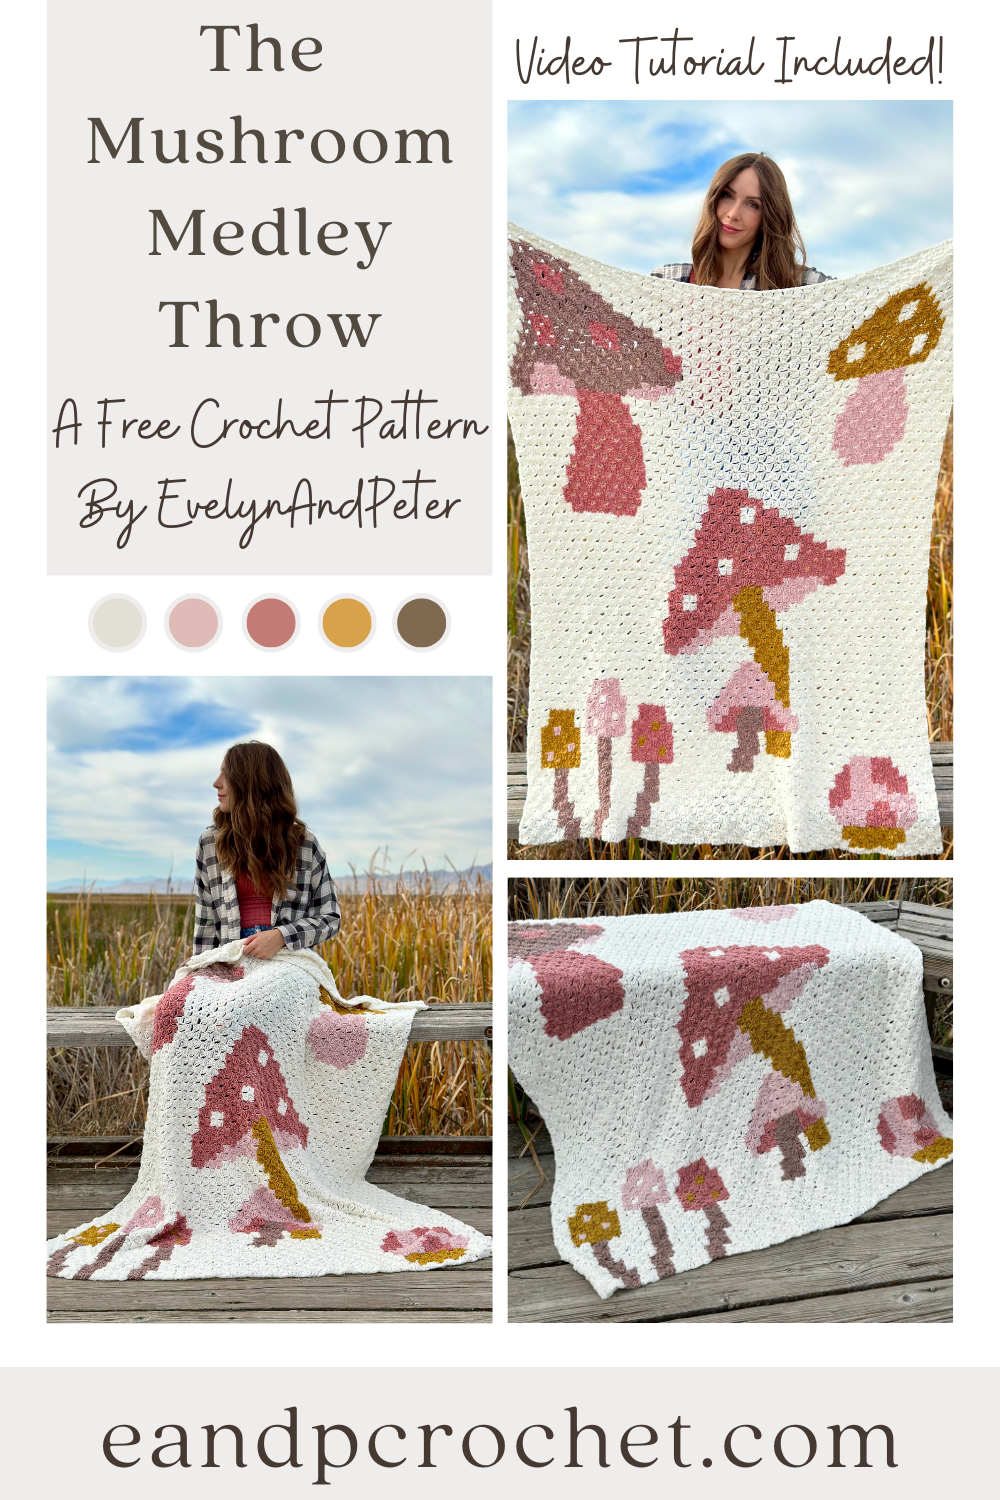
I know I’m not the only mushroom fan around here. If you’ve been to literally any store in the past year I’m sure you’ve seen cute little mushrooms on mugs, wall decor, pillows… I could go on and on! Who doesn’t love a cute whimsical mushroom?! The Mushroom Medley Throw is perfect to add to your mushroom collection or give to a mushroom fan! (how many times can I say mushroom haha)
If you guys have been following me for a while you know that I am a C2C crochet fan. I like to make at least 2 c2c crochet blankets every year. The Mushroom Medley Throw is my third this year! I designed The Daisy Day, The Squeeze The Day and now The Mushroom Medley! Be sure to check out all my other c2c patterns if you’re a fan too!
If you are new to C2C I recommend practicing with a smaller swatch before beginning a blanket! Once you understand how to make the basic squares it really is easy! You just repeat squares to grow your blanket, and decrease when you reach the corners!
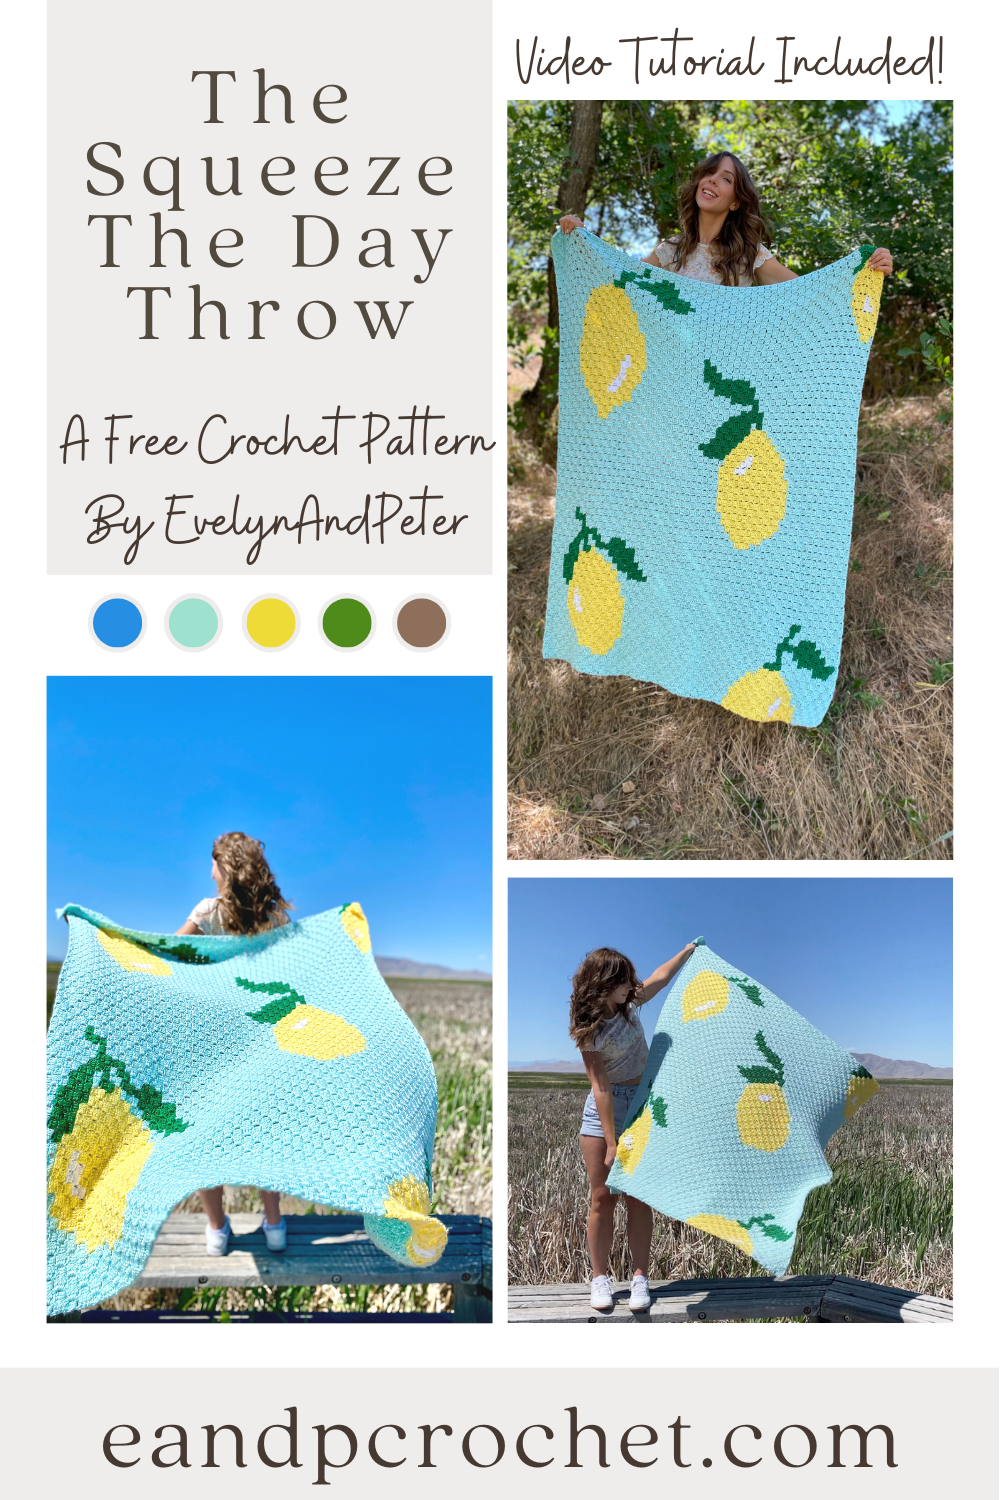
You guys already know I have a slight addiction to making fun C2C crochet patterns. Well, here’s another one for ya… The Squeeze The Day Throw crochet pattern! What’s better than bright happy lemons on a beautiful frosty background? I just love how it turned out so much! It totally reminds me of warm summer days in the middle of July. Perfect timing, right?!
This one has a similar style to The Daisy Day Throw. That one was a HUGE hit. My top performing pattern of the last few months, that’s for sure! You guys loved it so much and I hope you love this one too! Once again, I used Lion Brand Basic Stitch Anti-Pilling yarn to make it. And I can attest to the fact that it really is anti-pilling! My blanket was stuck in some prickers that I had to carefully pull off and then had to wash some dirt off. It definitely is anti-pilling to say the least!
This blanket is Corner 2 Corner (C2C) style. If you’ve never heard of that, it’s exactly what it sounds like! You work from the bottom right corner to the top left corner to create this blanket! Each block on the graph below is made up of a square. Each Sq is a Ch 3 and 3 Dc. I have the full written pattern down below as well as the graph. I always recommend cross referencing the graph if you think you made a mistake. The graph is EXACTLY how your blanket should look. If you think you have 1 too many yellow squares in a row, look at the graph, then look at your blanket! Do they match? If not you can go back and pull out your mistake!
If you need a little extra help with this blanket or your new to C2C I recommend checking out my video tutorial to get going! Once you learn the basics of the squares it’s easy breezy from there on out. If you need some extra help learning how to organize your yarn or keep it from tangling there are a ton of helpful videos and blog posts out there!
I hope you guys enjoy this pattern and I can’t wait to see all of your Squeeze The Day Throws!
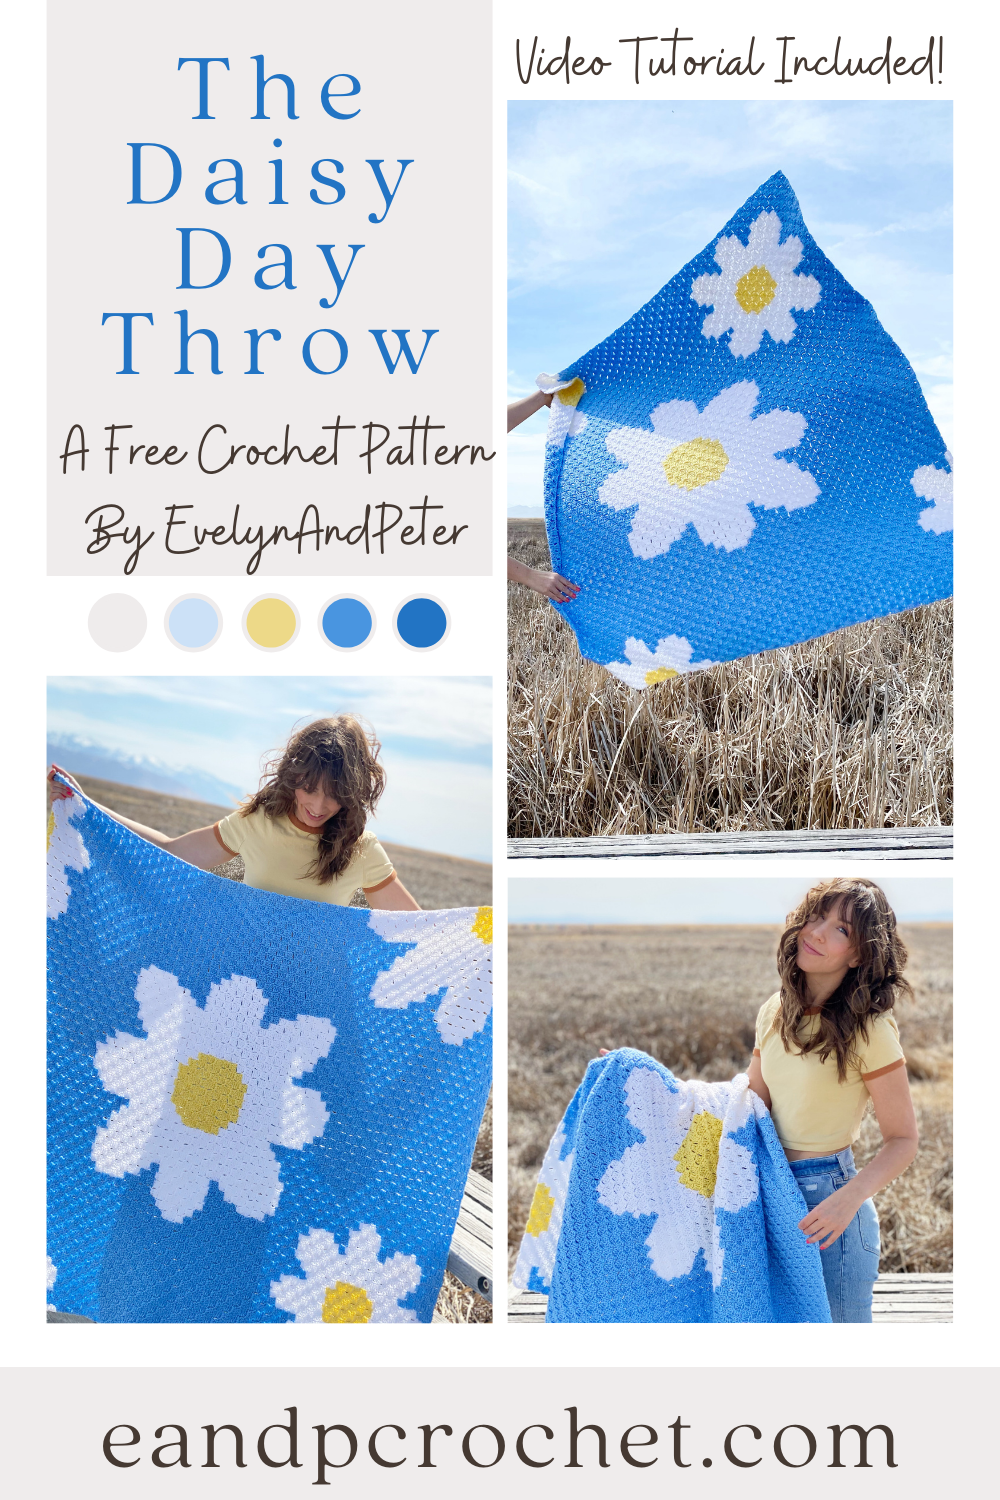
Every few months I get the urge to make a C2C crochet blanket and it never disappoints. The Daisy Day Throw was perfect to make on these cloudy spring days, to bring some happiness. I don’t know if you guys have noticed but the 90s are making a big comeback in design and fashion! I think that the Daisy Day Throw fits in perfectly with 90s vibes. It reminds me of my childhood and I love it!
The Daisy Day Throw is a Corner 2 Corner (C2C) blanket which means it’s made from the bottom right corner, diagonally to the top left corner. If you’ve never made a C2C then I recommend checking out my video tutorial as you create the blanket. You could even work up a practice swatch before diving into the project.
I also recommend making separate balls of yarn to help prevent cutting and joining your yarn with each color change. For example, when you get to the petal sections you will want a separate ball/skein of yarn for each petal and a separate ball for the blue sections in between. That way you don’t have to cut and join the yarn each time. Now, at some points there will be NO avoiding the cutting of the yarn. You will have to do it and you will have ends to weave in. I found with this blanket that it wasn’t too overwhelming and I got them all weaved in within an hour or so. If you need some visuals on how to keep your yarn organized there are lots of tutorials available out there!
If you love C2C make sure you check out some of my other free patterns!
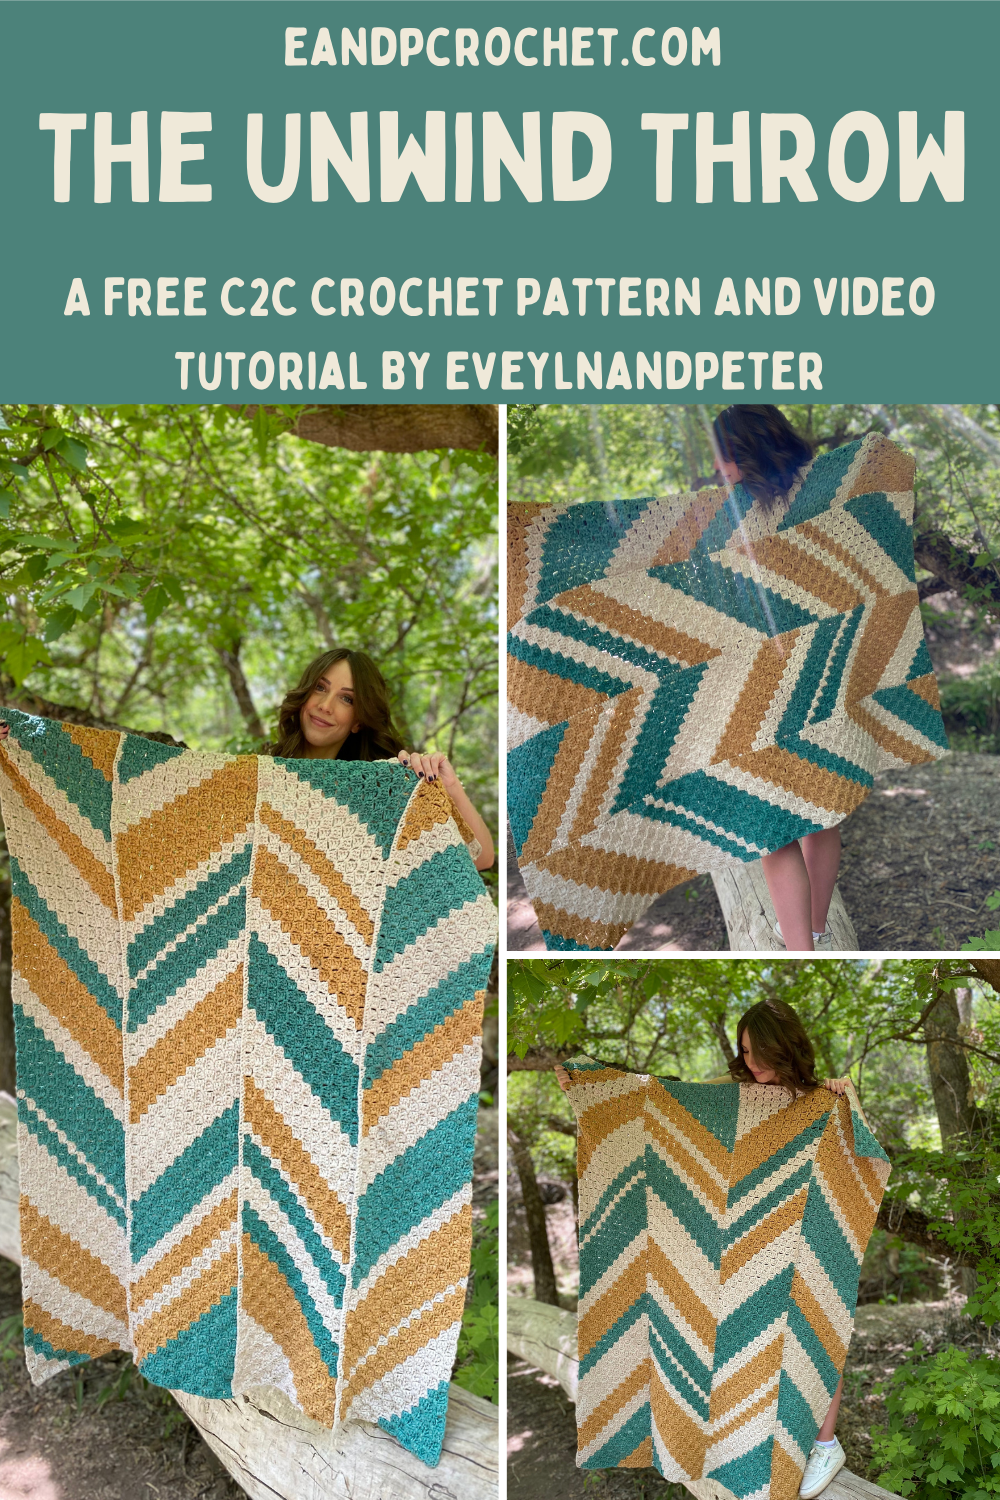
A while back I was browsing wayfair for home decor ideas (as one does) and came across the wallpaper section. One of them immediately caught my eye. Not to actually wallpaper my house with…but as a crochet project, obviously! I’m constantly on the lookout for inspiration and this one came easily!
Right away I knew I was going to do a C2C blanket design- The Unwind Throw blanket! Usually I make my C2C blankets in one large piece. For this design I split it into 4 separate rectangular panels. It actually made it feel like the crocheting went by a lot quicker! Breaking it up into easily manageable sections worked out great.
I know what your thinking… look at all those ends to weave in!! Well, it actually wasn’t very many at all! When you crochet the 4 panels together, you crochet right over the knotted tails! So the only ends to weave in on The Unwind Throw Blanket were from some of the color changes on the outside perimeter of the blanket. You could make it even easier on yourself and crochet a border too and not have a single end to weave!
If you like The Unwind Throw Blanket be sure to check out some of my other C2C blankets!
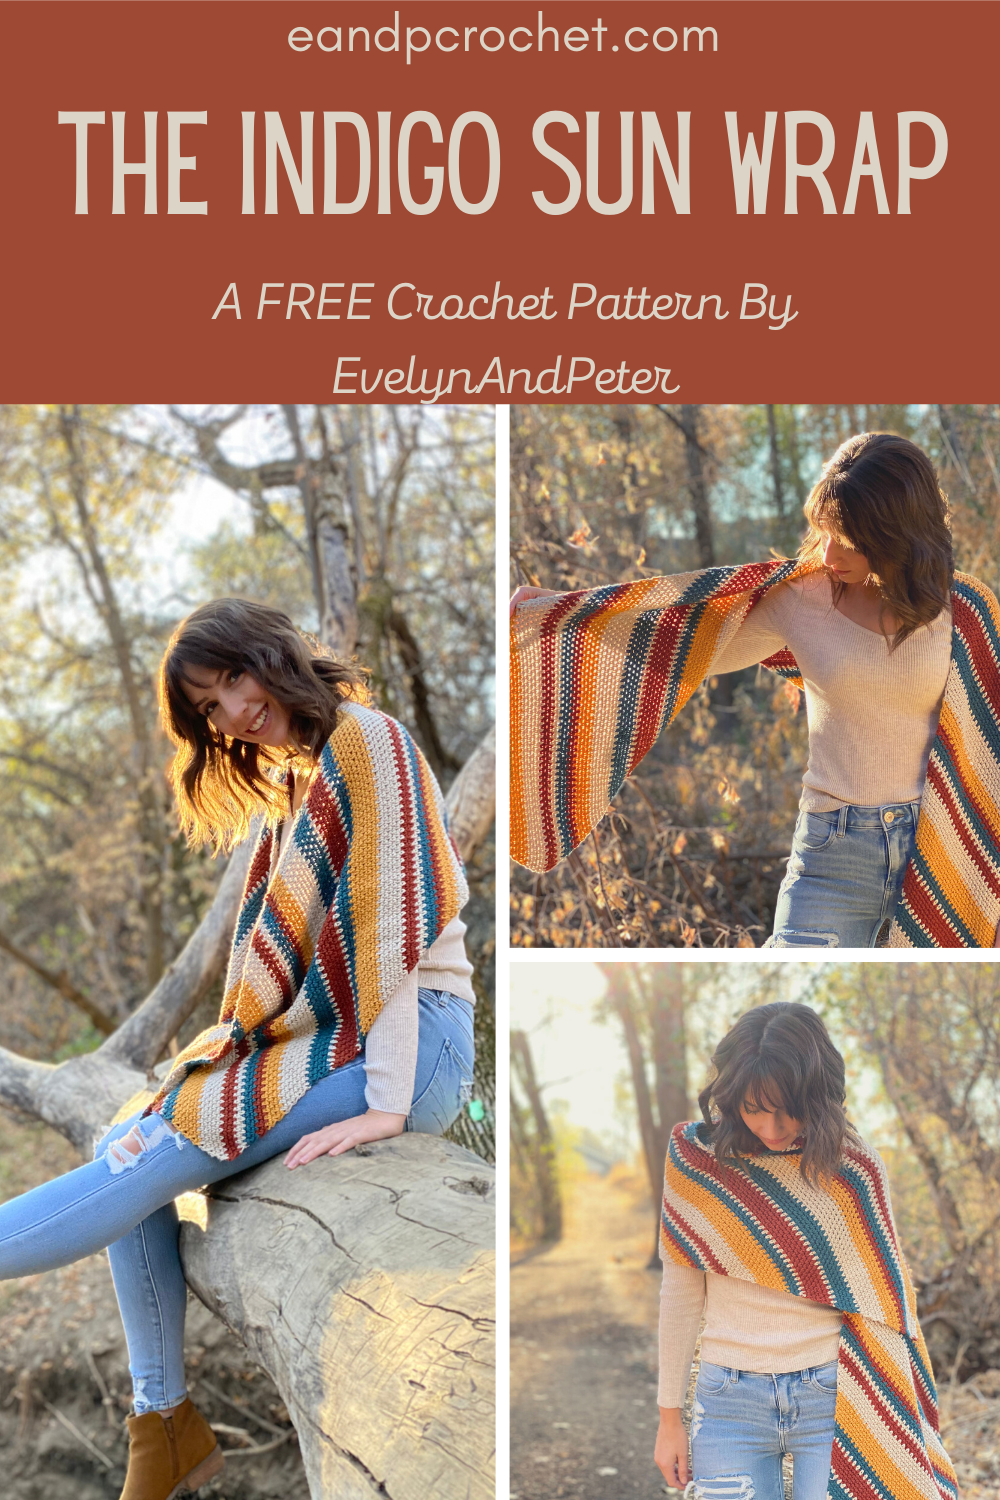
I ordered some Lion Brand Pima Cotton on a whim a couple of months ago. I had no plans on what I wanted to make but I couldn’t say no to these colors. After picking out 4 favorites for my color palette I knew I would end up doing something with stripes. And that’s how the Indigo Sun Wrap was born!
The Indigo Sun Wrap was so relaxing and fun to make. All you need to do is crochet 2 rectangles and make one short seam to join them together! The pattern uses moss stitch. Moss stitch is one of my absolute favorites! This one is not worked in a way you are probably used to though. It’s actually worked up corner to corner instead of horizontal!
Im a huge fan of all things corner 2 corner. So when I found out you could make the moss stitch corner 2 corner I knew I had to design something with it! You can check out a couple of my previous normal C2C designs here and here.
I also made a full video tutorial on the Indigo Sun Wrap as well! If you want a visual on how to make the moss c2c then this video will be perfect for you! View it here or scroll down to check it out!
Description:
If you love the moss stitch then this pattern is for you! Learn a new way to use this stitch by working it corner to corner. The gorgeous striping and bold colors make this wrap a statement piece.
