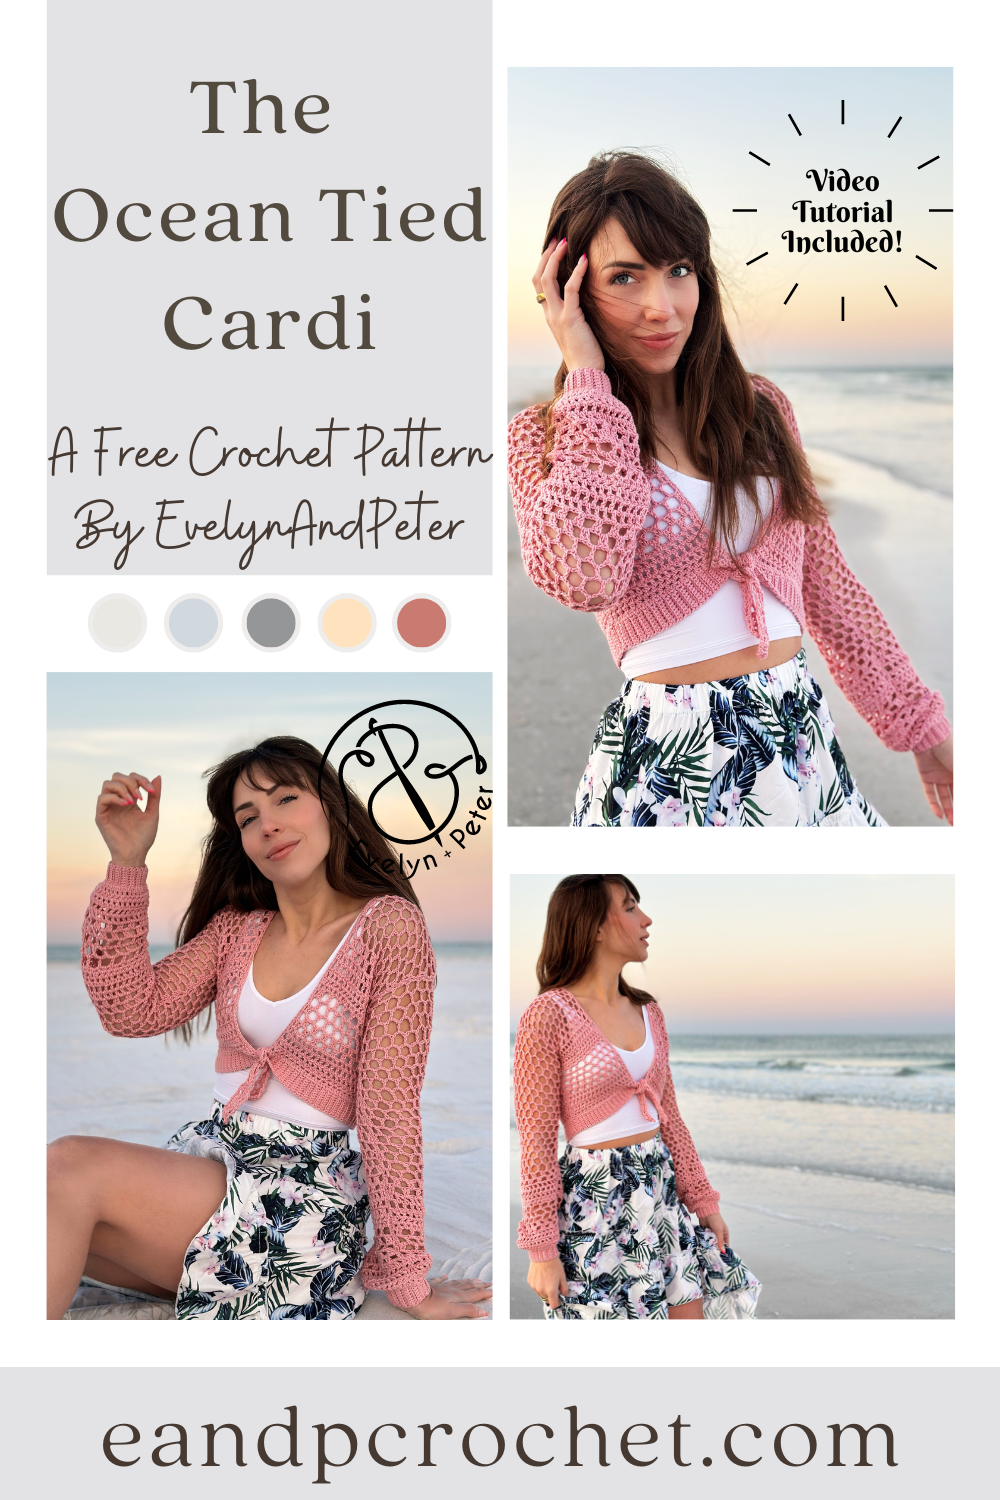
Once the sun starts shining and the blooms start to poke out I always get the urge to make a summer garment! I knew I wanted it to be meshy and airy as well as having a cute tie feature in the front. The Ocean Tied Cardi crochet pattern quickly came to life!
I played around with a bunch of different mesh stitches and decided to combine a whole bunch of them into one design! It actually came together pretty easily with very minimal swatching and frogging! It’s like it was meant to be. The majority of The Ocean Tied Cardi uses double crochet stitches and chains so it works up quickly. It’s also easily adjustable if you want yours longer or shorter. Just add or remove rows to the end of each panel before fastening off.
I think its sooo cute with the little tie in the front, it really makes the design in my opinion! However, if you want to keep it off and wear it as an open cardigan, then you can easily do that! Just add the final trim and don’t follow the instructions for the tie at the end.
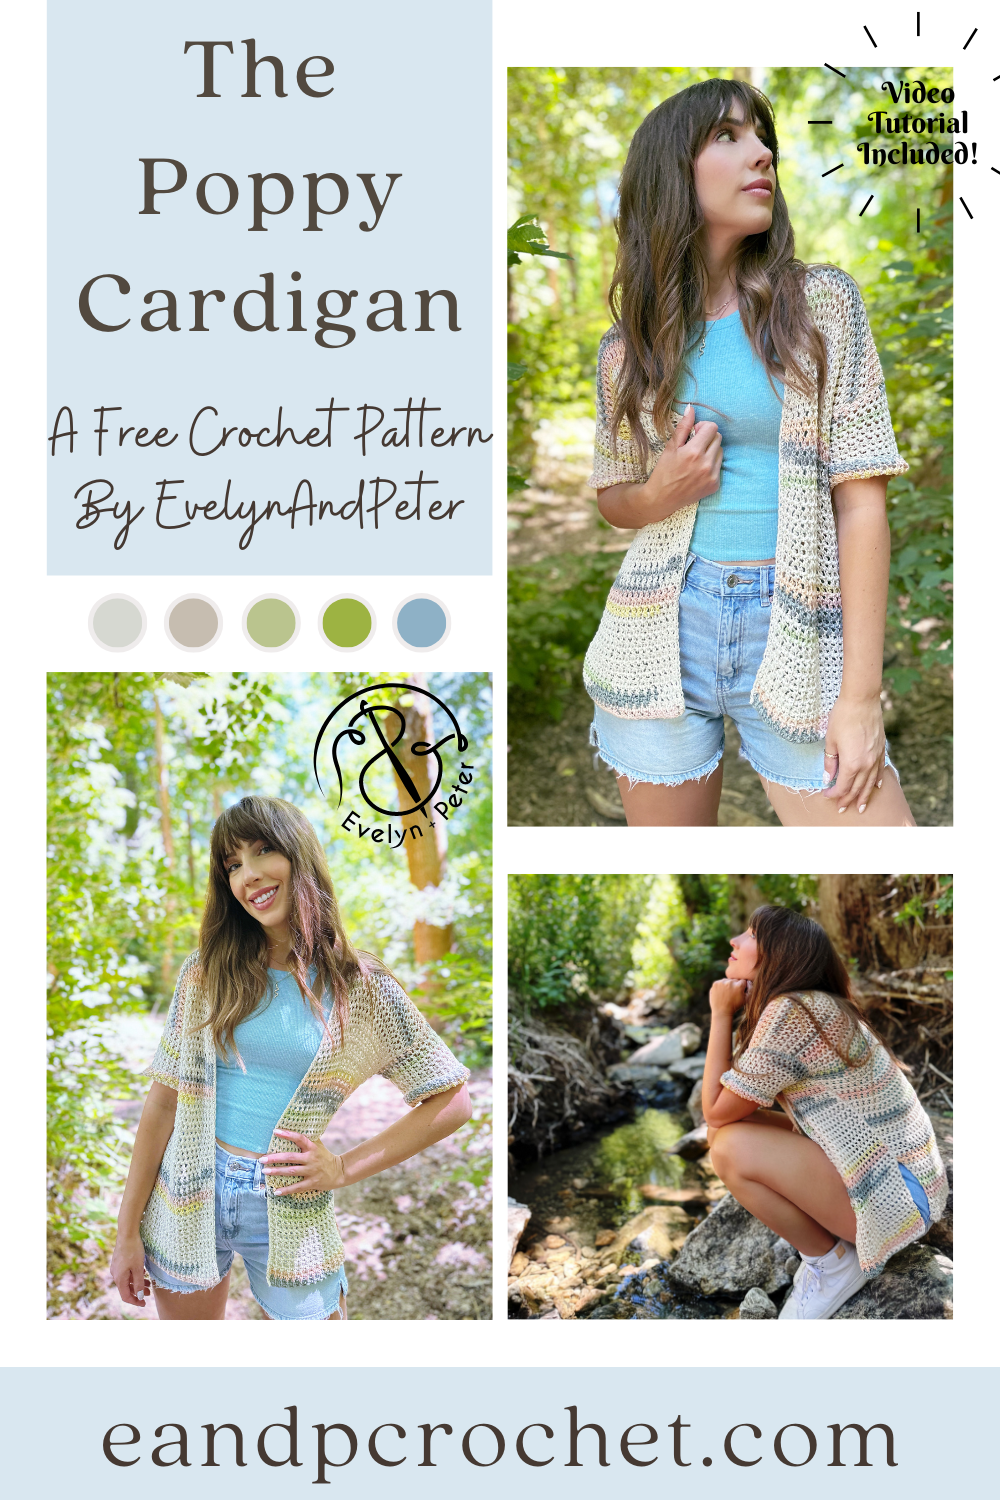
I couldn’t make a Poppy Pullover without making a Poppy Cardigan crochet pattern! The Poppy Pullover was a fan favorite and the Poppy Cardigan has the same design details so I hope you like this one too!
I used the same type of yarn for The Poppy Cardigan- 24/7 Cotton DK, except this time, I used the “prints” version instead of a solid color! I think the prints are so pretty and give it a little bit more pop of color and detail. I wasn’t sure how the yarn was going to work up with the distribution of color but I am loving the result! If you are more of a solid color kind of crocheter you can totally substitute out the yarn, they have lots of options! I used the Seaglass color for mine.
The Poppy Cardigan is worked up the same way as the pullover, from the bottom up. Again, we are using a larger hook than what you normally would use for a DK yarn to give it that loose, mesh look. When you are crocheting, make sure you don’t tug down too tightly on your stitches! If you are prone to a tight tension just make sure to pay attention to that. This is also a really stretchy stitch so when you wear the cardigan it will stretch and has great drape! Once all your panels are made you will give a light block ( I like to steam block mine) and sew together!
If you want to use the same yarn as me make sure you get the Lion Brand kit! It comes with a free copy of my printable pattern and you can choose your yarn color! They also frequently have very good sales! My Poppy Pullover is available on my blog here as well as a Lion Brand kit!
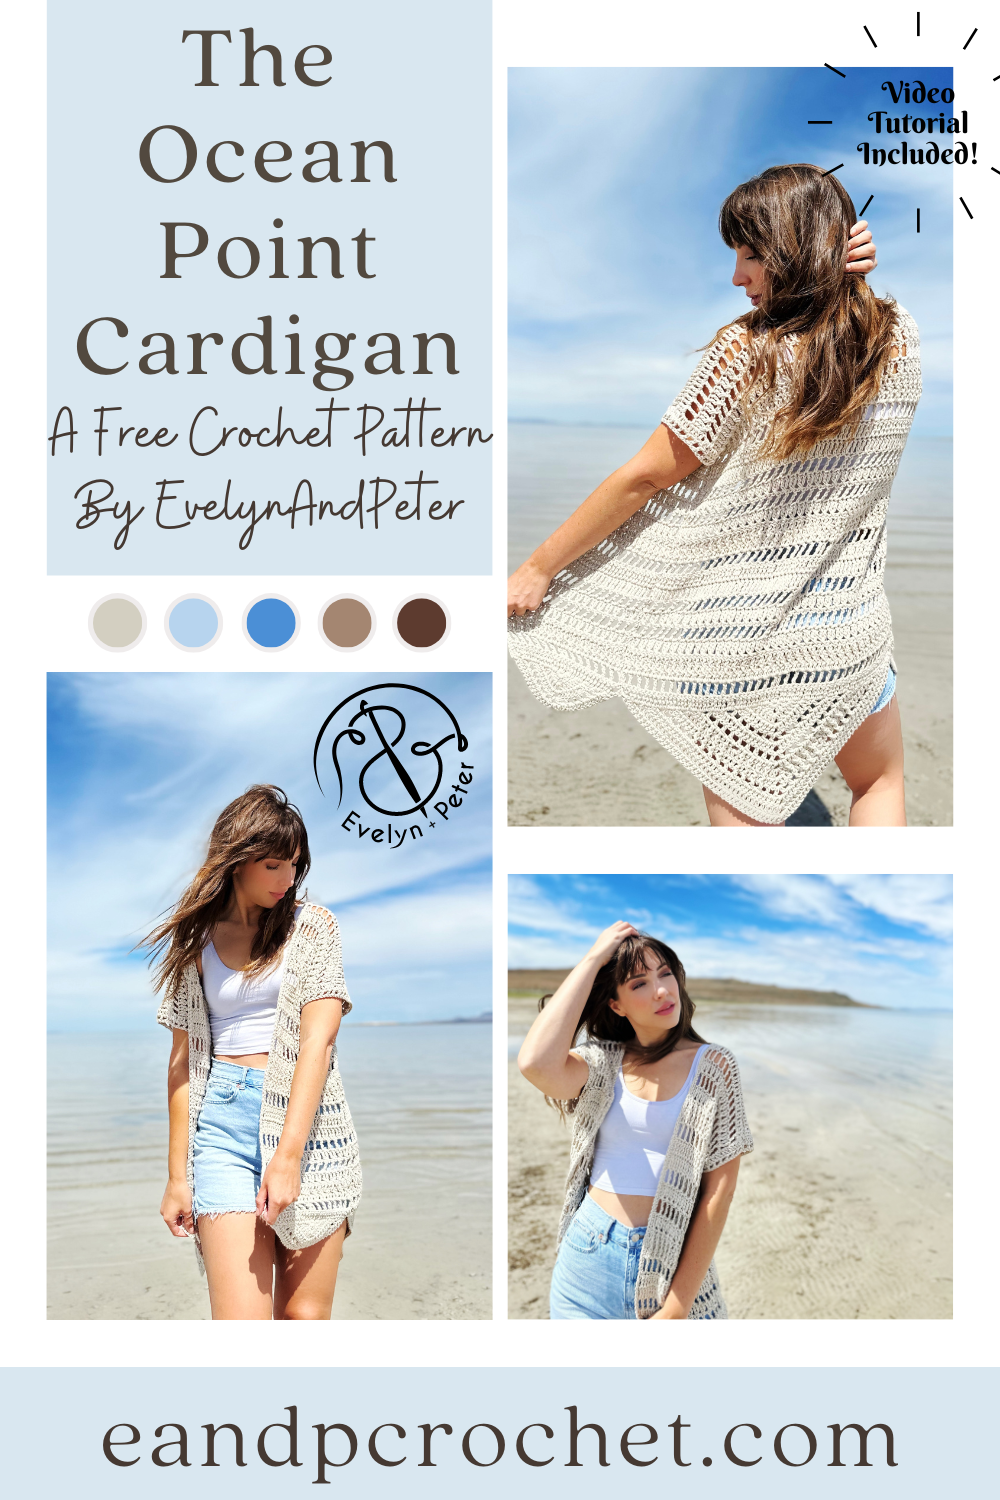
Are you nose deep in summer crochet patterns right now like I am?! Can I add another one to your “must make list”? Summer crochet patterns have always been one of my favorite things to spend time on. There is just something about the open stitches, the cotton yarn and also the fact that you don’t have to make long sleeves! haha! Summer makes usually work up quickly just like my new cardigan design, The Ocean Point Cardigan crochet pattern!
Is it weird that I have never designed a triangle shawl before? I have definitely crocheted a few in the past but never designed my own! I have been wanting to lately but I did not want to make a shawl in the middle of summer! I got the idea to somehow incorporate the shape of a triangle shawl into a cardigan and I am SO glad I did!! After a lot of math and a little bit of frogging I finally came up with the final result!
To create The Ocean Point Cardigan crochet pattern you start at the bottom, creating the triangle shape. If you are familiar with triangle shawls you will have no problem jumping right in. Once you have the triangle complete, you will rotate your work and create the first row of the main body into the ends of the rows you made in the triangle. After you get set up it’s just row repeats with no more shaping there on out! I used tall stitches like double crochet, treble crochet, and treble X St. There is also plenty of Ch 1 Sk 1 sprinkled in for an airy and lacy feel.
Because of the very specific St count and math going on in this cardigan there are 3 separate combo sizes written in the pattern. This cardigan is oversized and has a loose, flowy fit. Each size provided can fit a wide range of body shapes and sizes! To find your size, just locate your bust size on the size chart.
I used a worsted weight yarn for The Ocean Point Cardigan pattern- Pima Cotton from Lion Brand. This is a very soft cotton yarn! I have no trouble with this yarn. It works up beautifully and does not split or snag if you have to frog! They have lots of pretty colors available as well. If you end up purchasing the kit, you can swap out the color if you want to!
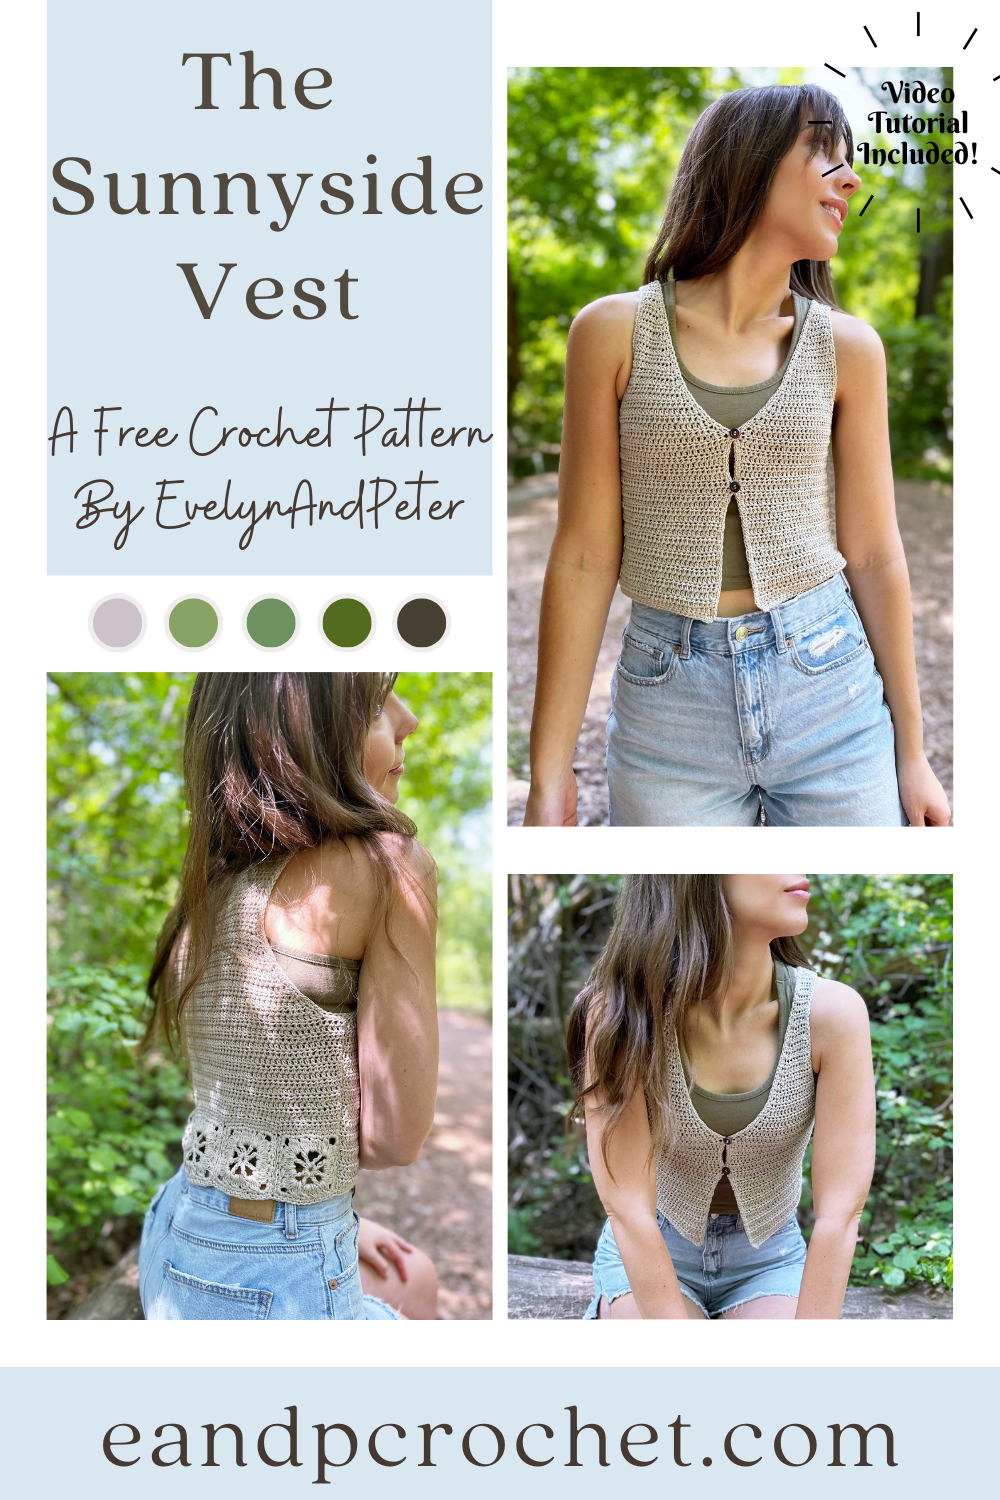
I’ve always wanted to crochet a cute little vest but I wanted to do something a little more unique than just all basic stitches. I knew I wanted to incorporate granny squares or motifs somehow after being inspired by a shower curtain with pretty motifs along the middle that reminded me of sunshine. That’s how we ended up with The Sunnyside Vest crochet pattern!
The Sunnyside Vest is worked in 3 separate panels after you get the motifs worked up. Each size will have a different amount of motifs along the back. Once you make all of your motifs you will join them together before finishing the back panel from the bottom up. The front panels are also worked from the bottom up before being joined at the shoulder and side seam.
I used Cotton Bamboo Linen yarn from Lion Brand which is a Fine (2) weight yarn. This is a newer yarn and has some lovely colors. I used Shale for my Sunnyside Vest crochet pattern. I loved the lightweight feel of this yarn and the fiber combo is perfect for a warm weather garment!
You will notice some of the sizes are combination sizes. This is due to the fact that it is a form fitting garment and the motifs along the back are all the same size. To find your size, just locate your bust size on the chart!
Usually I make a full video tutorial walkthrough for my designs. For this one I was not able to do a tutorial for the entire thing. I did make a video on how to make the motifs, join the motifs, and set up the first row for the back panel. In my opinion this might be the trickiest part for beginners so I wanted to make sure I provided a visual for you guys! After you are all set up it is just Hdc stitches throughout, with some decreasing and shaping! I had a very busy month when designing the Sunnyside Vest crochet pattern and my family was sick with the stomach bug for weeks. I hope you can forgive me for not having a full walkthrough but I am always available to help with pattern questions! Check out the video tutorial here!
If you like this crochet vest, please be sure to check out some of my other top patterns as well!
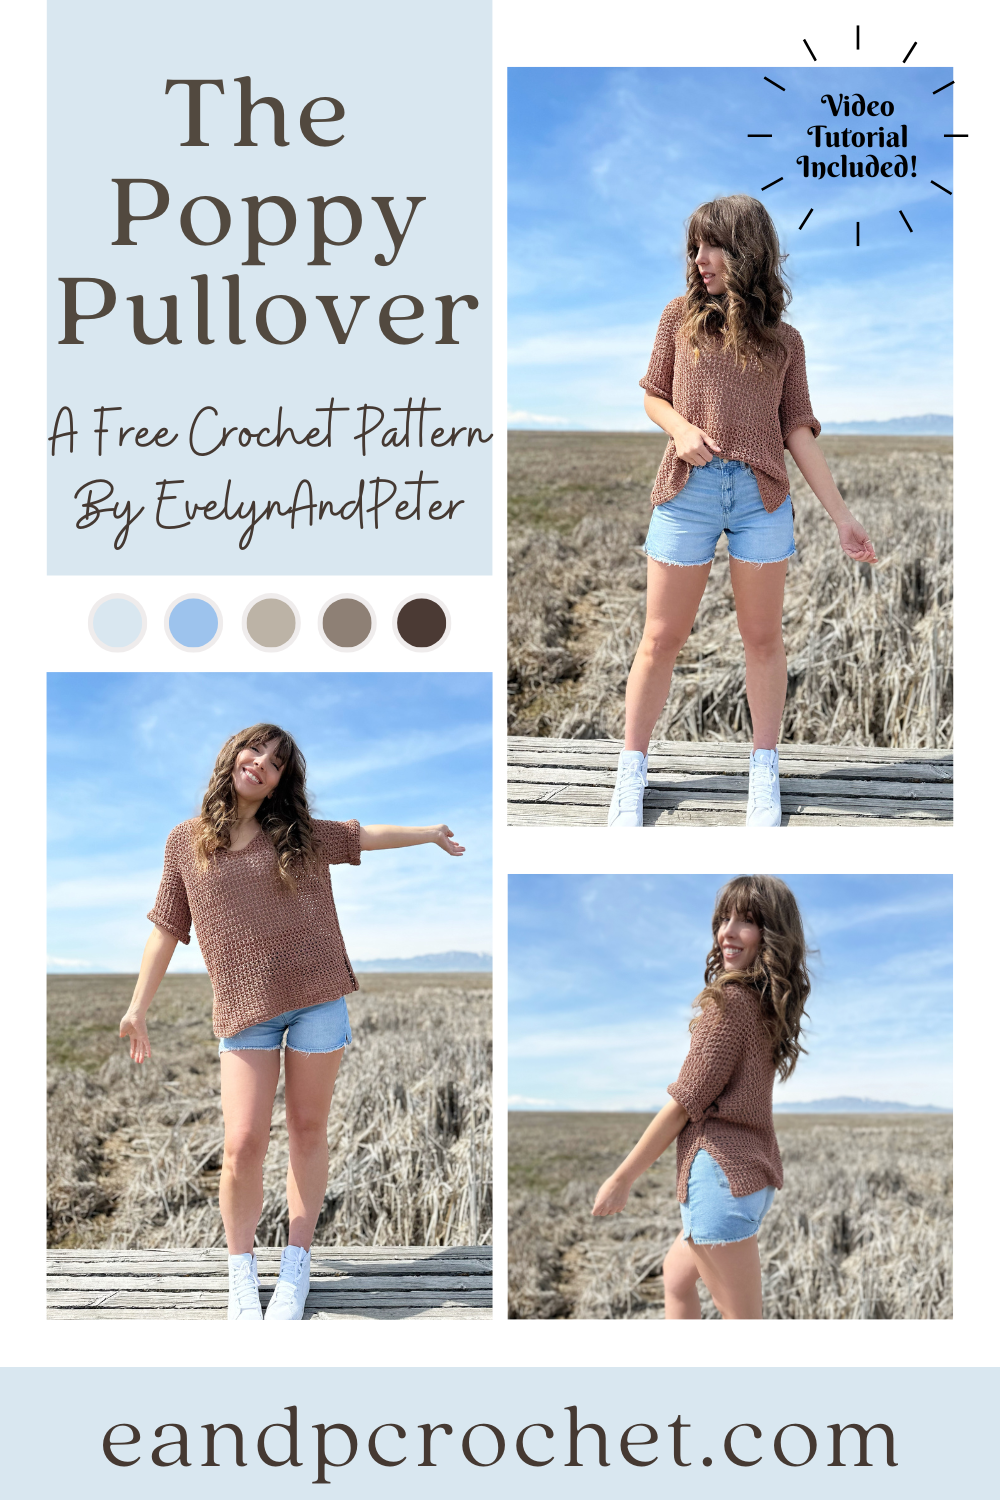
Did I just find my new favorite cotton yarn? I think I did. Be prepared for so many designs using this yarn because I am obsessed! My first make using this yarn is called The Poppy Pullover!
I used Lion Brand 24/7 cotton DK for the Poppy Pullover crochet pattern. Don’t get it confused with the worsted weight version! The DK weight is obviously thinner and much more soft. It had no splitting and no tangles as I crocheted. I’m absolutely in love with it! I used the color Cacao for mine but they have a lot of pretty choices.
The Poppy Pullover is crocheted in separate panels from the bottom up. You’ll be using a larger hook in comparison to the yarn to give it more of a mesh look. It’s important to not pull your stitches tight. You want a relaxed and even tension so you can give it the perfect drape. Feel free to go up in hook size if you normally have a tight tension and/or your gauge is off. Once you have all your panels complete you will sew them together.
The Poppy Pullover is easy to make adjustments to. You can add or takeaway as many rows as you want on the back panel to adjust the length. Just be sure to make the same adjustments on the front panel as well, right before you split the neckline.
If you are a beginner be sure to check out my full video tutorial to help walk you through!
If you like this crochet top make sure you check out some of my other ones as well!
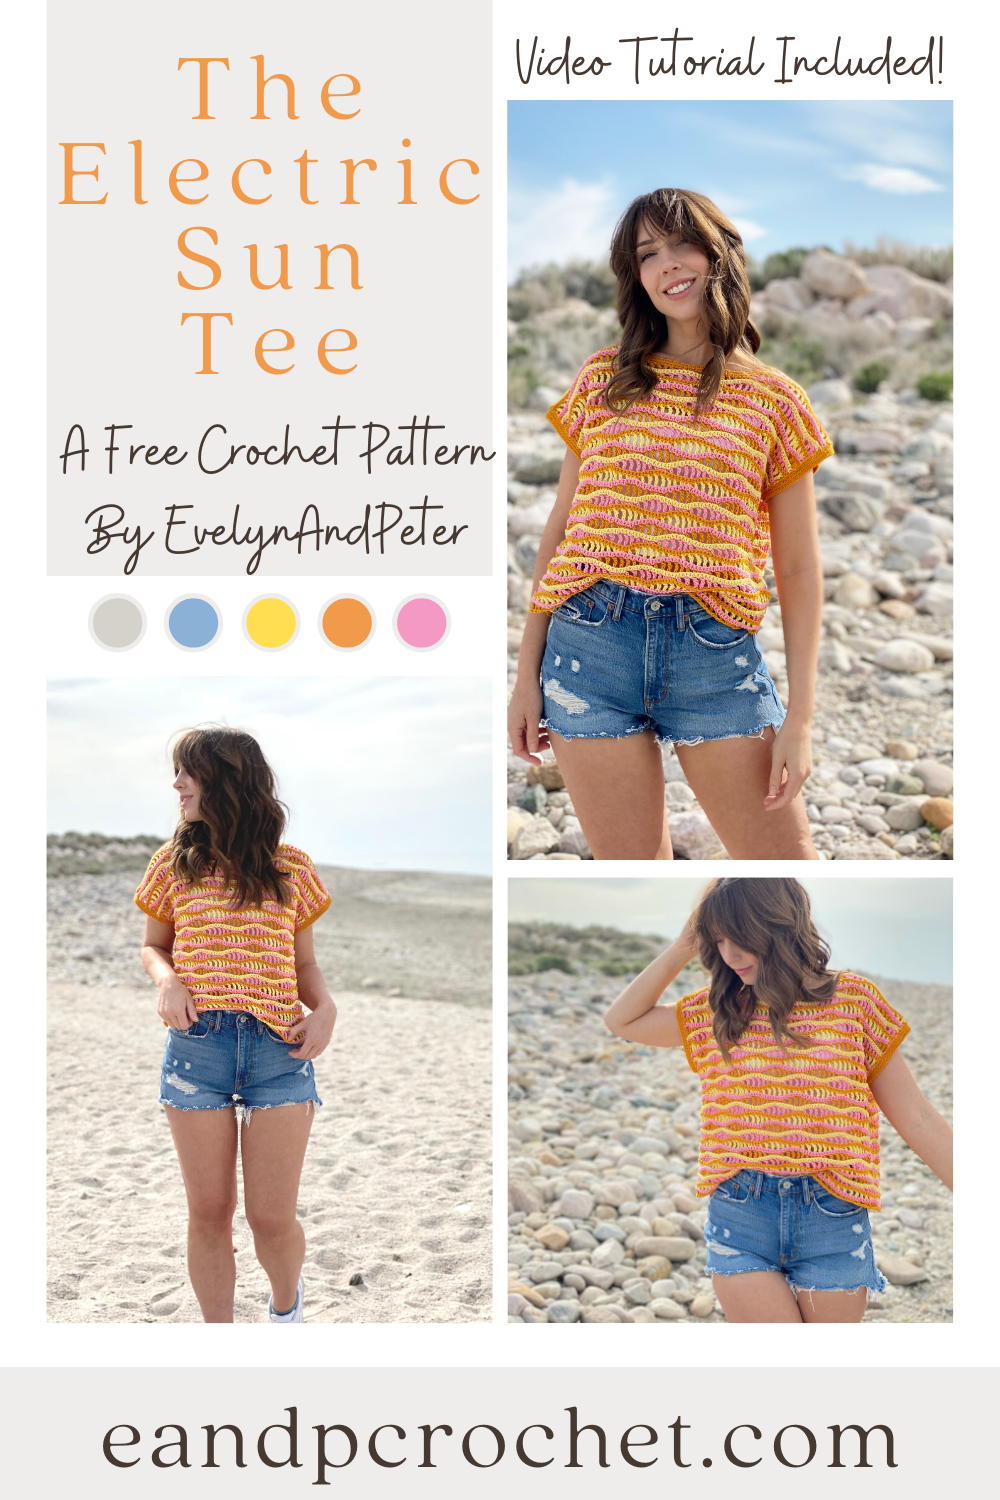
Stepping out of my color comfort zone with The Electric Sun Tee Crochet Pattern! This oversized top was so fun to make! I used 3 different colors for mine and switched them out with each row. The stitches create a really cool wave effect!
This top is written with plenty of positive ease for a very oversized look! Because of the oversized fit, each of the 3 sized can fit a wide range of body shapes and sizes! You can also make your top longer if you want by adding as many row repeats as you want before you start the shaping of the neckline. Be sure to add the same amount on both panels!
Make sure you do not cut your yarn when you change colors. If you do, you will have a ton of ends to weave in! I kept my yarn attached with each color change. Then, when I come back to that color I simply picked it back up and switched colors. This leaves small floats along the outer edge of your panel. When we sew the front and back panel together, we will sew over the floats and they will be hidden within the seam on the inside of the shirt! And TaDa! You just save yourself a ton of work!
The first few rows might be a little tricky to remember the stitch repeat. If you need some extra help, be sure to check out my video tutorial! If you have a question, it is most likely covered in the video!
If you like this top, then be sure to check out some of my other ones!
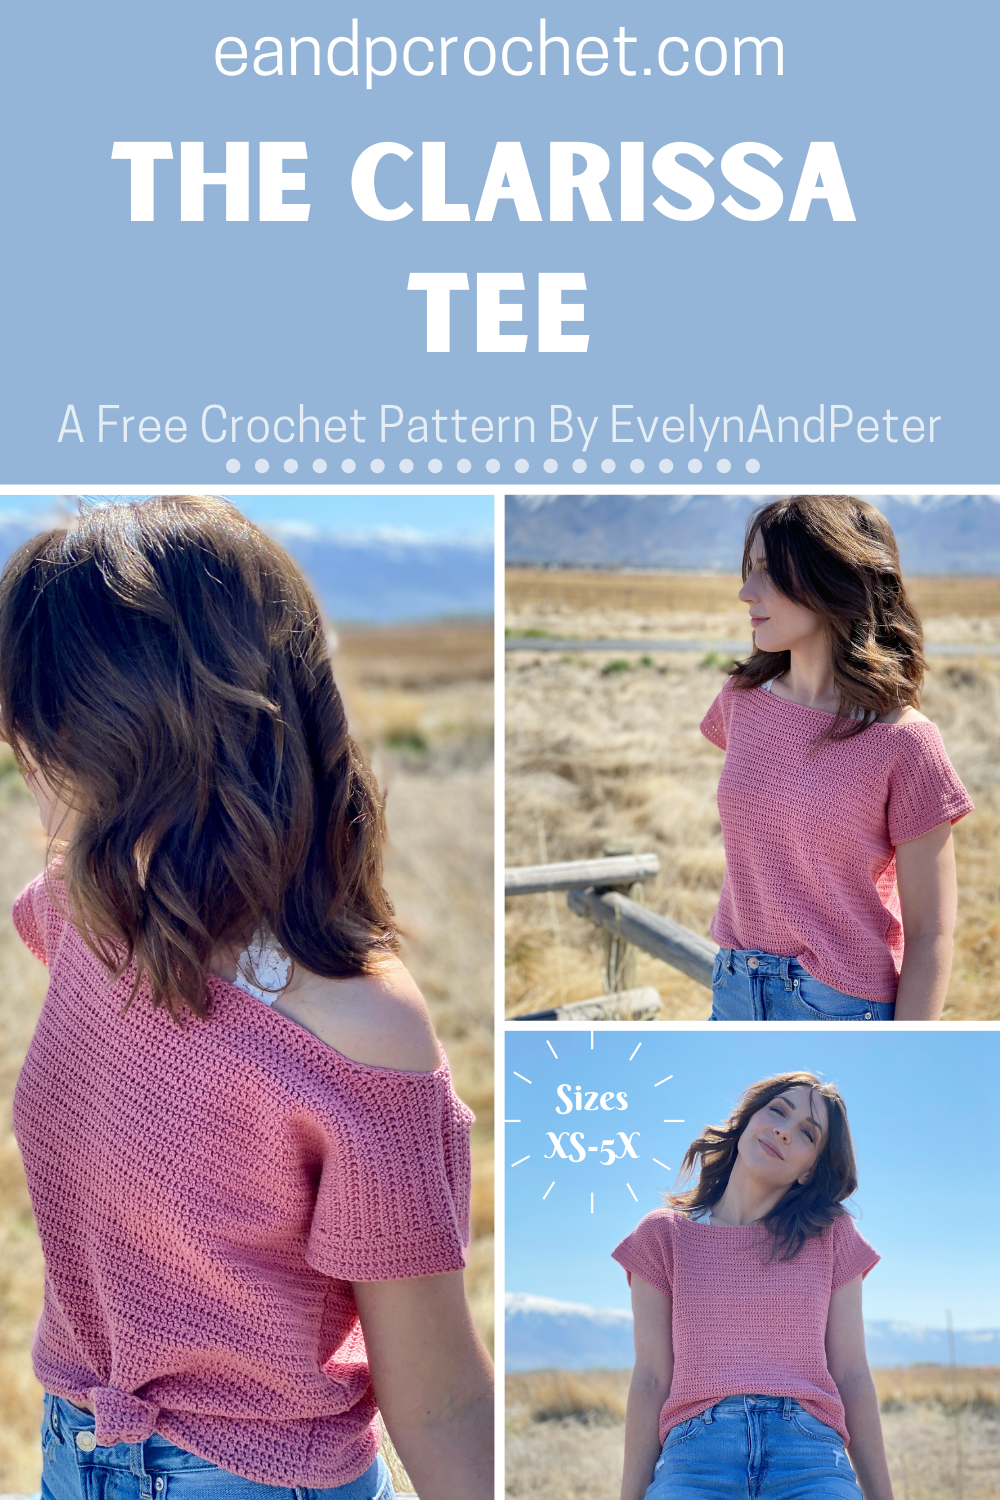
Surprise! I’ve been keeping this pattern a secret for a few months and i’m excited to finally release it into the world! The Clarissa Tee is a super easy and fun pattern. I have been wanting to make an off the shoulder style tee but still be able to be worn on both shoulders if desired!
The Clarissa Tee features a wide boat neck style neckline. I think it looks super cute paired with a lacy bralette underneath. It definitely gives me some retro vibes! I just need a side ponytail and some leggings to go with it now! haha! I tied it up with a little hair tie for some of the photos and just love the look of it!
This top has a mid length cut. If you are the type that likes longer style shirts then I definitely recommend adding some rows in before you start the neckline and shoulder shaping. I’m wearing the size small in photos and do not have any extra length added. Remember, you will need extra yarn if you add rows!
I have a full video tutorial for this top so be sure to check it out!
If you like this top then be sure to check out some of my other tops I have made!
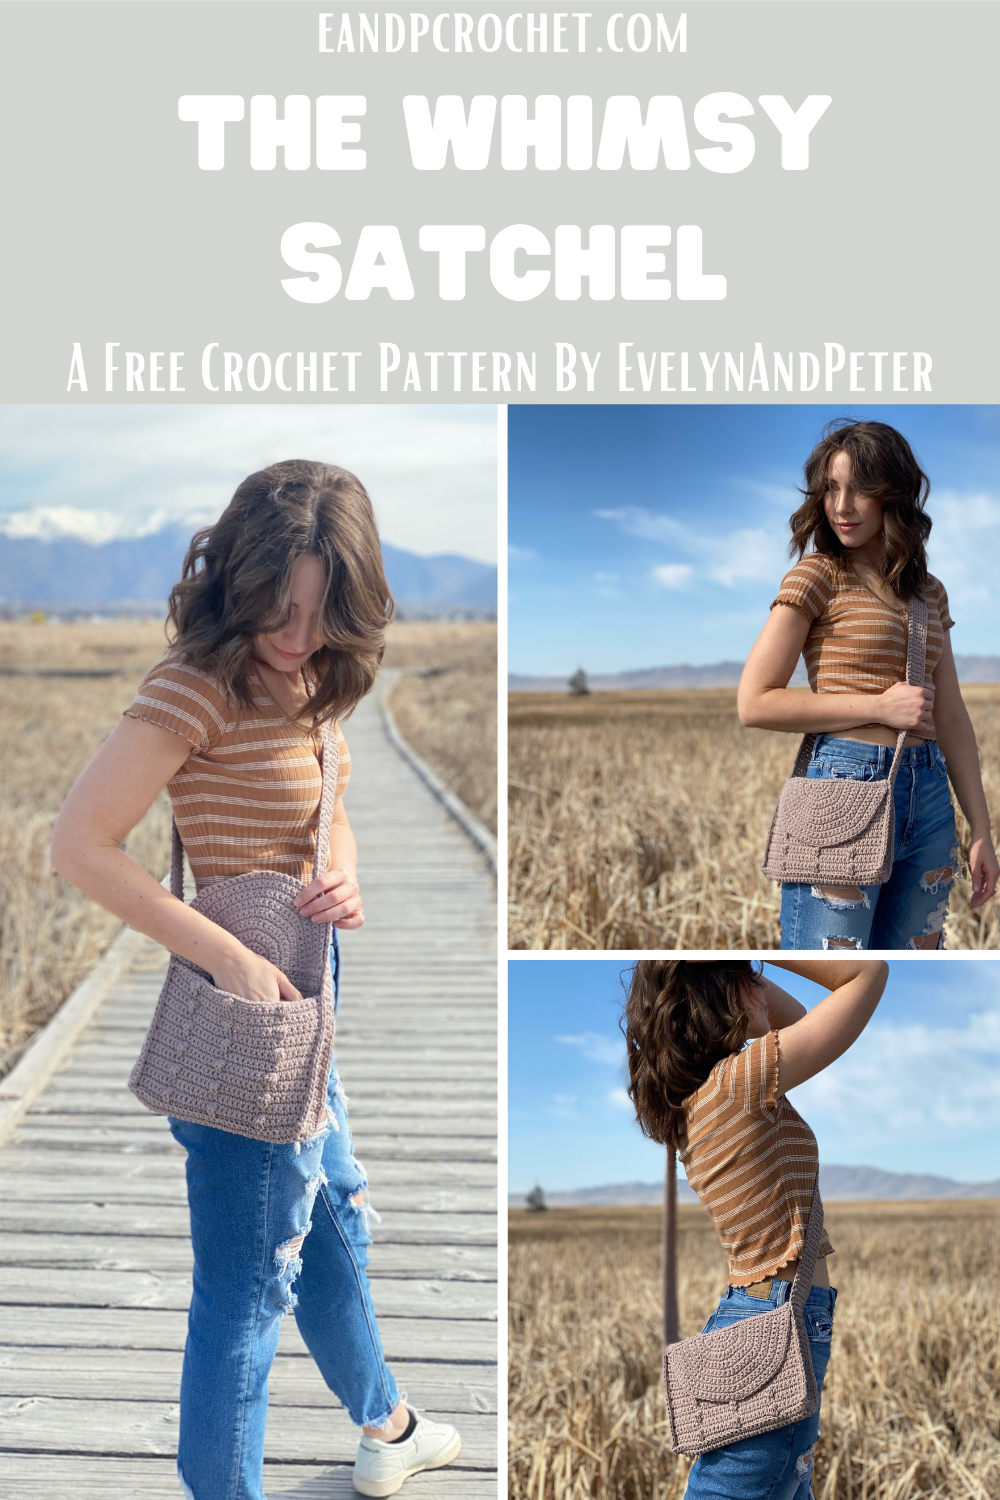
It’s been a while since I’ve made a crochet bag. The Whimsy Satchel is definitely a new favorite of mine! It’s perfect for quick trips out when you don’t want to carry a ton of stuff. It also works up super quickly!
I used a new yarn from Lion Brand called “Just Hemp”. This is a sturdy bulky weight yarn. It’s definitely the type of yarn I would recommend for bags/placemats/baskets over garments and blankets!
The Whimsy Satchel is worked almost entirely in one piece. You will start in the center of the front flap and make your half circle in rows. The front flap, top, back, bottom and front panel are all worked in one piece. The strap and sides are worked in one piece as well and then everything is sewn together. Make sure you check out the available photos if you get confused!
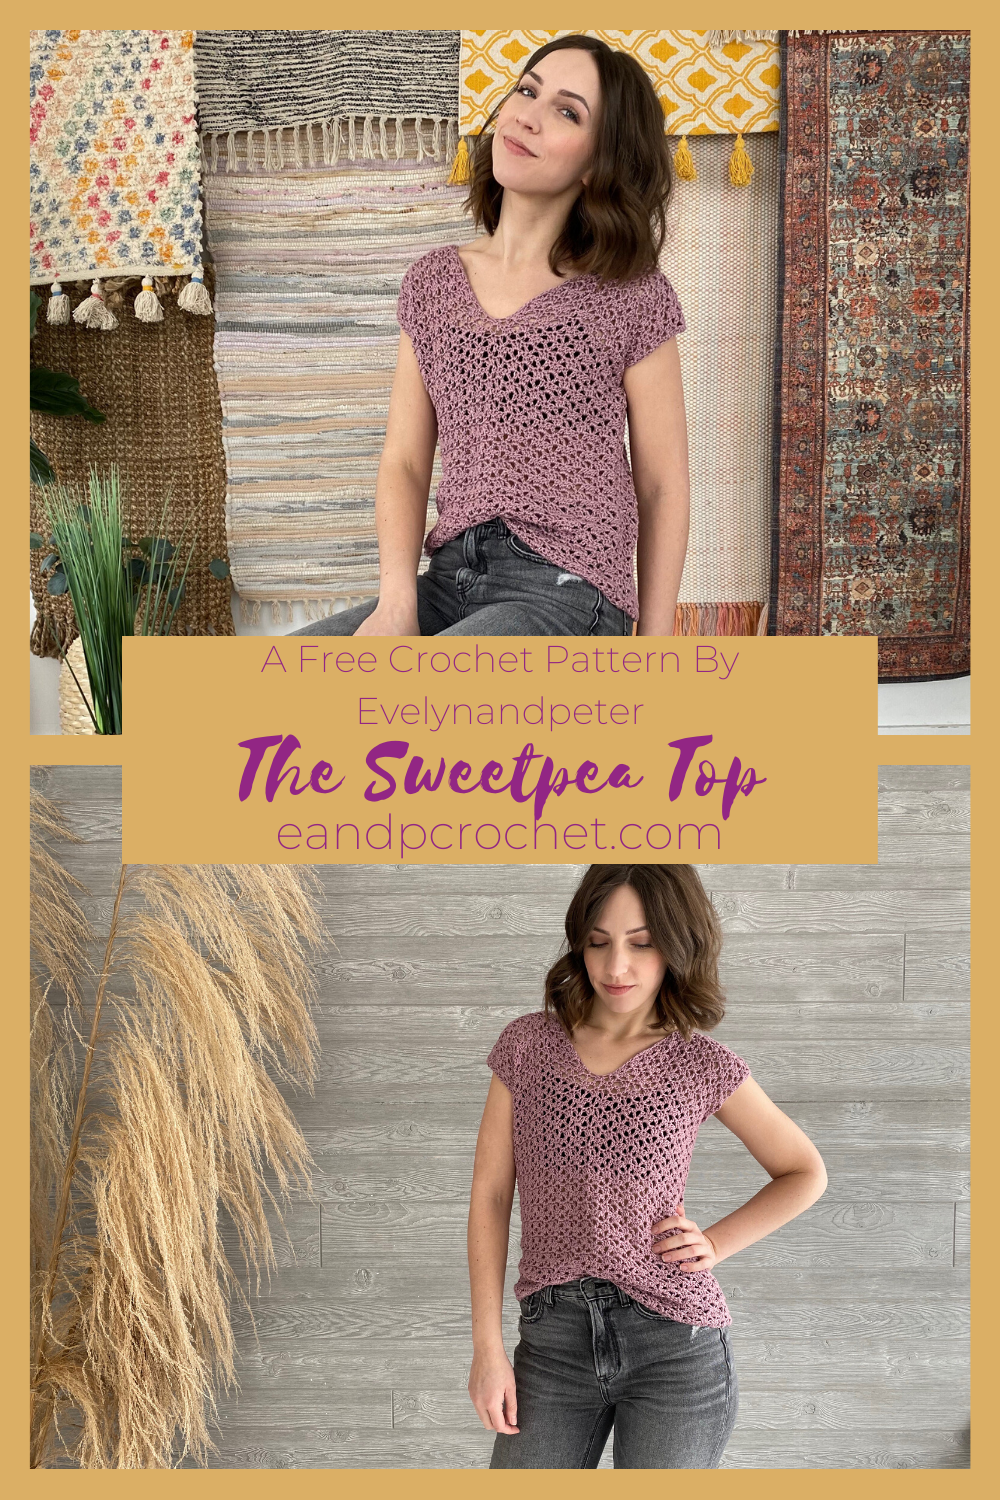
Can you tell I’m more than ready for warmer weather?! The Sweetpea Crochet Top was inspired by beautiful sweetpea flowers blooming in spring! I love the wearability of this top. It layers perfectly over a cami or bralette! The stitches give it a beautiful lacy look.
I used Lion Brand Truboo yarn and let me tell ya…the drape on it is something else! It’s very similar to Coboo but it has a beautiful sheen to it! It’s so silky and smooth, I can’t wait to work with it again. I’ve made an adorable summer top using coboo called The Bobble Crop Top, be sure to check it out!
The Sweetpea Crochet Top is created by making 2 panels and seaming together. You will add arm trim and neckline trim at the end.
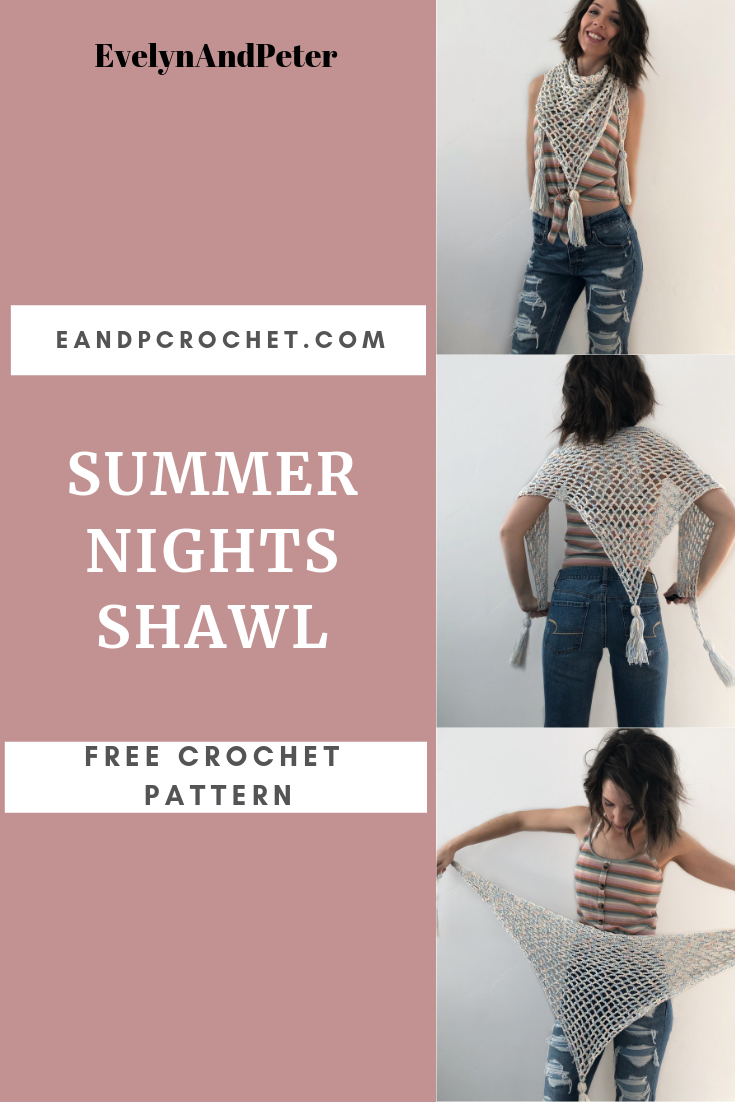
Is it summer yet?! Nope, it’s not even spring yet. lol. I’m hoping that if I make all of the warm weather things it will force the sunshine to come. Let’s see if it works. 🙂 The Summer Nights Shawl is a super fun and quick make to work up while you’re netflixing. It’s a very easy mesh stitch with a simple repeat row. It’s worked up double stranded with the light and superfine yarn. If you don’t have both yarns available, I recommend using just a basic worsted weight yarn!
Be sure to follow me on Instagram and tag me with your finished shawl! I love to share your work with my followers. 🙂
Materials:
- Light (3) weight cotton yarn. Pattern uses Lion Brand Comfy Cotton in “whipped Cream”. 200 yards.
- Superfine (1) weight yarn. Pattern uses Lion Brand Summer Nights in “blue Lagoon”. 215 yards.
- 5.00mm Crochet Hook
- Optional- If you add tassels or fringe, you will need more yarn then noted above.