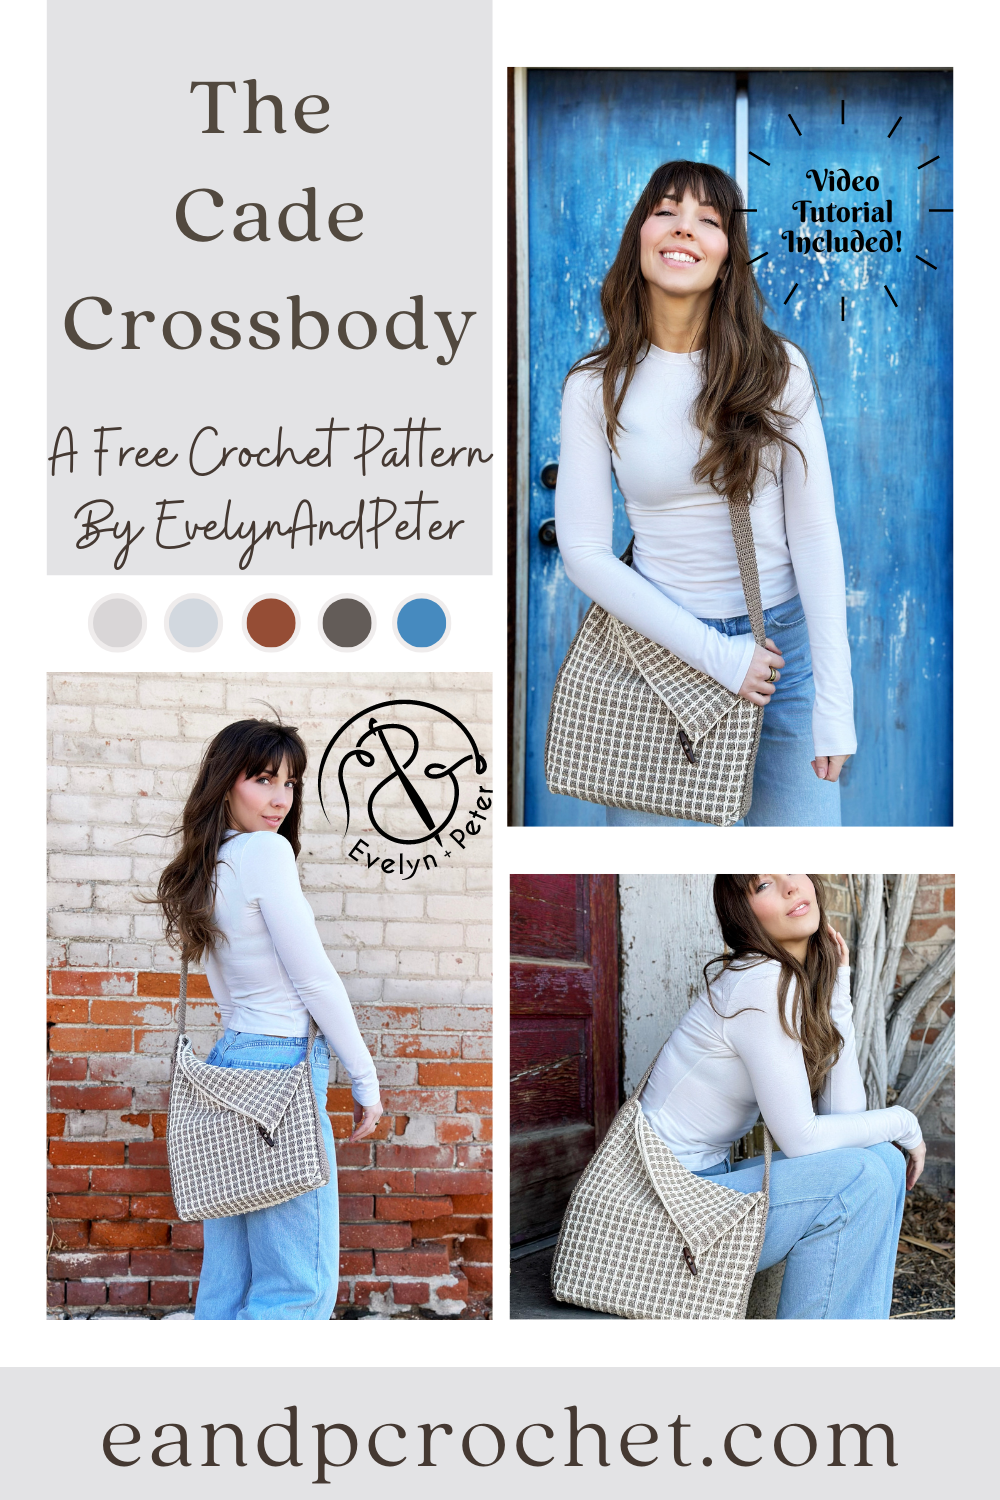
I had so much designing The Cade Crossbody. Why? Because it’s part of a collab with my yarn bestie Meghan from Meghanmakesdo! I made the crochet version and she made the knit version! It’s always nice to have options so maybe if you are seeing this but you are a knitter, than be sure to check out her blog!
The Cade Crossbody crochet pattern is actually pretty simple. It’s 2 rectangles sewn together and a long strap added last! You’ll add the strap on with a unique twist to give it the slanted fold over look. To give your bag some shape, you will be tacking/sewing the corners up into a triangle point when you add the strap. Once side is sewn further up than the other. That’s it!
When Meghan showed me the knit stitch she was going to use for her bag, I knew I would have to do some swatching and figure out how to get my crochet version looking similar! I tried a bunch of different stitch combinations. Finally I settled with a combo of Sc, Sl St and surface stitches to give the look you see here! There will be some ends on your rectangle panels. But don’t worry!! Most of them you will crochet right over, so don’t let the ends scare you! Just check out the notes section or watch the video tutorial!
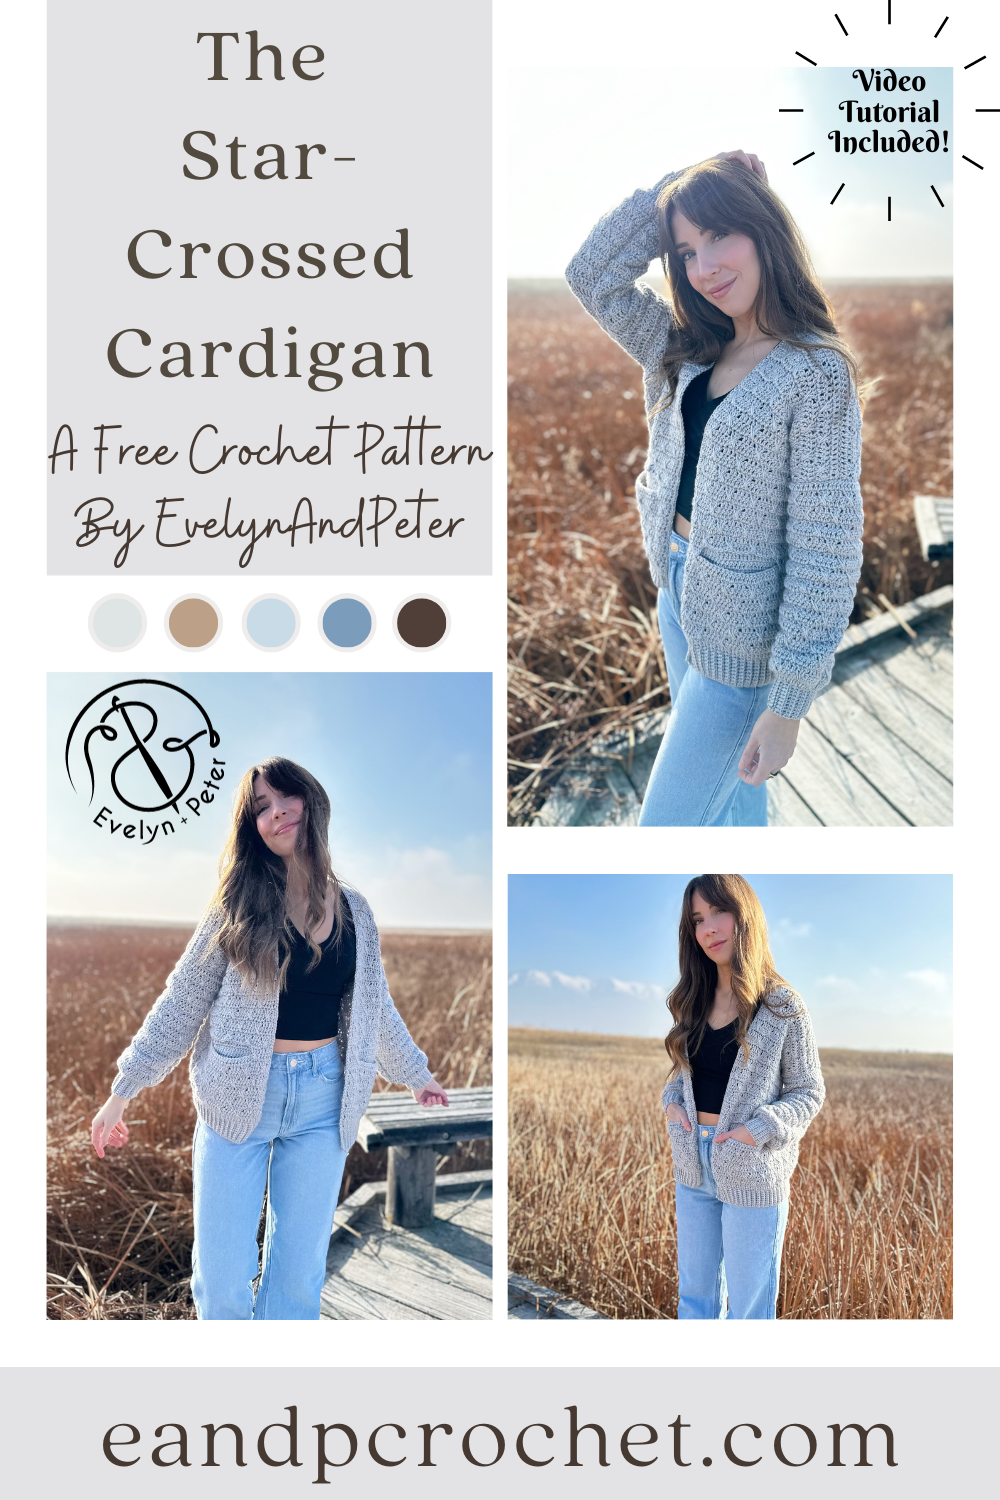
Let’s kick off the new year with a brand new crochet design, The Star-Crossed Cardigan Crochet Pattern! I wanted to start off strong with a cardigan design using Heartland yarn. You might remember my Stony Shore Cardigan and my Kiah Cardigan, both are very popular and well loved and both use Heartland yarn! I knew I needed something to add to the collection of my popular cardigans!
The Star-Crossed Cardigan crochet pattern is very beginner friendly and uses basic shapes. Once you nail the “double crosses spike” stitch you will work this cardigan up easy peasy! It’s basically a combination of all double crochet stitches with the ribbing using single crochet. You will work the panels from the bottom up and sew together.
Did you notice the Star-Crossed Cardigan crochet pattern has pockets?! The best part is that the pocket swatch is your gauge swatch. So feel free to jump ahead in the pattern and make a pocket swatch before starting. You will then use that swatch to measure 4×4″ within. Save it for later when you are required to seam to the inside of your cardigan!
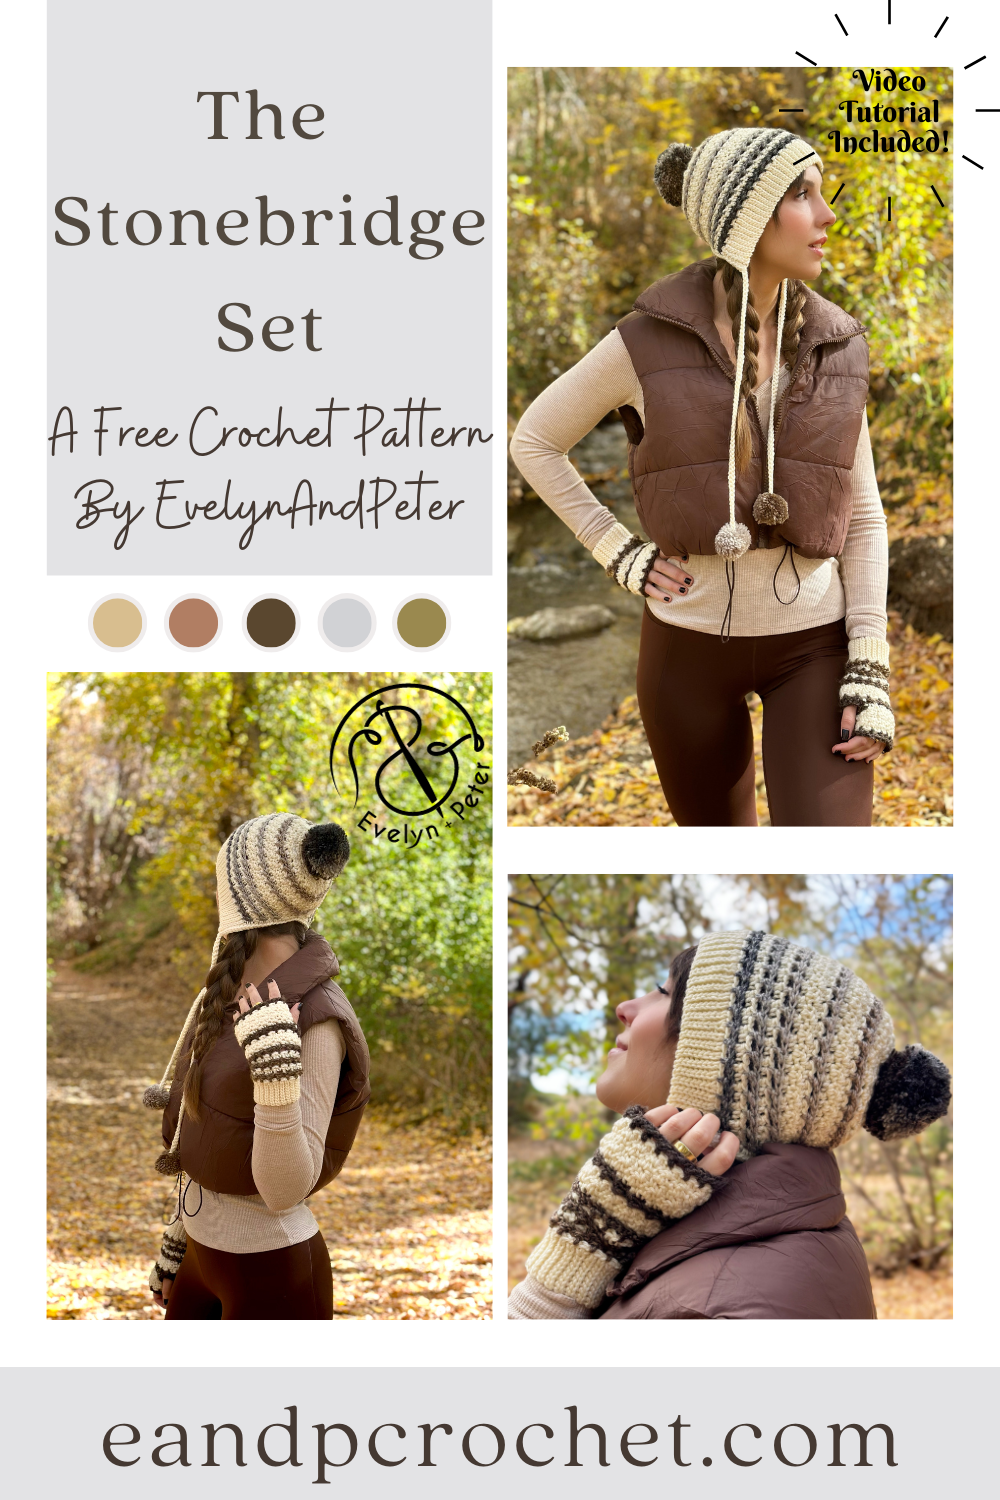
I can’t believe it’s already November and cold enough for my annual Beanie and Mitt set! Last winter I released The Winter Moonlight Set and this year is The Stonebridge Set crochet pattern!
I wanted to do something a little bit different than your typical beanie. I decided to construct it in more of a “bonnet” style and add a tie with little poms on the ends! You’ll start the beanie by creating the ribbing in rows, then crocheting your first row into the sides of the ribbing rows made. You’ll continue the first several rows back and fourth before joining the piece together and crocheting the remaining beanie in joined and turned rounds. Don’t forget the turn! It’s very important to do so within the pattern.
The fingerless mitts uses the same stitches but worked up slightly different. The ribbing is made the same as the beanie but you will immediately join together and worked in turned rounds throughout the entirety of the main body of the mitt. Take note of the thumb hole round! This will be slightly different for the left vs. the right mitt. Other than that, both left and right will be the same!
I used worsted (4) weight yarn for this set. The main color A is Lion Brand Skein Tones in “Ivory or Basic Stitch Anti-pilling in “ecru” (these are the same colors and either one will work) and Color B is Ferris Wheel in “Morning Java”. If you want your fingerless mitts to have the same color stripes, be sure to start on the same color within the ferris wheel skein. You’ll have to pull the yarn out and cut so you can start at the same point! Other than that, no need to worry about rearranging the colors as they stripe on there own! You can find this yarn in the Lion Brand kit along with a free copy of my PDF pattern!
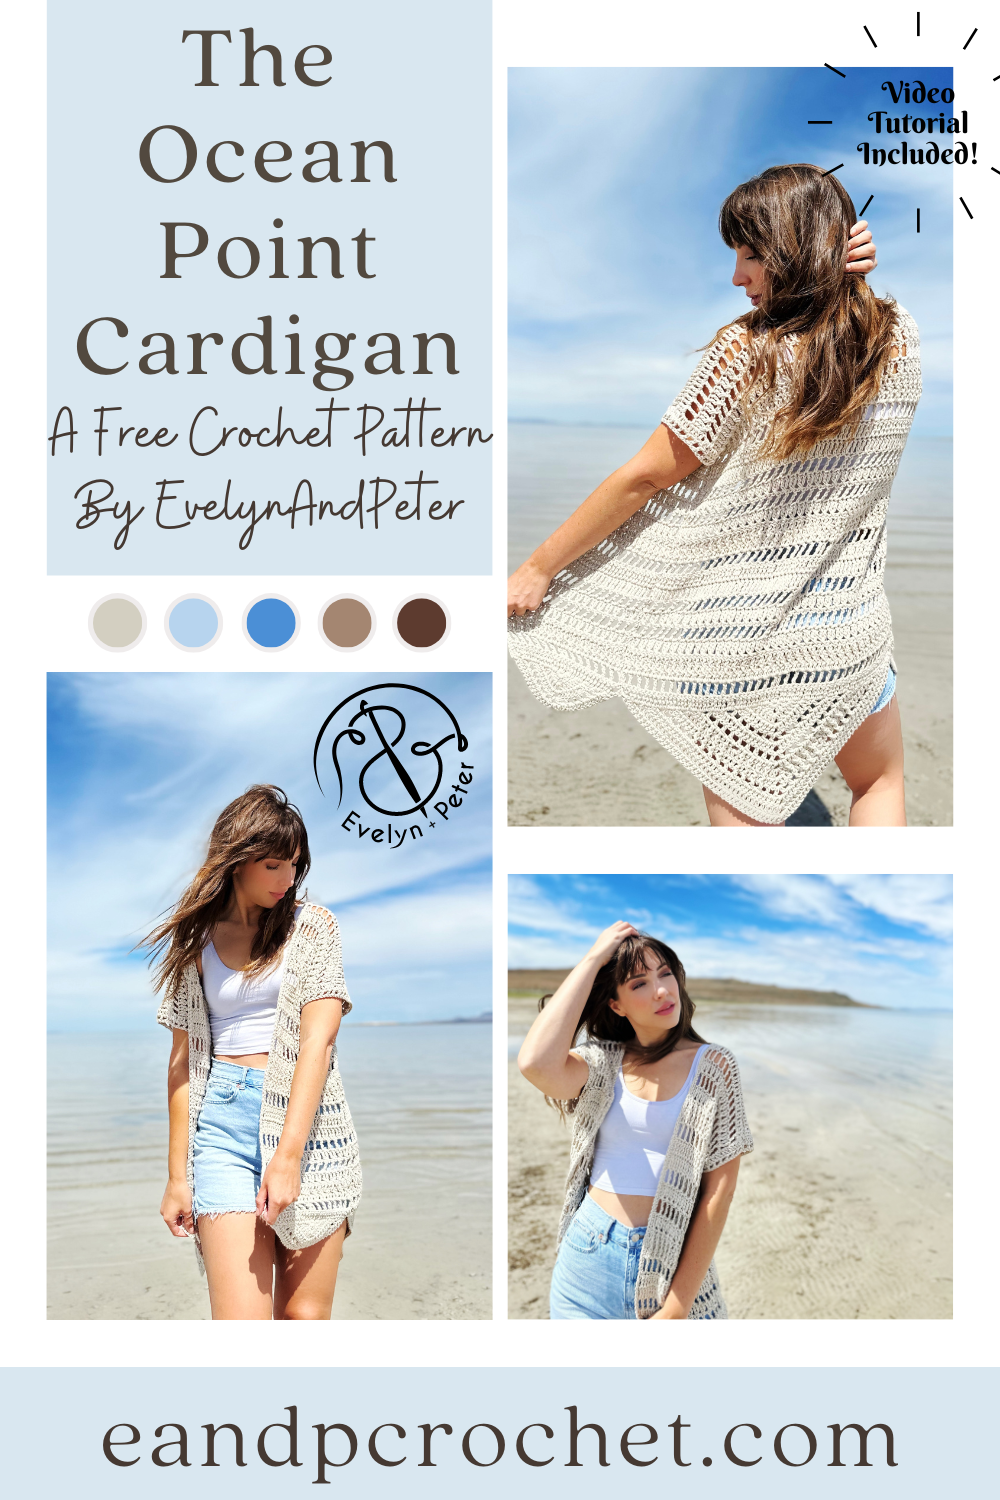
Are you nose deep in summer crochet patterns right now like I am?! Can I add another one to your “must make list”? Summer crochet patterns have always been one of my favorite things to spend time on. There is just something about the open stitches, the cotton yarn and also the fact that you don’t have to make long sleeves! haha! Summer makes usually work up quickly just like my new cardigan design, The Ocean Point Cardigan crochet pattern!
Is it weird that I have never designed a triangle shawl before? I have definitely crocheted a few in the past but never designed my own! I have been wanting to lately but I did not want to make a shawl in the middle of summer! I got the idea to somehow incorporate the shape of a triangle shawl into a cardigan and I am SO glad I did!! After a lot of math and a little bit of frogging I finally came up with the final result!
To create The Ocean Point Cardigan crochet pattern you start at the bottom, creating the triangle shape. If you are familiar with triangle shawls you will have no problem jumping right in. Once you have the triangle complete, you will rotate your work and create the first row of the main body into the ends of the rows you made in the triangle. After you get set up it’s just row repeats with no more shaping there on out! I used tall stitches like double crochet, treble crochet, and treble X St. There is also plenty of Ch 1 Sk 1 sprinkled in for an airy and lacy feel.
Because of the very specific St count and math going on in this cardigan there are 3 separate combo sizes written in the pattern. This cardigan is oversized and has a loose, flowy fit. Each size provided can fit a wide range of body shapes and sizes! To find your size, just locate your bust size on the size chart.
I used a worsted weight yarn for The Ocean Point Cardigan pattern- Pima Cotton from Lion Brand. This is a very soft cotton yarn! I have no trouble with this yarn. It works up beautifully and does not split or snag if you have to frog! They have lots of pretty colors available as well. If you end up purchasing the kit, you can swap out the color if you want to!
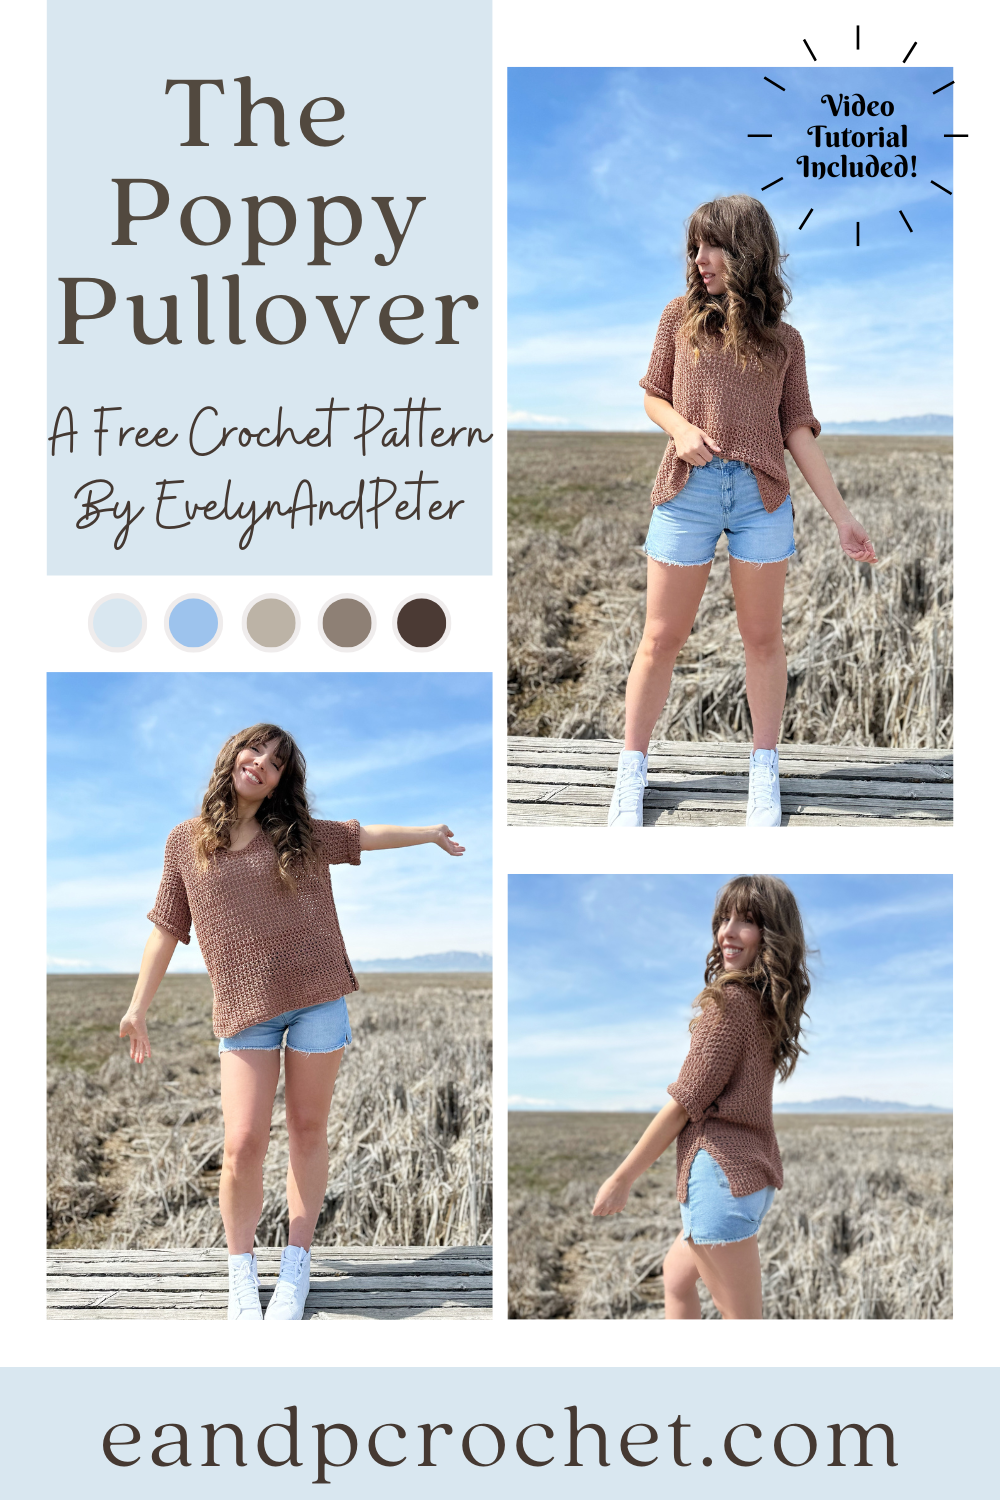
Did I just find my new favorite cotton yarn? I think I did. Be prepared for so many designs using this yarn because I am obsessed! My first make using this yarn is called The Poppy Pullover!
I used Lion Brand 24/7 cotton DK for the Poppy Pullover crochet pattern. Don’t get it confused with the worsted weight version! The DK weight is obviously thinner and much more soft. It had no splitting and no tangles as I crocheted. I’m absolutely in love with it! I used the color Cacao for mine but they have a lot of pretty choices.
The Poppy Pullover is crocheted in separate panels from the bottom up. You’ll be using a larger hook in comparison to the yarn to give it more of a mesh look. It’s important to not pull your stitches tight. You want a relaxed and even tension so you can give it the perfect drape. Feel free to go up in hook size if you normally have a tight tension and/or your gauge is off. Once you have all your panels complete you will sew them together.
The Poppy Pullover is easy to make adjustments to. You can add or takeaway as many rows as you want on the back panel to adjust the length. Just be sure to make the same adjustments on the front panel as well, right before you split the neckline.
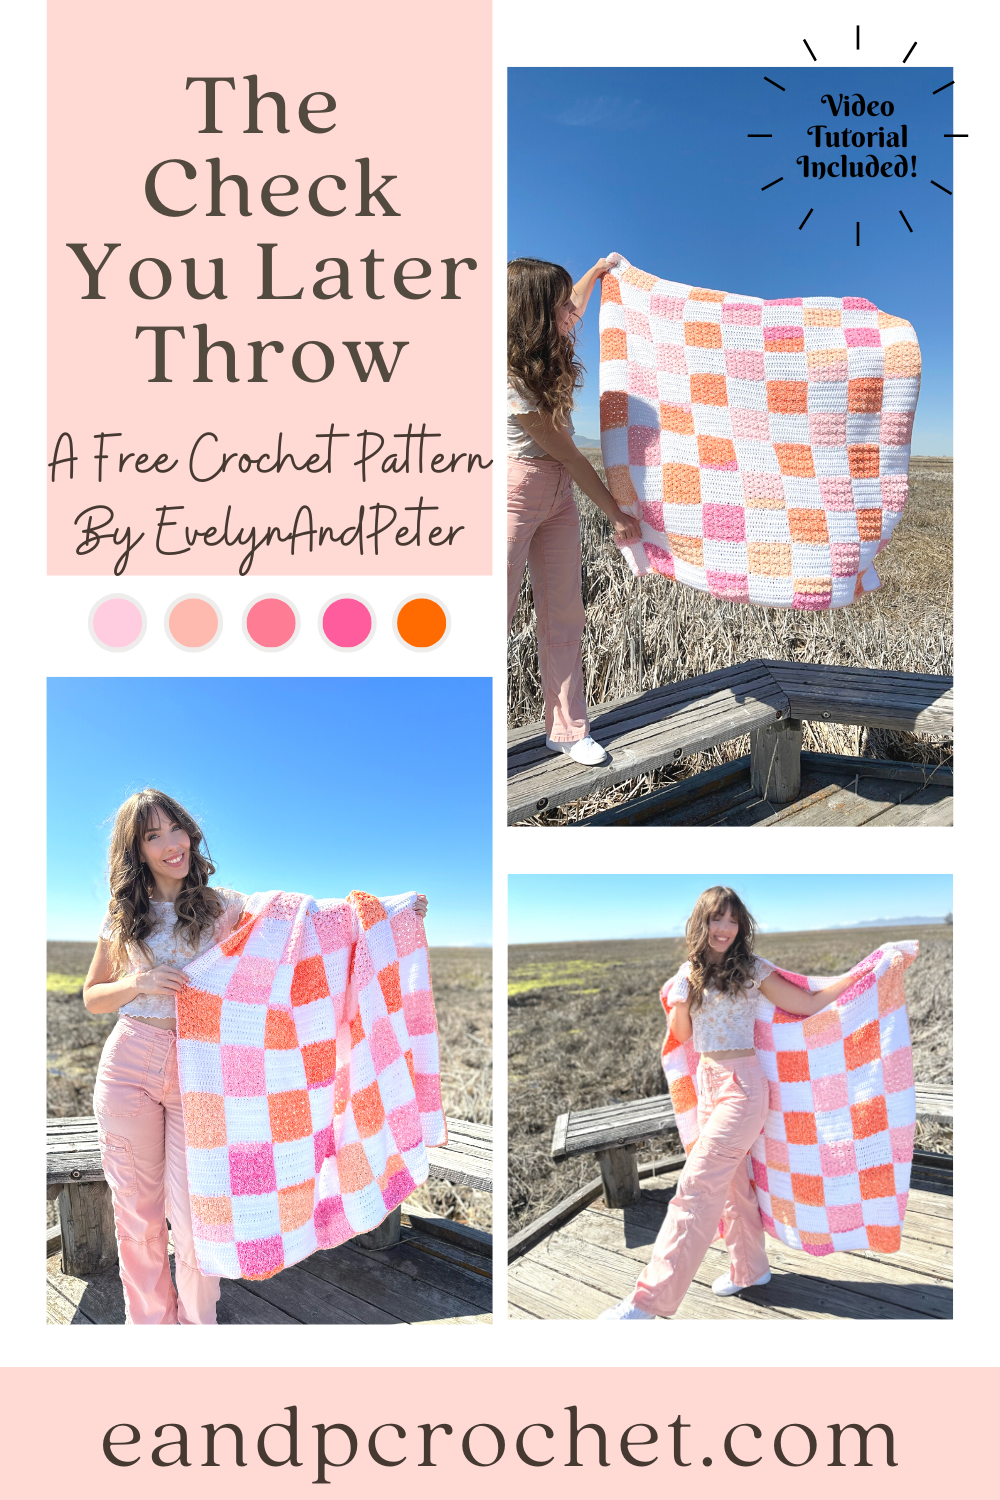
I don’t know about you but I’ve been seeing checkers everywhere this season! On shirts, shoes, hats, rugs, bags and of course, blankets!! I wanted to put my own spin on the trend and came up with The Check You Later Throw!
After testing out different ways to make a checkered design I finally settled on working it up in strips. I know doing separate squares is more time consuming and can be intimidating so I got rid of that idea. I swatched a bit with C2C but ultimately decided that there would be too many skeins of yarn going at once for the amount of squares I wanted. I also thought about working in rows but that would still require too many balls of yarn at once for me. I wanted something a bit easier for a beginner to do! After I did a test working it from the bottom up in separate strips I knew I found the winner!!
There are 2 separate strip patterns, Panel A and Panel B. You will be making 5 Panel A and 4 of Panel B. They are made from the bottom up. You will have to cut and join yarn each time you change colors for the squares but don’t worry! Tie the tails together in a secure knot. Then, you can crochet over the tails for less ends to weave. I only did this when changing from color B to Color A. I would work my Dc stitches over half the tail. Then after I was done I weaved them back the other way to make it extra secure. I did not crochet over the tails when making the Color B square. I found that because of the stitch I used it didn’t hide the tails well enough and you could see it peaking through. I save those to weave in at the end.
When I made my strips, I kept my colors in order as they came. I did not do any special cutting and rearranging of yarn colors. I worked my panels from let to right starting with the first Panel A and picked up each skein where I left off in the previous square. That does not mean you have to do the same though! You can join in your colors from the Mandala however you would like.
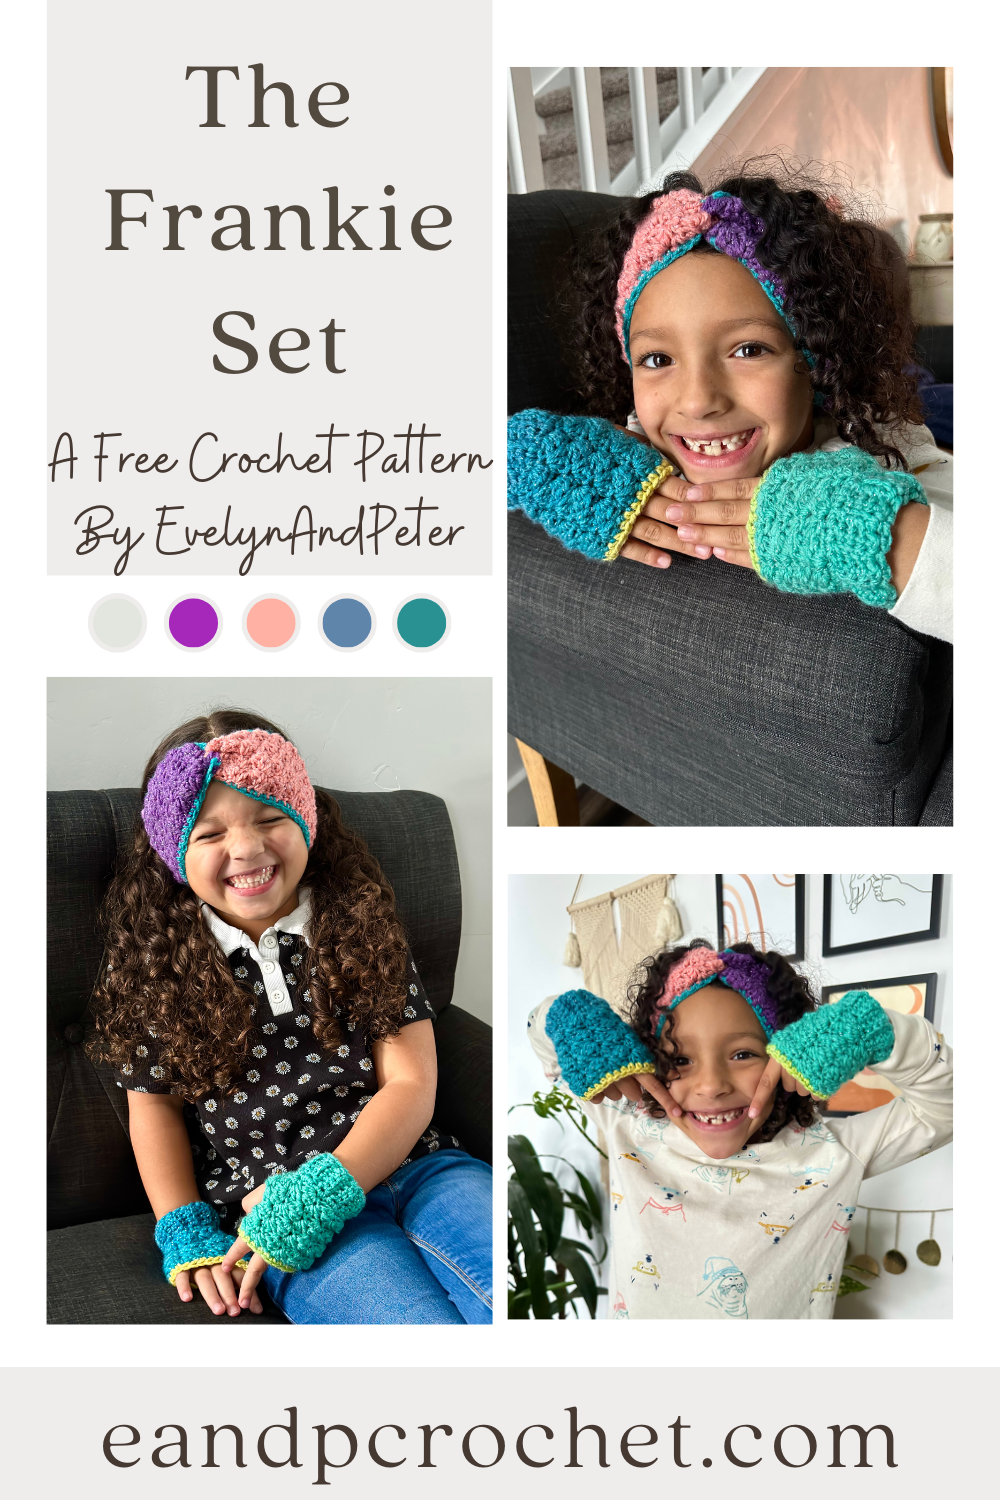
The girls have been begging for me to crochet them something with lots of bright, rainbow colors. Of course i’m going to oblige! I already knew a matching headband and fingerless mitt set would be super cute but I still had to hunt down the perfect yarn!
I decided to go to JOANN and check out the yarn because I knew it was currently the Yarnormous sale! Unless you are brand new to the yarn life, than you already know the Yarnormous sale that happens every year is THE best time to stock up on yarn!
I found a really pretty Mandala Sparkle yarn by Lion Brand and knew it would be perfect for this project! The color I picked was Serpents but they had a ton of different color combos to chose from. I absolutely had to get this color because it reminded me of Lisa Frank! Don’t you agree? I had so many Lisa Frank folders, stickers and pencils back in the day with fun crazy colors like this! I had to go with the name Frankie for this design! Haha
The best part about this project is using up the different colors in the cakes however you want. You can cut and join to arrange colors to your liking! I ended up with a purple and pink headband with matching green and blue mitts! I added some trim on to both the mitts and headband to give it even more color.
Make sure you head to YouTube for the full video tutorials! I have one available for the headband and one available for the fingerless mitts if you need some extra help!
You might recognize this stitch as the same one I used in The Kiah Cardigan and The Winter Moonlight Set! If you want adult size mittens, beanie and cardigan then be sure to check them out!
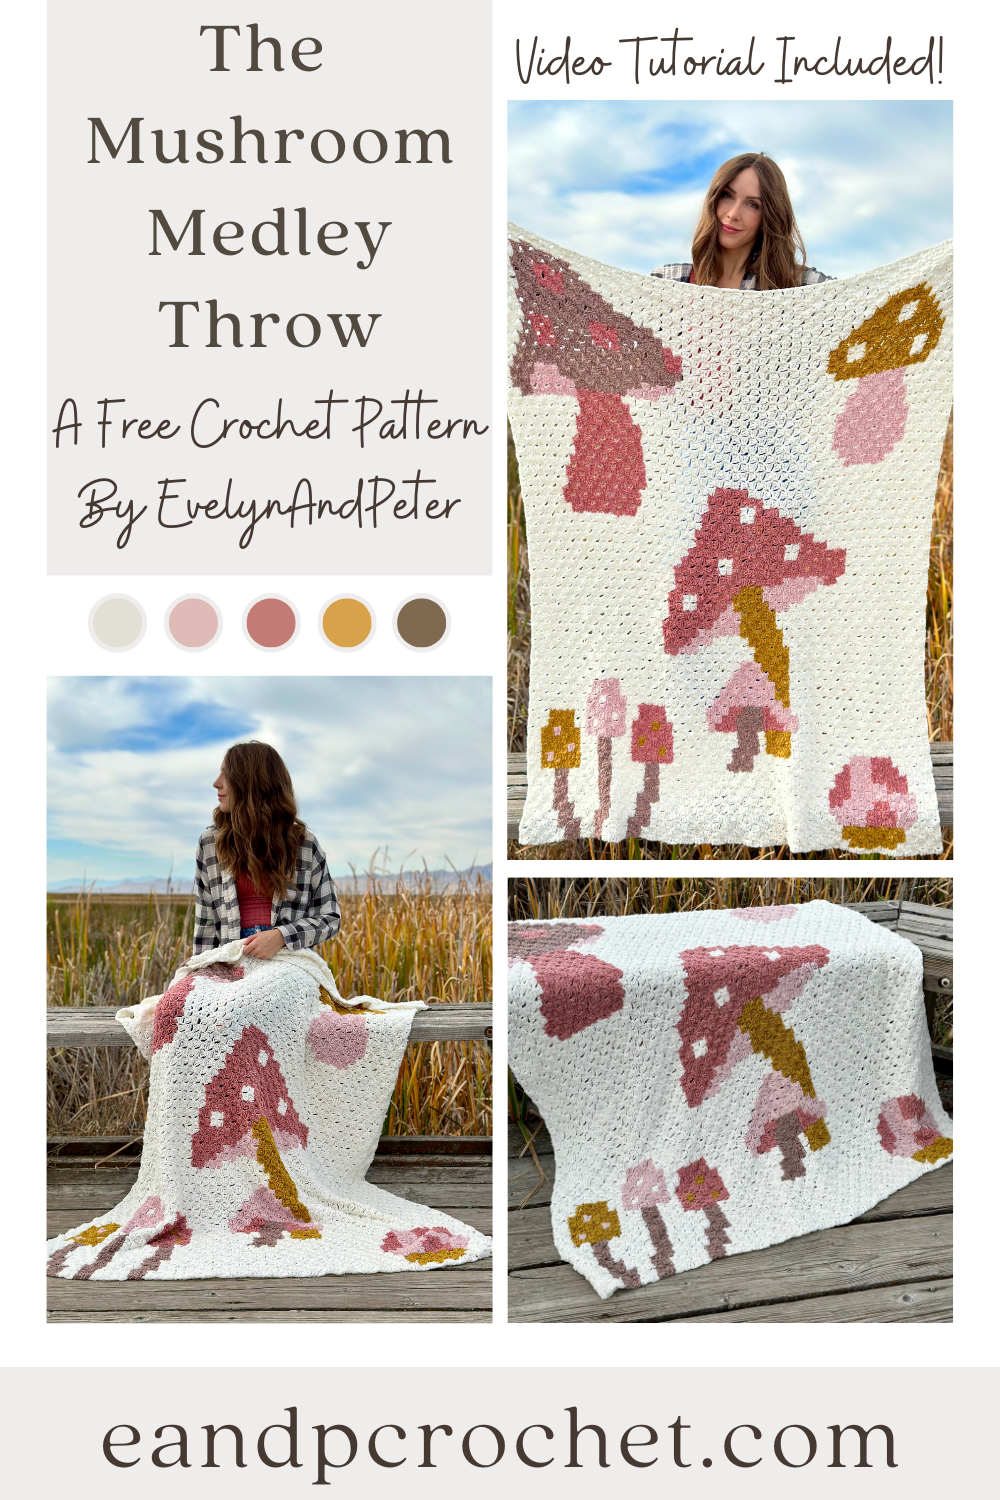
I know I’m not the only mushroom fan around here. If you’ve been to literally any store in the past year I’m sure you’ve seen cute little mushrooms on mugs, wall decor, pillows… I could go on and on! Who doesn’t love a cute whimsical mushroom?! The Mushroom Medley Throw is perfect to add to your mushroom collection or give to a mushroom fan! (how many times can I say mushroom haha)
If you guys have been following me for a while you know that I am a C2C crochet fan. I like to make at least 2 c2c crochet blankets every year. The Mushroom Medley Throw is my third this year! I designed The Daisy Day, The Squeeze The Day and now The Mushroom Medley! Be sure to check out all my other c2c patterns if you’re a fan too!
If you are new to C2C I recommend practicing with a smaller swatch before beginning a blanket! Once you understand how to make the basic squares it really is easy! You just repeat squares to grow your blanket, and decrease when you reach the corners!
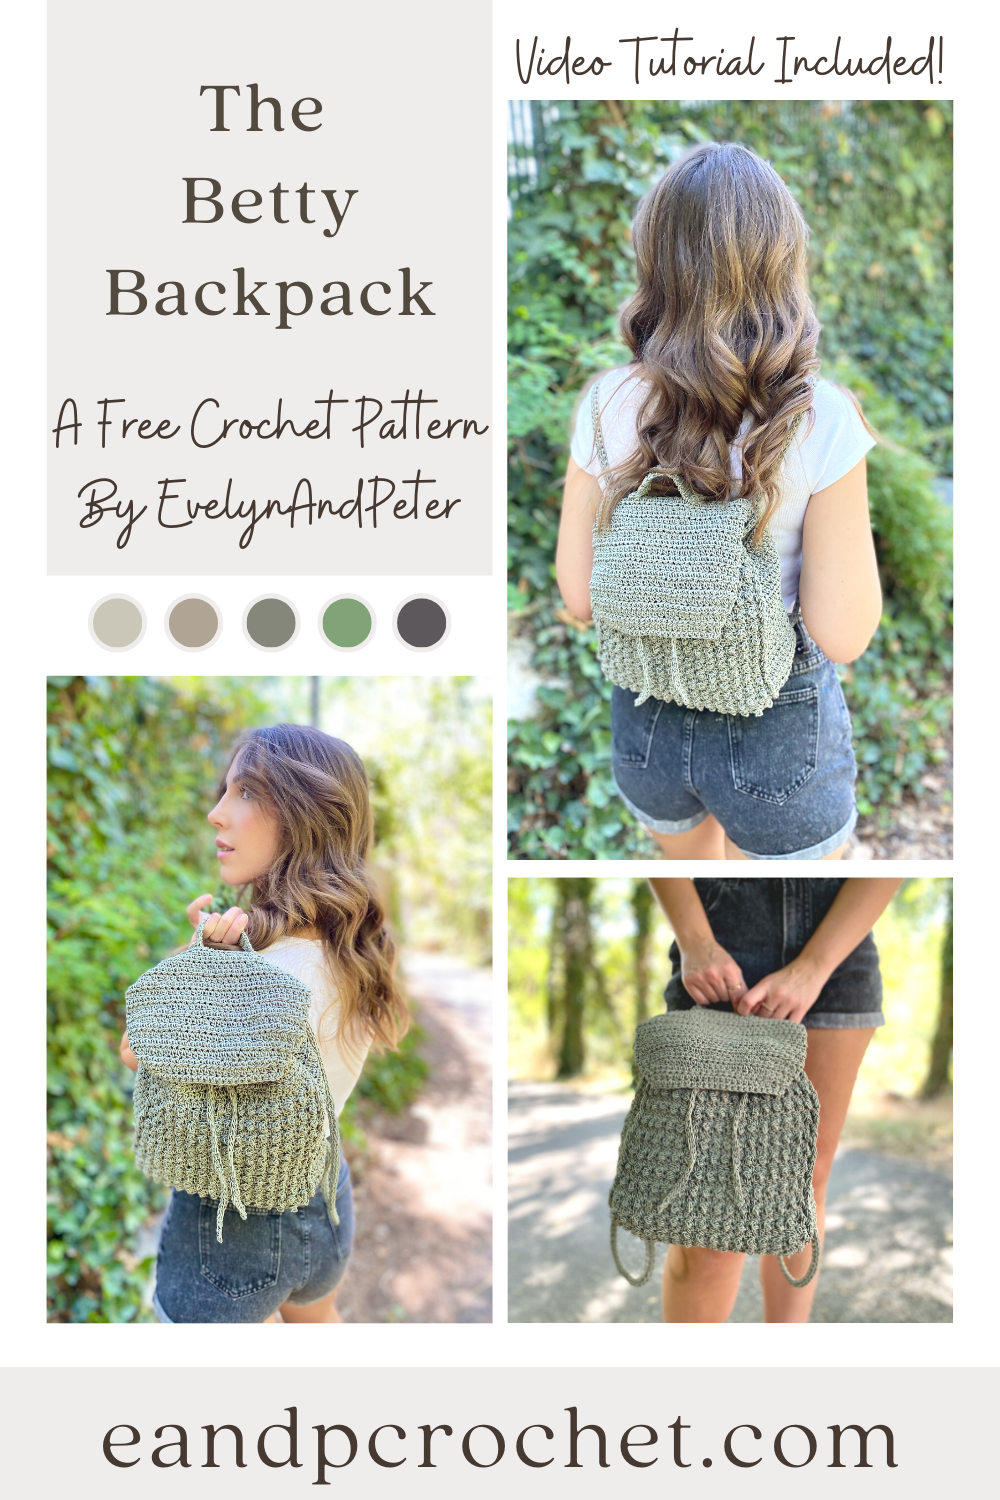
Have you tried out the new For The Home Cording by Lion Brand? I saw it and immediately knew I had to create some sort of bag with it. The Betty Backpack was the perfect outcome!
The Betty Backpack is worked flat and all in one piece! If you’ve made my Aspen Loop Bag, then you will be familiar with this construction. Once you get the main body of the backpack done, you fold it together and join on both sides. After that, you will add the upper trim in the round (don’t forget to join and turn!) and add the flap! Finally, the straps, drawstring and handle are added last.
The stitches used in this backpack are so simple but they create such a beautiful texture! You will use a combination of Hdc stitches throughout and alternating Tr/Sc stitches! Doesn’t it look like tiny puffs or bobbles? Well they aren’t! It’s just the Tr St being pushed to the front of your work! So simple and so cute.
I highly recommend using the yarn I used for this pattern or something similar. This is a cording yarn so it is very sturdy and has no stretch. It might feel a little strange and stiff to work with at first but I promise it’s worth it! If you don’t want to use a cording yarn then make sure you get a sturdy cotton or something with no stretch. The cording helps keep the shape of the backpack and is more secure for heavier weight.
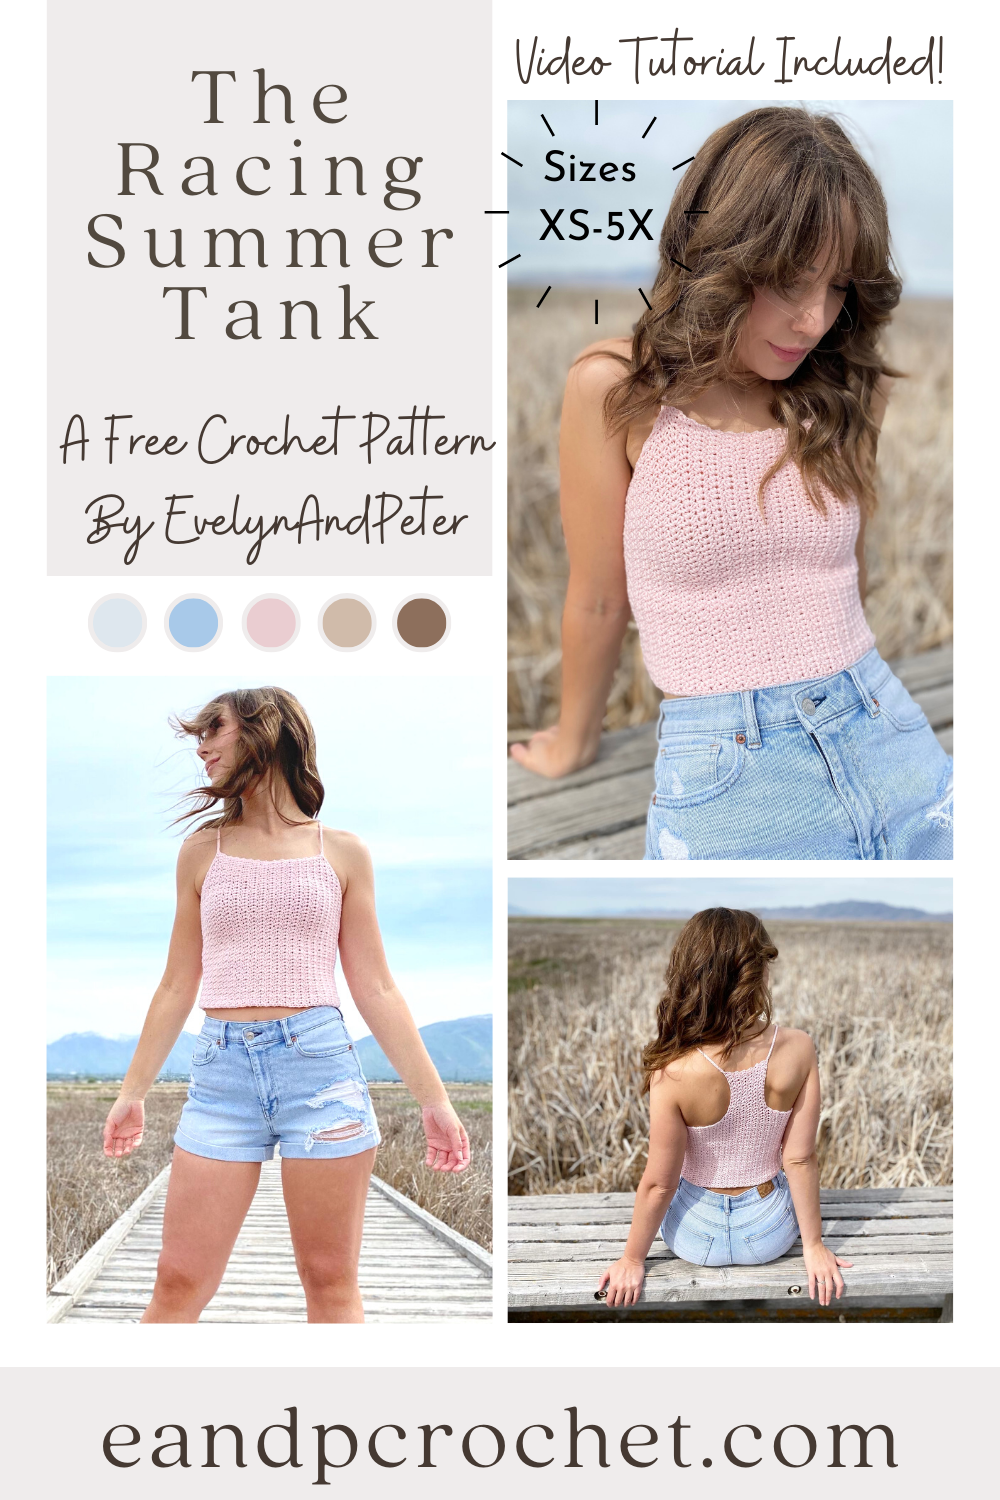
Summer is in full swing here and I knew I needed to design a comfy tank top to wear! The Racing Summer Tank crochet pattern is light weight, soft and quick to make! It has a cropped look to it but you can easily make it as long as you want! It’s racerback style on the back with spaghetti straps!
I used your typical single crochet V-St for this tank top. What’s a V Stitch? Sc, Ch 1, Sc all into the same space! You will work your V St into the V from the row below! Then just repeat throughout the pattern. Easy peasy. If you want a bit more length just repeat the V St row right before the shaping on the front panel. Be sure to add the same amount of rows to the back as well.
Pair it with some cute jean shorts or a long flowy skirt! The Coboo yarn I used comes in so many nice colors, so you have tons of options! Grabbing the kit from Lion Brand is such a good deal. Basically you are just paying for the yarn and you get the printable PDF for free! They usually have a sale or coupon code running so you can grab it even cheaper! Make sure you subscribe to my email newsletter, I frequently notify about these good deals!
Need a little bit of extra help? If you are more of a visual learner than be sure to check out my video tutorial! If you have a question about the racing summer tank crochet pattern, it will most likely be addressed in the video!