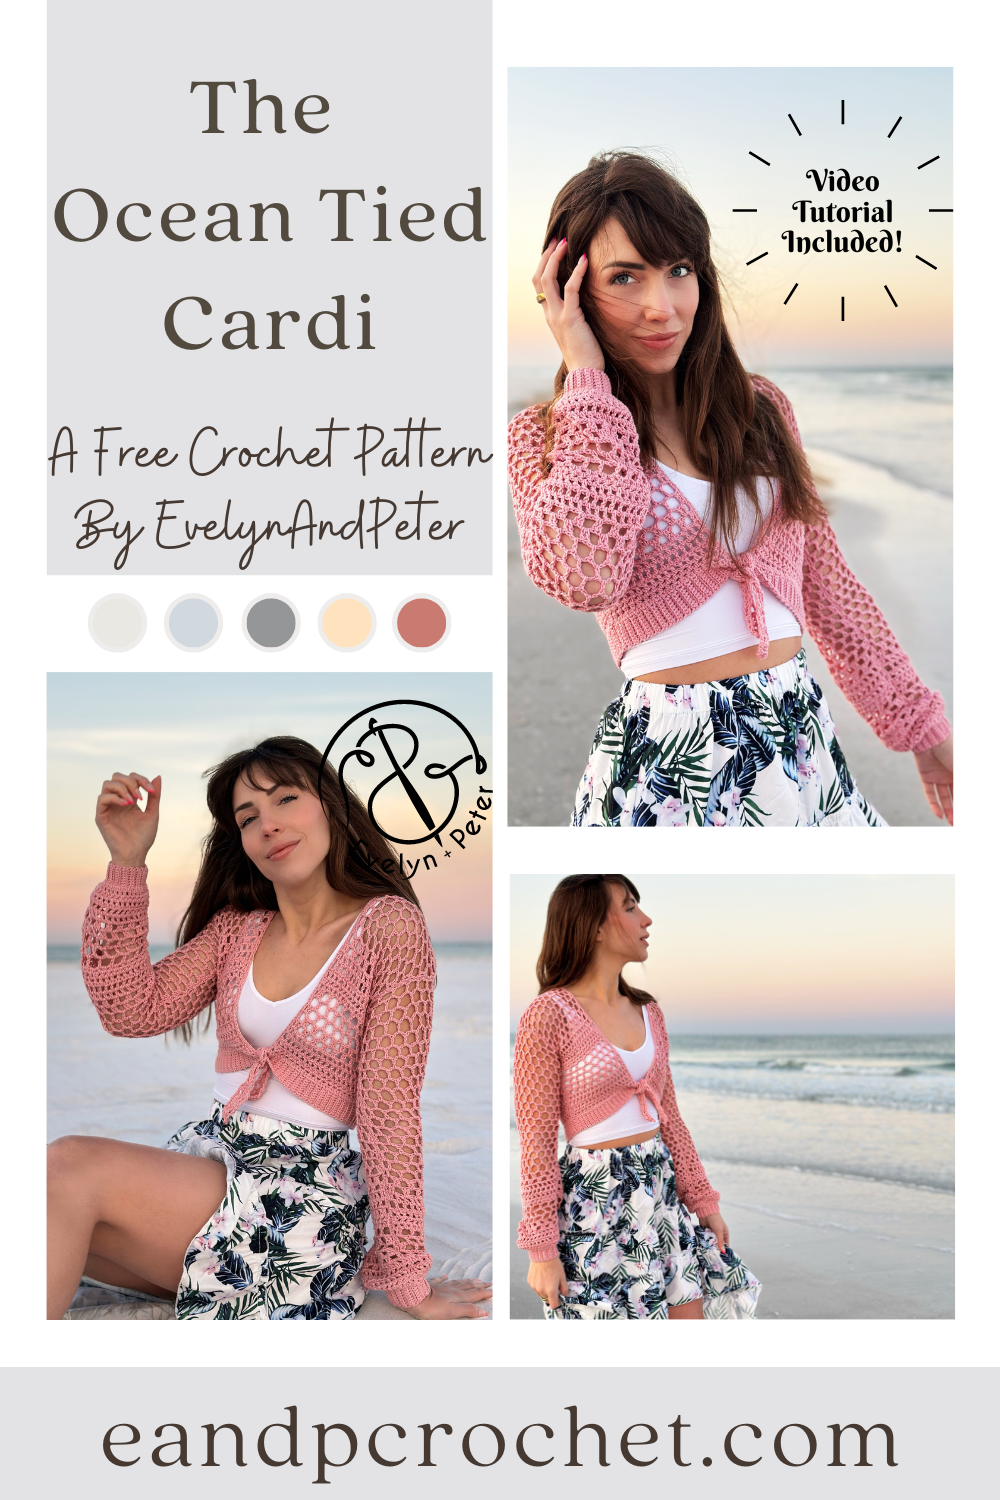
Once the sun starts shining and the blooms start to poke out I always get the urge to make a summer garment! I knew I wanted it to be meshy and airy as well as having a cute tie feature in the front. The Ocean Tied Cardi crochet pattern quickly came to life!
I played around with a bunch of different mesh stitches and decided to combine a whole bunch of them into one design! It actually came together pretty easily with very minimal swatching and frogging! It’s like it was meant to be. The majority of The Ocean Tied Cardi uses double crochet stitches and chains so it works up quickly. It’s also easily adjustable if you want yours longer or shorter. Just add or remove rows to the end of each panel before fastening off.
I think its sooo cute with the little tie in the front, it really makes the design in my opinion! However, if you want to keep it off and wear it as an open cardigan, then you can easily do that! Just add the final trim and don’t follow the instructions for the tie at the end.
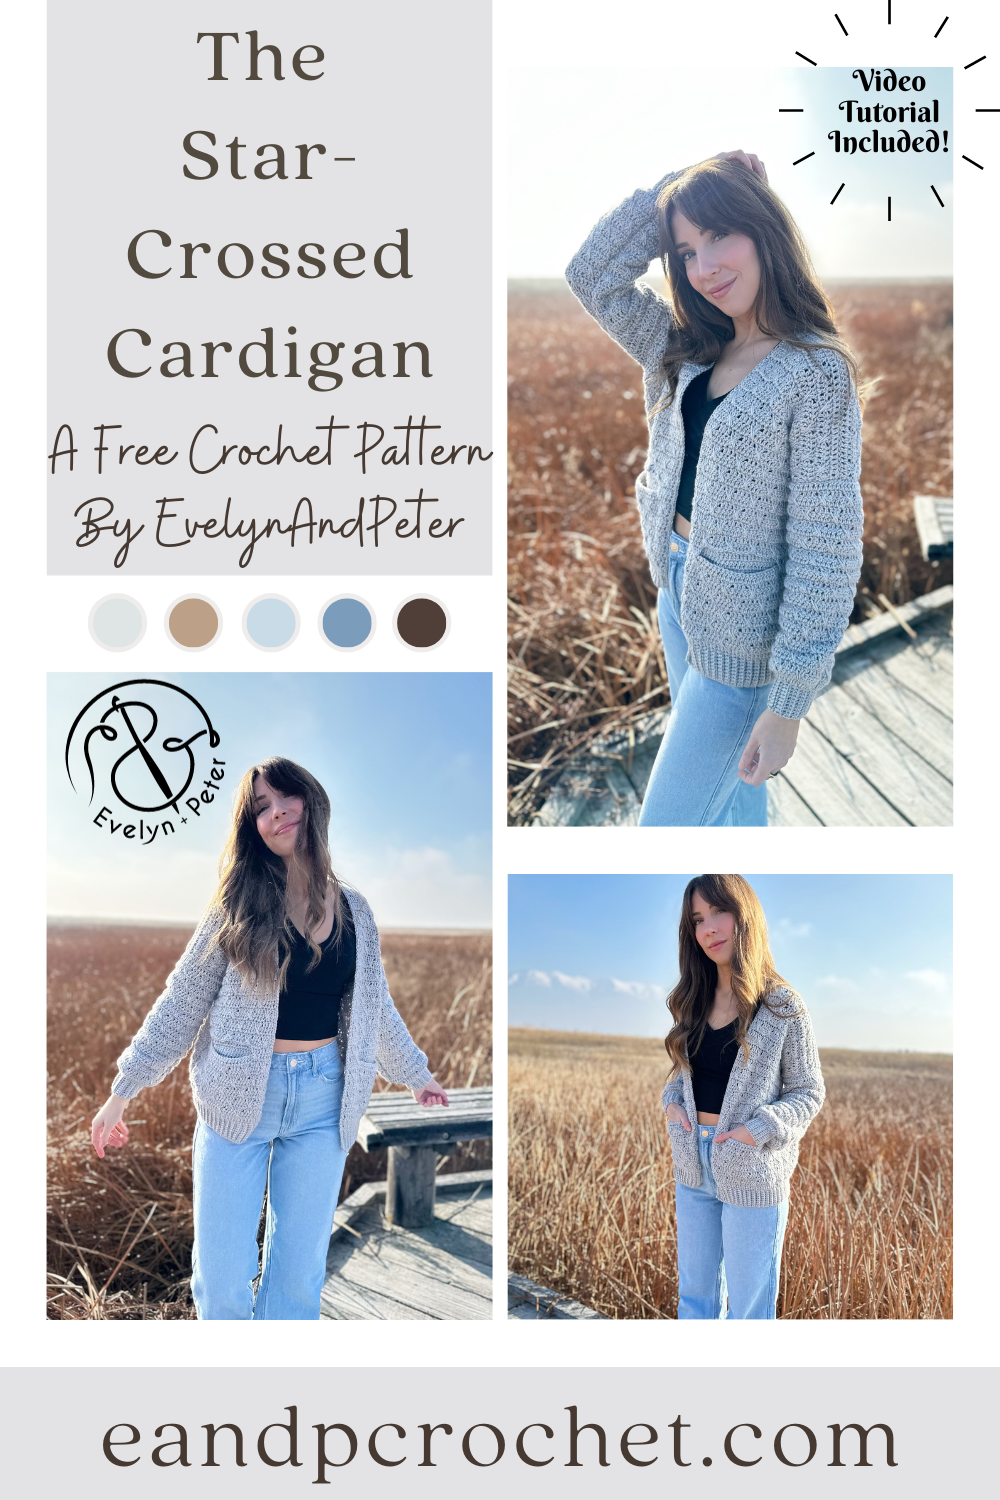
Let’s kick off the new year with a brand new crochet design, The Star-Crossed Cardigan Crochet Pattern! I wanted to start off strong with a cardigan design using Heartland yarn. You might remember my Stony Shore Cardigan and my Kiah Cardigan, both are very popular and well loved and both use Heartland yarn! I knew I needed something to add to the collection of my popular cardigans!
The Star-Crossed Cardigan crochet pattern is very beginner friendly and uses basic shapes. Once you nail the “double crosses spike” stitch you will work this cardigan up easy peasy! It’s basically a combination of all double crochet stitches with the ribbing using single crochet. You will work the panels from the bottom up and sew together.
Did you notice the Star-Crossed Cardigan crochet pattern has pockets?! The best part is that the pocket swatch is your gauge swatch. So feel free to jump ahead in the pattern and make a pocket swatch before starting. You will then use that swatch to measure 4×4″ within. Save it for later when you are required to seam to the inside of your cardigan!
I’m so excited to finally release The Wisteria Sweater! I finished this one several weeks ago and am so happy to get it out in the world! You can find the full written pattern below, along with links to the Lion Brand kit, video tutorial and printable PDF!
The front and back panels of The Wisteria Sweater are worked from the bottom up. Then, you will seam the sides and shoulders before attaching and working the sleeves top down. For a longer top, add more rows in multiples of 4 before you begin the underarm shaping. For longer or shorter sleeves, just add or remove more rounds before beginning the cuff! The great part about the sleeves being worked top down is you can try it on and adjust the sleeves before fastening off!
I used Lion Brand Re-spun yarn in the bonus bundle, color “blush”. You can find The Wisteria Sweater as a kit on the Lion Brand website, which comes with all the yarn needed to make your sweater plus a free copy of the ad-free printable PDF! You can also customize your yarn color.
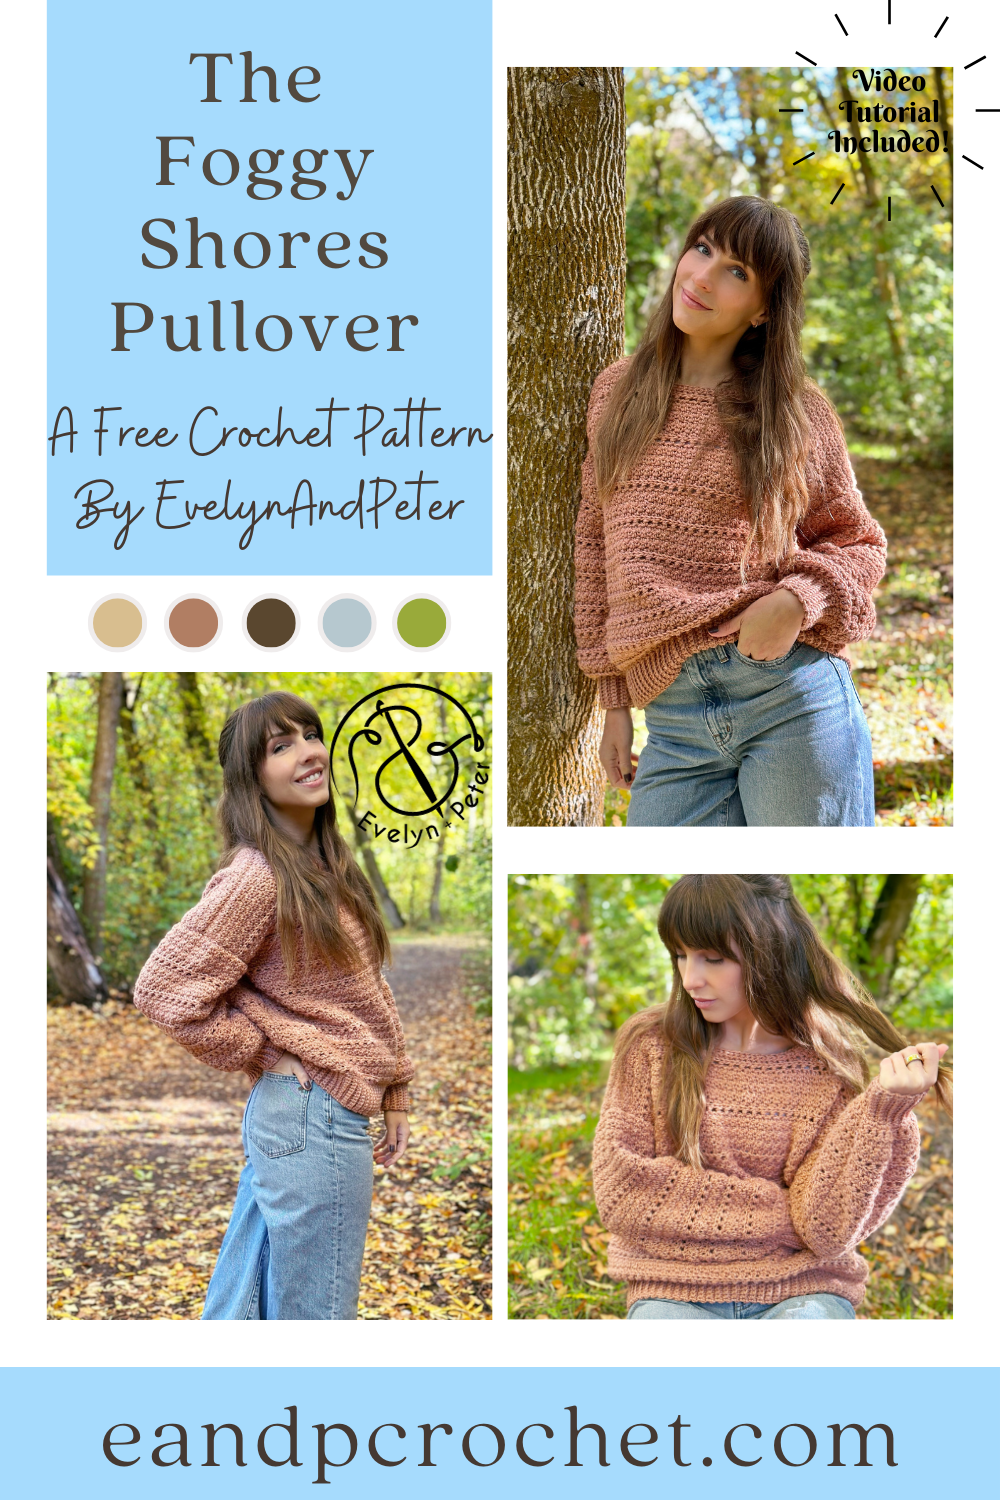
You know I wasn’t going to leave you hanging! The Foggy Shores Pullover crochet pattern is here! One of my biggest requests I get when I make a popular cardigan design is to make a pullover version or vice versa. So when I released The Foggy Shores Cardigan a couple weeks ago I already had the pullover ready and waiting!
I did use a different yarn for the pullover version, Lion Brands Basic Stitch Anti-Microbial! It has some really cute colors and was very easy to work with! This is an Anti-Allergen yarn which I thought was pretty cool. It has long-lasting freshness for your projects while preventing odor, bacteria and allergens. You can grab this yarn as part of the kit with Lion Brand! The kit comes with all the yarn you need to make your Foggy Shores Pullover plus a FREE copy of the printable PDF pattern! You can also swap out your yarn colors.
The Foggy Shores Pullover crochet pattern is worked in separate panels from the bottom up. You can easily adjust the length of your pullover by adding or removing rows to the front and back panel. If you made the cardigan than you should already have the easy row repeat memorized! You’ll be using a mix of lemon peel stitch and hdc stitches!
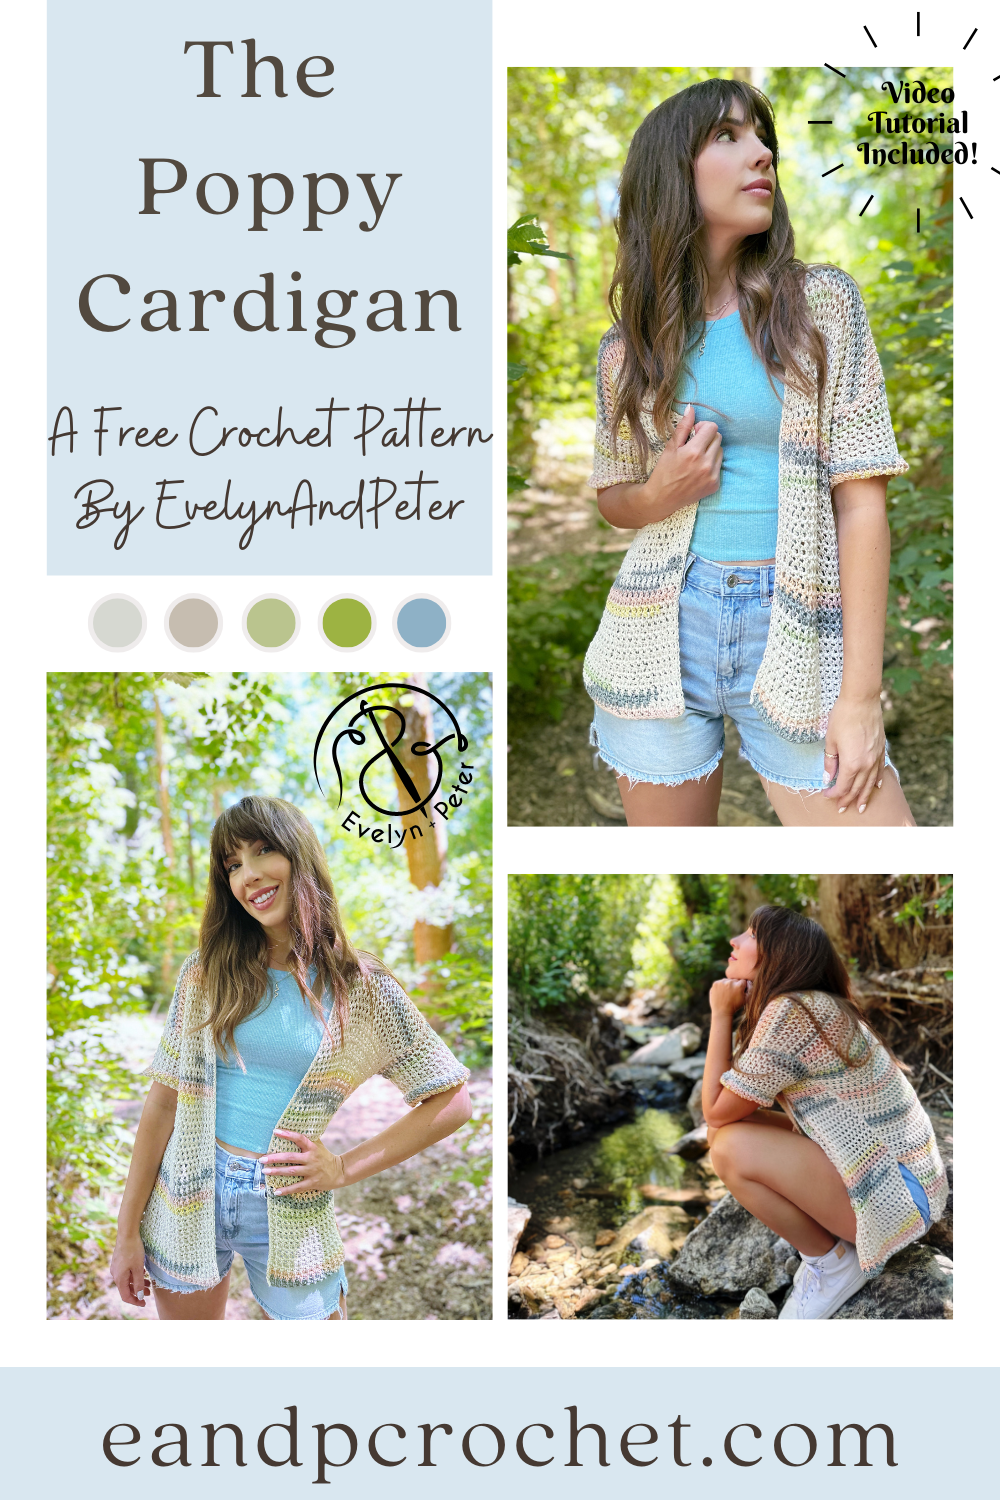
I couldn’t make a Poppy Pullover without making a Poppy Cardigan crochet pattern! The Poppy Pullover was a fan favorite and the Poppy Cardigan has the same design details so I hope you like this one too!
I used the same type of yarn for The Poppy Cardigan- 24/7 Cotton DK, except this time, I used the “prints” version instead of a solid color! I think the prints are so pretty and give it a little bit more pop of color and detail. I wasn’t sure how the yarn was going to work up with the distribution of color but I am loving the result! If you are more of a solid color kind of crocheter you can totally substitute out the yarn, they have lots of options! I used the Seaglass color for mine.
The Poppy Cardigan is worked up the same way as the pullover, from the bottom up. Again, we are using a larger hook than what you normally would use for a DK yarn to give it that loose, mesh look. When you are crocheting, make sure you don’t tug down too tightly on your stitches! If you are prone to a tight tension just make sure to pay attention to that. This is also a really stretchy stitch so when you wear the cardigan it will stretch and has great drape! Once all your panels are made you will give a light block ( I like to steam block mine) and sew together!
If you want to use the same yarn as me make sure you get the Lion Brand kit! It comes with a free copy of my printable pattern and you can choose your yarn color! They also frequently have very good sales! My Poppy Pullover is available on my blog here as well as a Lion Brand kit!
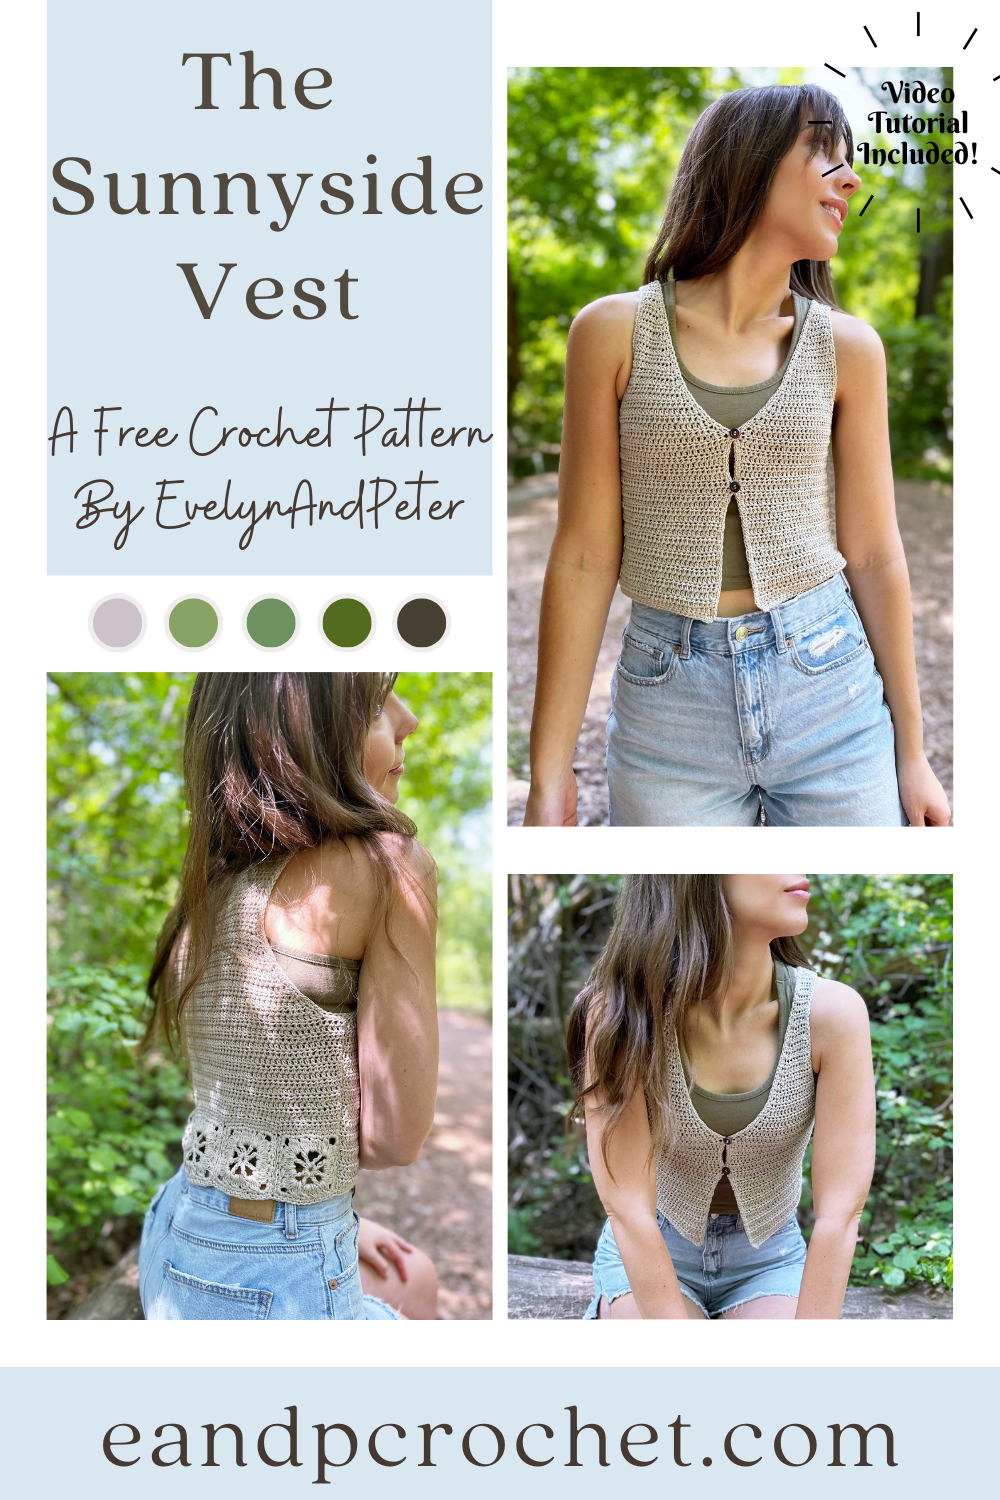
I’ve always wanted to crochet a cute little vest but I wanted to do something a little more unique than just all basic stitches. I knew I wanted to incorporate granny squares or motifs somehow after being inspired by a shower curtain with pretty motifs along the middle that reminded me of sunshine. That’s how we ended up with The Sunnyside Vest crochet pattern!
The Sunnyside Vest is worked in 3 separate panels after you get the motifs worked up. Each size will have a different amount of motifs along the back. Once you make all of your motifs you will join them together before finishing the back panel from the bottom up. The front panels are also worked from the bottom up before being joined at the shoulder and side seam.
I used Cotton Bamboo Linen yarn from Lion Brand which is a Fine (2) weight yarn. This is a newer yarn and has some lovely colors. I used Shale for my Sunnyside Vest crochet pattern. I loved the lightweight feel of this yarn and the fiber combo is perfect for a warm weather garment!
You will notice some of the sizes are combination sizes. This is due to the fact that it is a form fitting garment and the motifs along the back are all the same size. To find your size, just locate your bust size on the chart!
Usually I make a full video tutorial walkthrough for my designs. For this one I was not able to do a tutorial for the entire thing. I did make a video on how to make the motifs, join the motifs, and set up the first row for the back panel. In my opinion this might be the trickiest part for beginners so I wanted to make sure I provided a visual for you guys! After you are all set up it is just Hdc stitches throughout, with some decreasing and shaping! I had a very busy month when designing the Sunnyside Vest crochet pattern and my family was sick with the stomach bug for weeks. I hope you can forgive me for not having a full walkthrough but I am always available to help with pattern questions! Check out the video tutorial here!
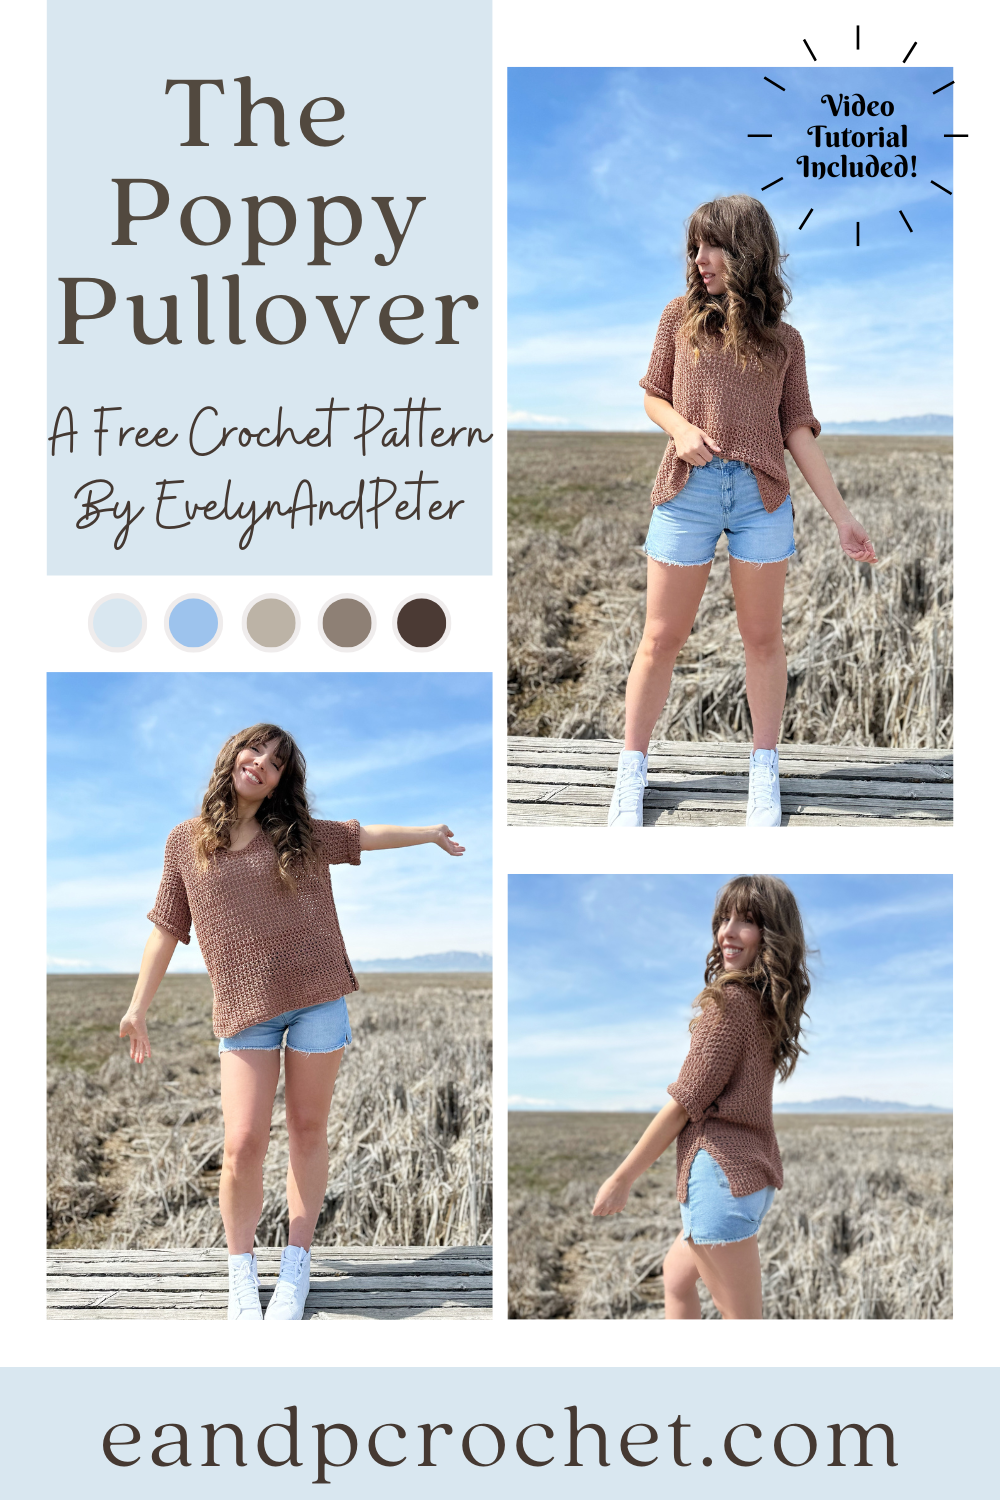
Did I just find my new favorite cotton yarn? I think I did. Be prepared for so many designs using this yarn because I am obsessed! My first make using this yarn is called The Poppy Pullover!
I used Lion Brand 24/7 cotton DK for the Poppy Pullover crochet pattern. Don’t get it confused with the worsted weight version! The DK weight is obviously thinner and much more soft. It had no splitting and no tangles as I crocheted. I’m absolutely in love with it! I used the color Cacao for mine but they have a lot of pretty choices.
The Poppy Pullover is crocheted in separate panels from the bottom up. You’ll be using a larger hook in comparison to the yarn to give it more of a mesh look. It’s important to not pull your stitches tight. You want a relaxed and even tension so you can give it the perfect drape. Feel free to go up in hook size if you normally have a tight tension and/or your gauge is off. Once you have all your panels complete you will sew them together.
The Poppy Pullover is easy to make adjustments to. You can add or takeaway as many rows as you want on the back panel to adjust the length. Just be sure to make the same adjustments on the front panel as well, right before you split the neckline.
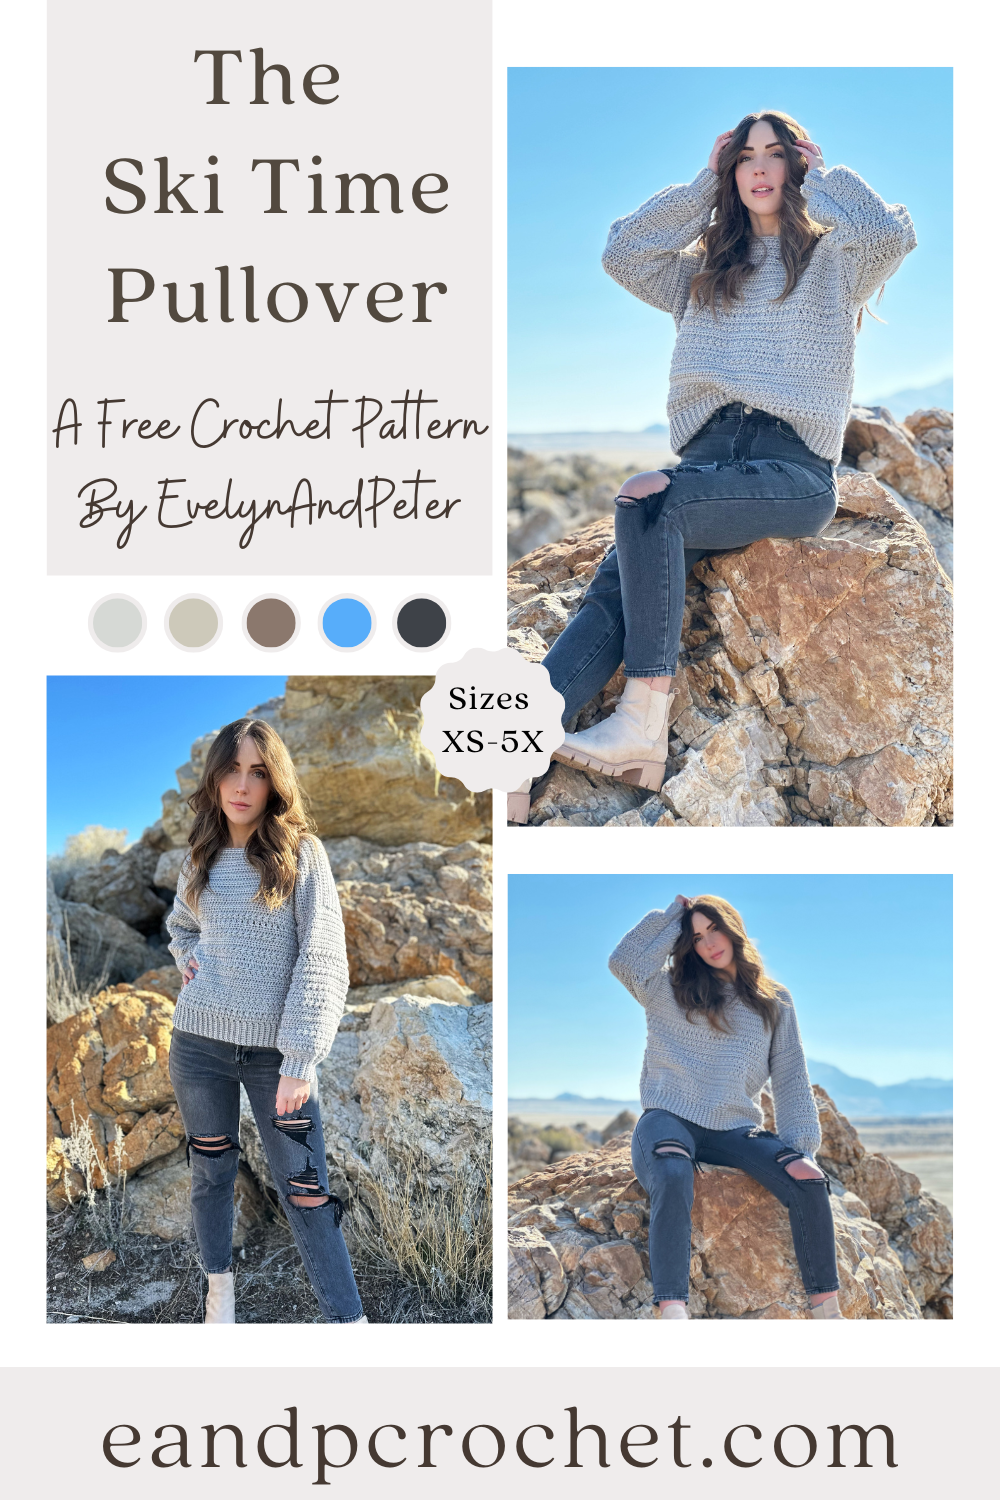
Which do you prefer… Teatime? Or Ski Time? The Ski Time Pullover is the sister design to The Teatime Cardigan! I decided to go with my same stitch pattern but wanted to make this one a solid color for a more subtle look! But…I do reallllly want to see someone make this one with different color stripes! I think it would be so cute!!
I used Heartland yarn for this design which is one of my favorite soft and cozy yarns. It’s the same yarn I used for The Stony Shore Cardigan and The Pemberly Pullover! Be sure to check them out if you want more heartland design! There are a ton of colors in Heartland to chose from and it’s really easy to work with. No snagging or catching on your hook and the sheen is beautiful! If you want a free copy of this PDF pattern and want to use Heartland yarn, then be sure to purchase my kit for the best deal!
The Ski Time Pullover is worked from the bottom up in separate panels. You can easily add more rows if you want a longer sweater! Just add as many rows as you want before the neckline shaping on the front panel, then add the same amount to the back! It’s also written with several inches of positive ease, so no need to size up. I’m wearing a size small in the photos!
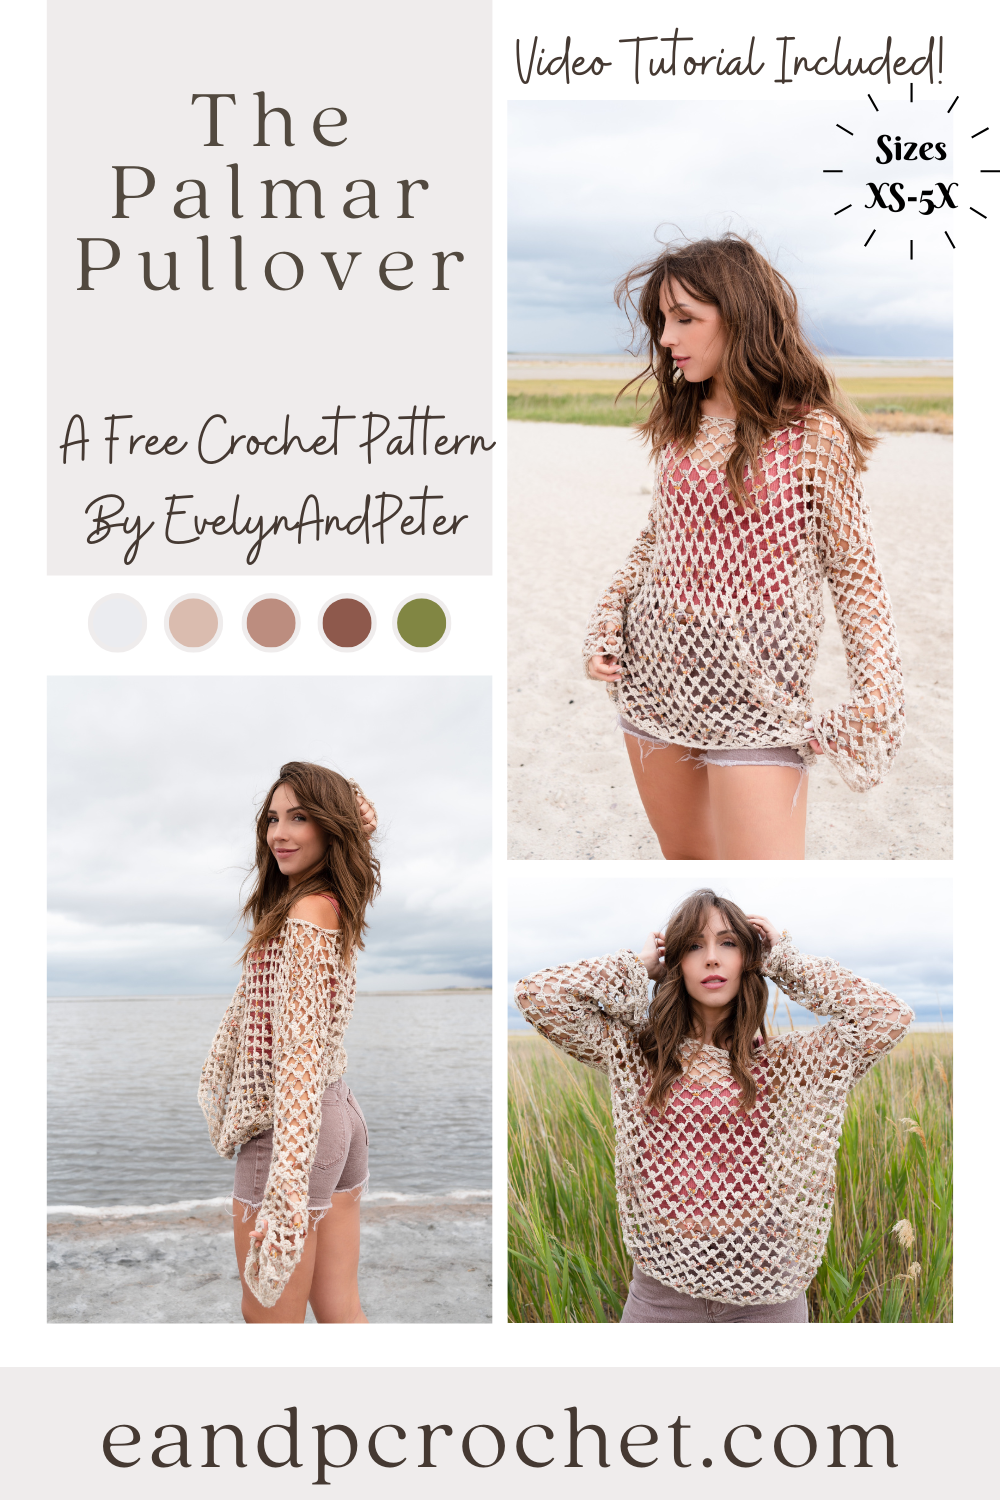
How are we already in this weird in between stage of summer and fall?! The end of summer is looming so that means my summer designs are also coming to an end. Luckily, The Palmar Pullover is perfect for this in between time!
The Picot Mesh stitch is one of my all time favorites for warmer makes! I think it’s one of yours too since The Zahora Cardigan was so loved! I used the Picot Mesh stitch for the Zahora and fell in love with the drape and comfy fit! After a few requests here and there for a pullover version I decided it was time to make one using Pima Cotton yarn! The Zahora used Lion Brand Comfy Cotton which is very similar to the Pima that I used here!
I wanted to give The Palmar Pullover a similar look to the Zahora with the speckled colors throughout a neutral base. Luckily, there is a few super cute options for the Pima yarn! I didn’t want it to be too overwhelming with color so I grabbed a neutral vintage and paired it with a colorful Seaglass! You might not even be able to see the striping, it’s so subtle! If you want to stick to solid stripes you can easily do that by picking 2 solid colors. Or, if you aren’t a fan of the stripes you can even make it in one solid color throughout! I definitely recommend grabbing the Lion Brand yarn kit so you can customize your look!
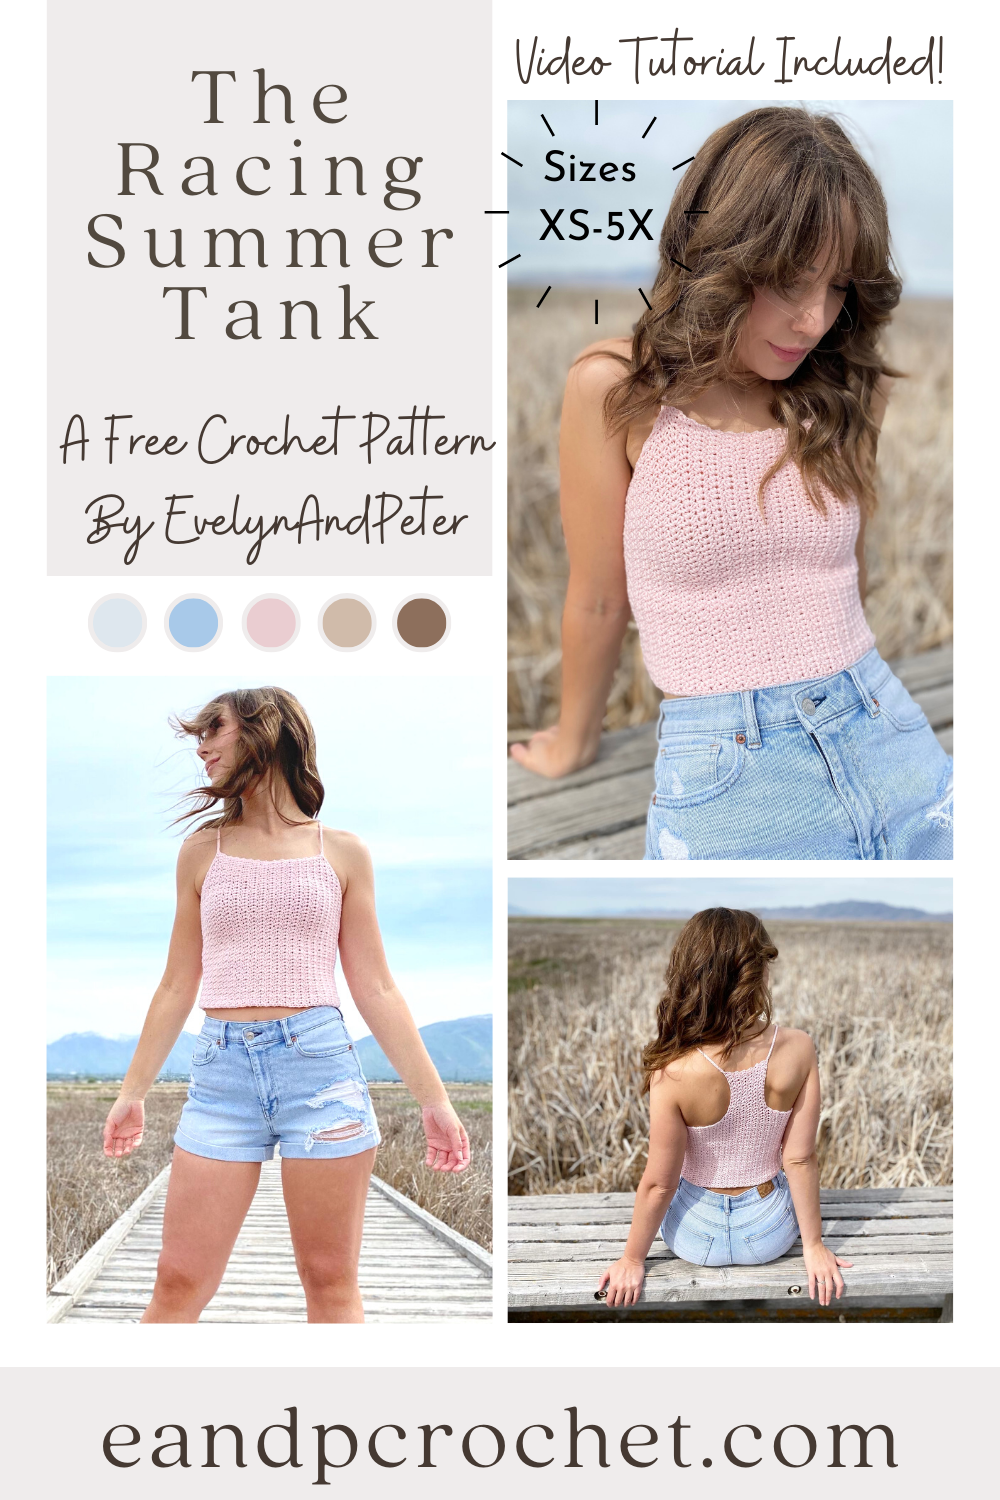
Summer is in full swing here and I knew I needed to design a comfy tank top to wear! The Racing Summer Tank crochet pattern is light weight, soft and quick to make! It has a cropped look to it but you can easily make it as long as you want! It’s racerback style on the back with spaghetti straps!
I used your typical single crochet V-St for this tank top. What’s a V Stitch? Sc, Ch 1, Sc all into the same space! You will work your V St into the V from the row below! Then just repeat throughout the pattern. Easy peasy. If you want a bit more length just repeat the V St row right before the shaping on the front panel. Be sure to add the same amount of rows to the back as well.
Pair it with some cute jean shorts or a long flowy skirt! The Coboo yarn I used comes in so many nice colors, so you have tons of options! Grabbing the kit from Lion Brand is such a good deal. Basically you are just paying for the yarn and you get the printable PDF for free! They usually have a sale or coupon code running so you can grab it even cheaper! Make sure you subscribe to my email newsletter, I frequently notify about these good deals!
Need a little bit of extra help? If you are more of a visual learner than be sure to check out my video tutorial! If you have a question about the racing summer tank crochet pattern, it will most likely be addressed in the video!