search results for
cardigan
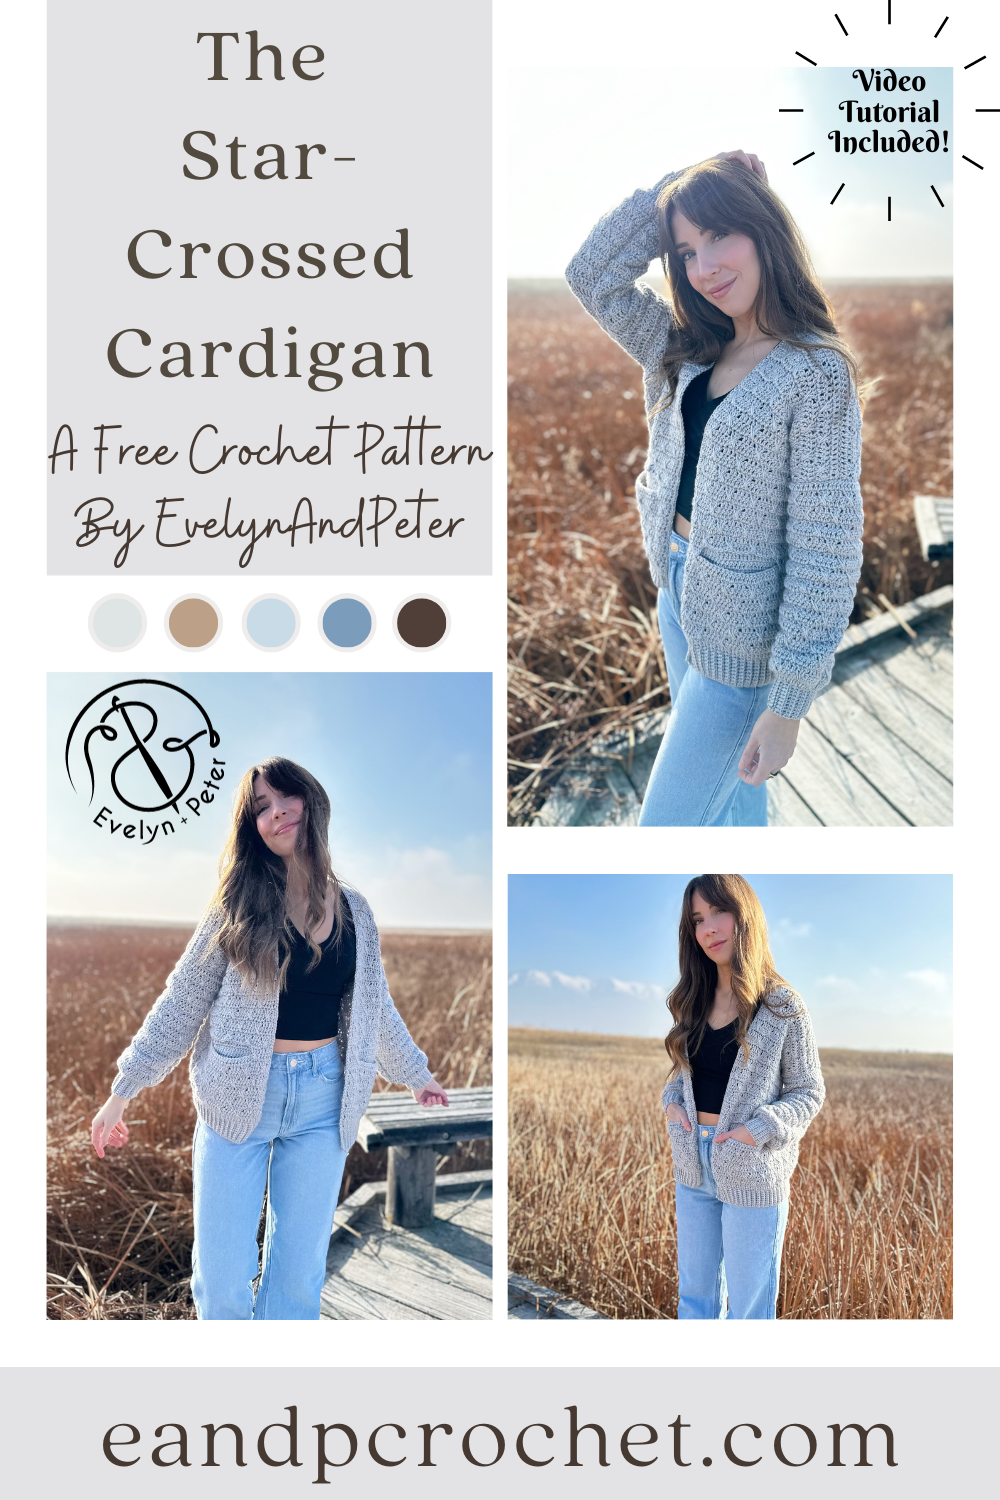
Let’s kick off the new year with a brand new crochet design, The Star-Crossed Cardigan Crochet Pattern! I wanted to start off strong with a cardigan design using Heartland yarn. You might remember my Stony Shore Cardigan and my Kiah Cardigan, both are very popular and well loved and both use Heartland yarn! I knew I needed something to add to the collection of my popular cardigans!
The Star-Crossed Cardigan crochet pattern is very beginner friendly and uses basic shapes. Once you nail the “double crosses spike” stitch you will work this cardigan up easy peasy! It’s basically a combination of all double crochet stitches with the ribbing using single crochet. You will work the panels from the bottom up and sew together.
Did you notice the Star-Crossed Cardigan crochet pattern has pockets?! The best part is that the pocket swatch is your gauge swatch. So feel free to jump ahead in the pattern and make a pocket swatch before starting. You will then use that swatch to measure 4×4″ within. Save it for later when you are required to seam to the inside of your cardigan!
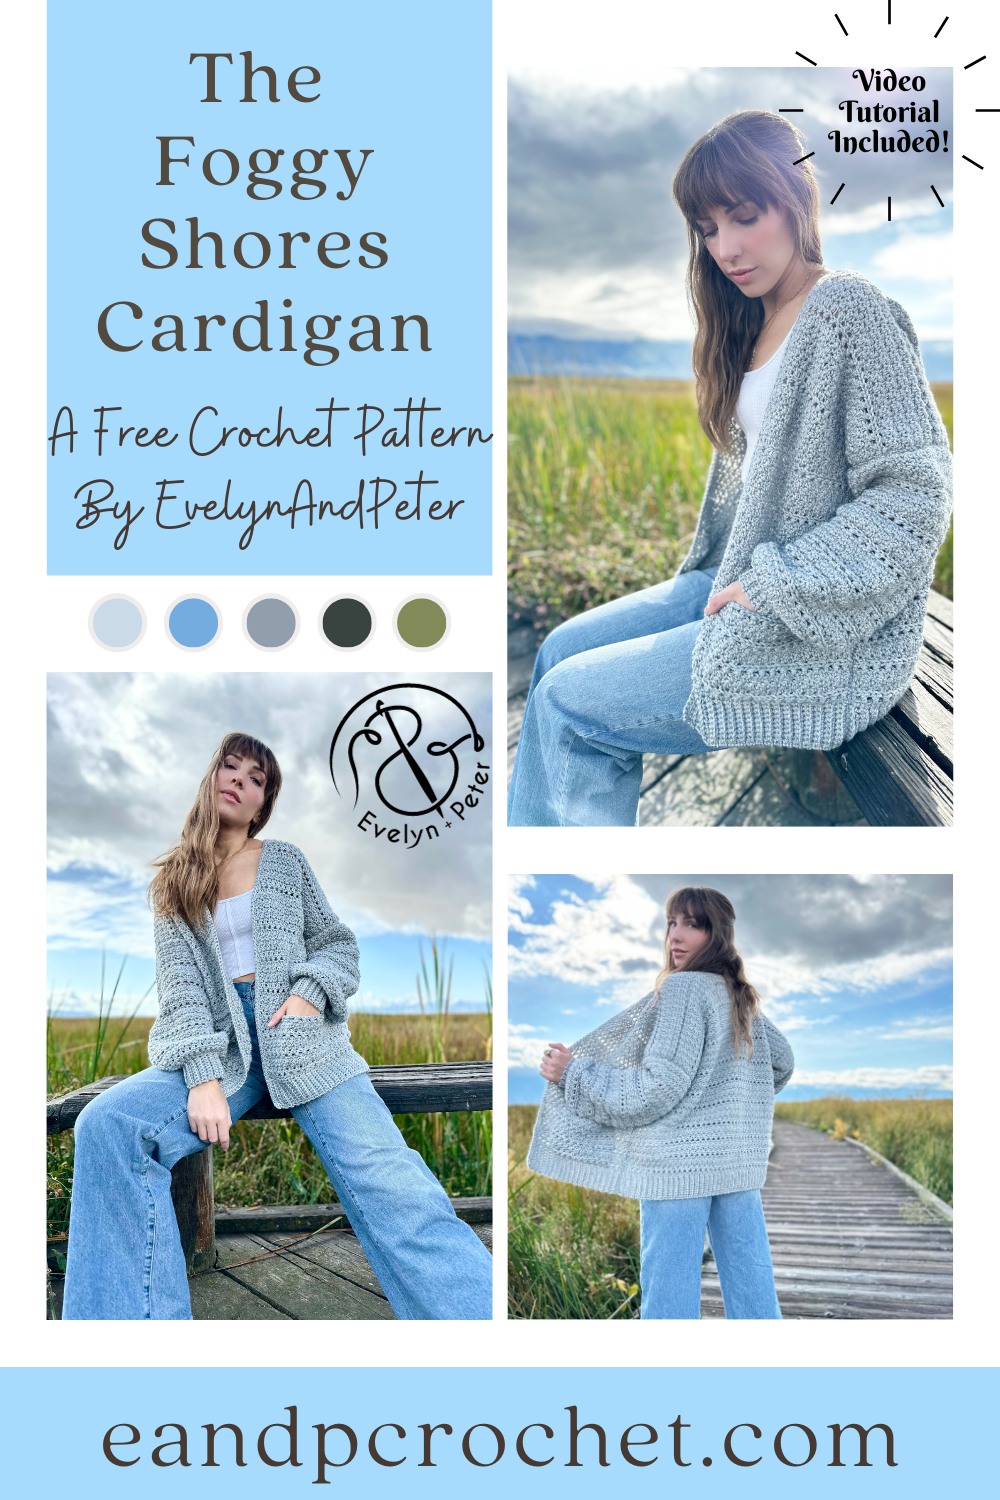
I had to sneak in one more crochet cardigan using Heartland yarn before the end of the year! The Foggy Shores Cardigan crochet pattern turned out exactly how I wanted. I love the style of my Stony Shore Cardigan and Kiah Cardigan and I think you guys do too! I wanted to keep the style similar but decided I needed something a bit more oversized and cozy! I think The Foggy Shores Cardigan is the perfect addition to my Heartland collection!
The Foggy Shores Cardigan is worked from the bottom up and is easily customizable. It has cozy pockets worked into the front panels. You can easily skip this part if you want if you prefer no pockets! Instead of working the chain length, just continue across the row with your regular stitch repeat. If you prefer your cardigan longer or shorter just add or remove rows to both the back and front panels until its the length you desire. If you don’t want your cardigan as oversized you can follow a size smaller than you normally would!
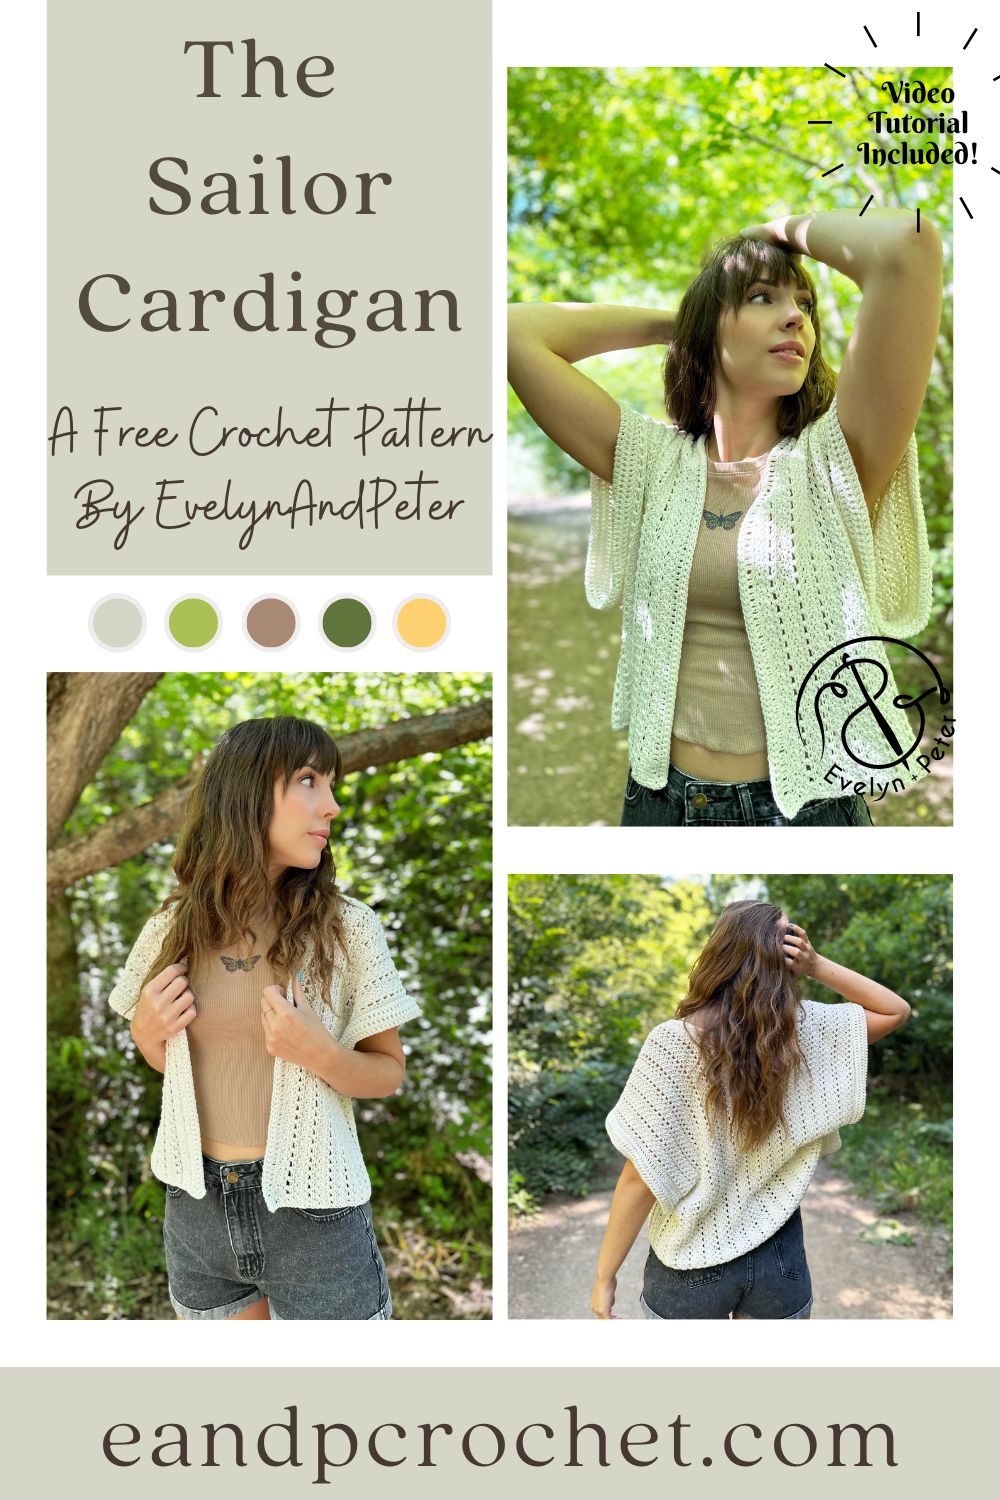
You already know I had to make ONE more summer design before the chilly weather arrives. The great thing about The Sailor Cardigan is that it’s perfect for layering! Toss it on while in the office or better yet, while relaxing out on a boat in the ocean with the cool breeze blowing in your hair…one can dream right?!
My favorite thing about The Sailor Cardigan is that it is made from side to side! It only requires one tiny section of seaming on each side of the cardigan. The vertical rows give it a really pretty striped look. The sleeves are super oversized, they remind me of a sail! See what I did there? haha!
If you are a beginner and need a little extra help or you just prefer a visual, be sure to check out my video tutorial on YouTube! I’ll walk you through step by step on how to crochet your Sailor Cardigan.
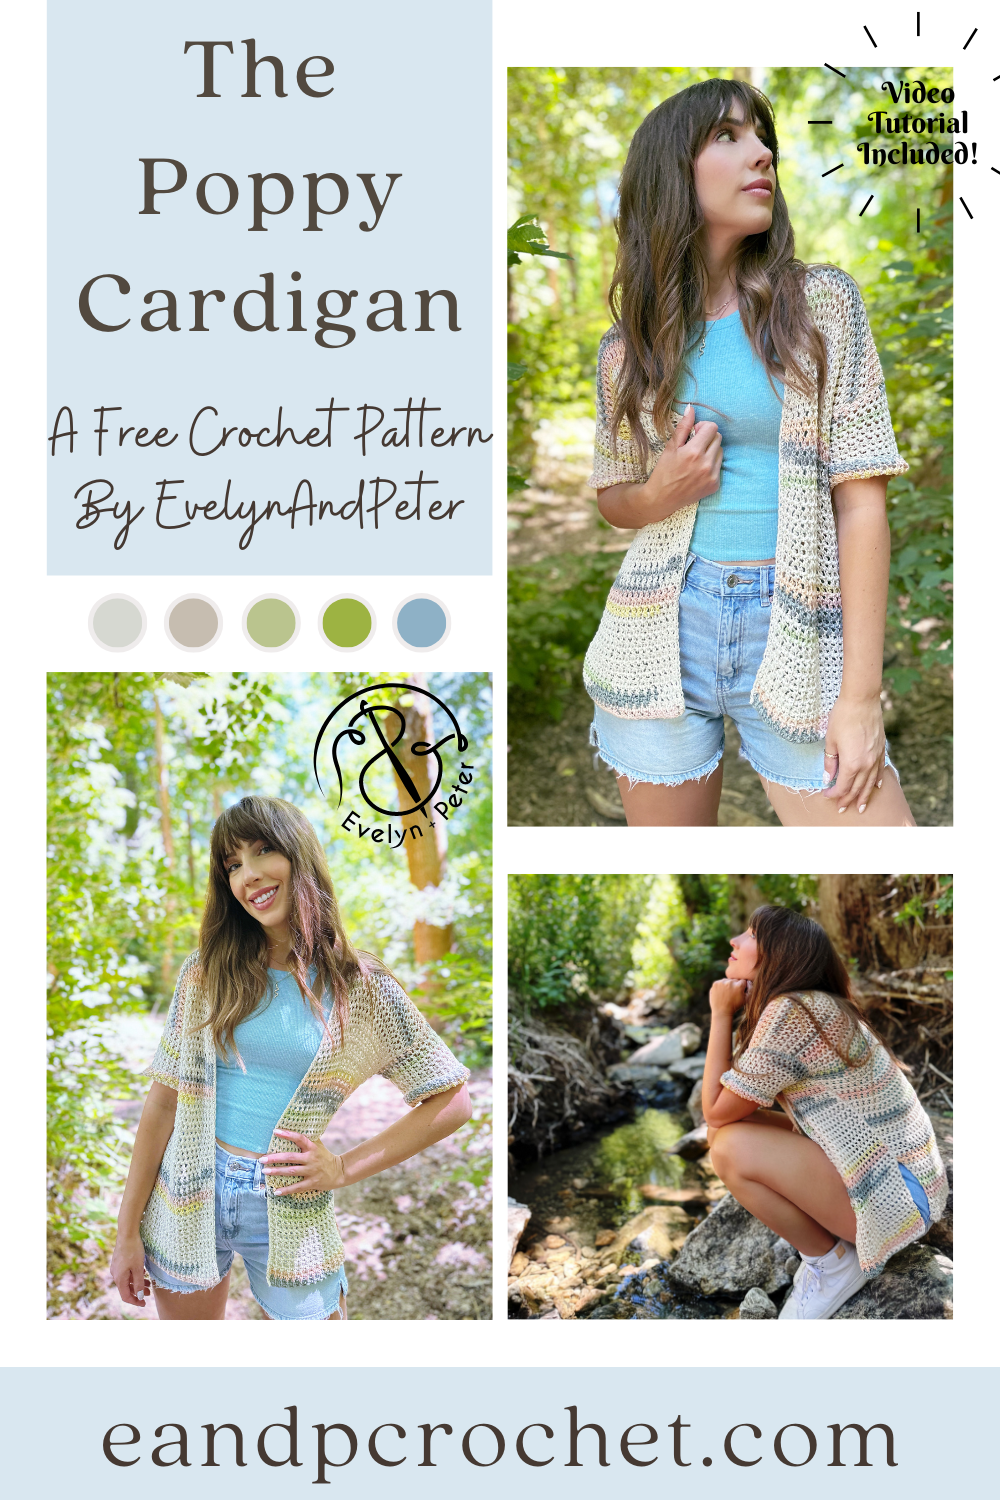
I couldn’t make a Poppy Pullover without making a Poppy Cardigan crochet pattern! The Poppy Pullover was a fan favorite and the Poppy Cardigan has the same design details so I hope you like this one too!
I used the same type of yarn for The Poppy Cardigan- 24/7 Cotton DK, except this time, I used the “prints” version instead of a solid color! I think the prints are so pretty and give it a little bit more pop of color and detail. I wasn’t sure how the yarn was going to work up with the distribution of color but I am loving the result! If you are more of a solid color kind of crocheter you can totally substitute out the yarn, they have lots of options! I used the Seaglass color for mine.
The Poppy Cardigan is worked up the same way as the pullover, from the bottom up. Again, we are using a larger hook than what you normally would use for a DK yarn to give it that loose, mesh look. When you are crocheting, make sure you don’t tug down too tightly on your stitches! If you are prone to a tight tension just make sure to pay attention to that. This is also a really stretchy stitch so when you wear the cardigan it will stretch and has great drape! Once all your panels are made you will give a light block ( I like to steam block mine) and sew together!
If you want to use the same yarn as me make sure you get the Lion Brand kit! It comes with a free copy of my printable pattern and you can choose your yarn color! They also frequently have very good sales! My Poppy Pullover is available on my blog here as well as a Lion Brand kit!
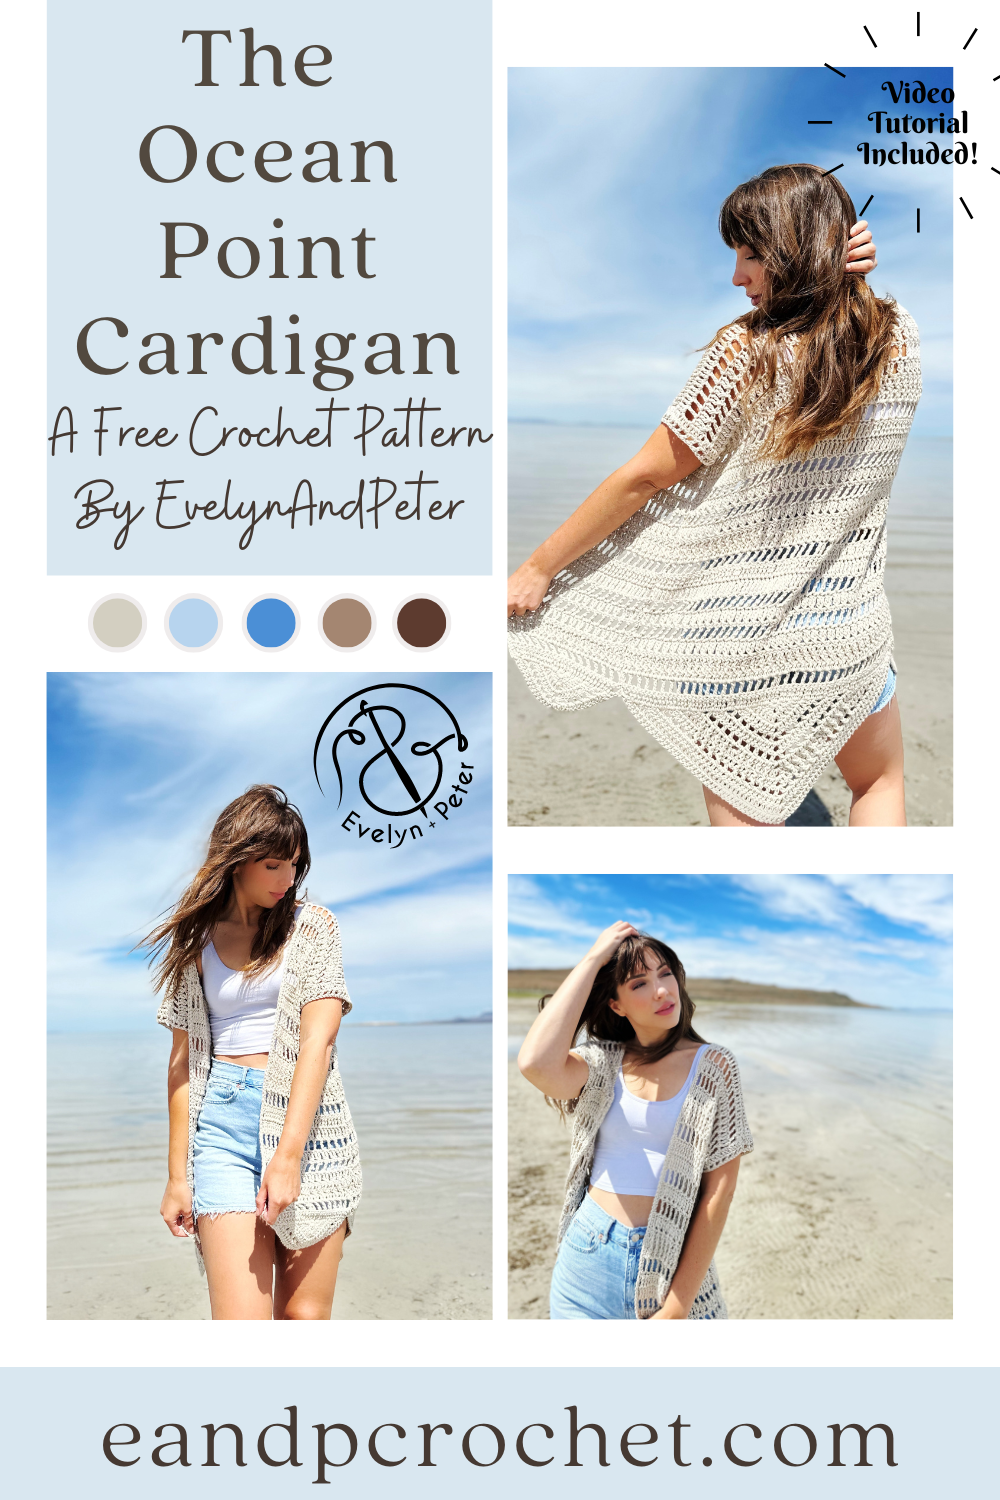
Are you nose deep in summer crochet patterns right now like I am?! Can I add another one to your “must make list”? Summer crochet patterns have always been one of my favorite things to spend time on. There is just something about the open stitches, the cotton yarn and also the fact that you don’t have to make long sleeves! haha! Summer makes usually work up quickly just like my new cardigan design, The Ocean Point Cardigan crochet pattern!
Is it weird that I have never designed a triangle shawl before? I have definitely crocheted a few in the past but never designed my own! I have been wanting to lately but I did not want to make a shawl in the middle of summer! I got the idea to somehow incorporate the shape of a triangle shawl into a cardigan and I am SO glad I did!! After a lot of math and a little bit of frogging I finally came up with the final result!
To create The Ocean Point Cardigan crochet pattern you start at the bottom, creating the triangle shape. If you are familiar with triangle shawls you will have no problem jumping right in. Once you have the triangle complete, you will rotate your work and create the first row of the main body into the ends of the rows you made in the triangle. After you get set up it’s just row repeats with no more shaping there on out! I used tall stitches like double crochet, treble crochet, and treble X St. There is also plenty of Ch 1 Sk 1 sprinkled in for an airy and lacy feel.
Because of the very specific St count and math going on in this cardigan there are 3 separate combo sizes written in the pattern. This cardigan is oversized and has a loose, flowy fit. Each size provided can fit a wide range of body shapes and sizes! To find your size, just locate your bust size on the size chart.
I used a worsted weight yarn for The Ocean Point Cardigan pattern- Pima Cotton from Lion Brand. This is a very soft cotton yarn! I have no trouble with this yarn. It works up beautifully and does not split or snag if you have to frog! They have lots of pretty colors available as well. If you end up purchasing the kit, you can swap out the color if you want to!
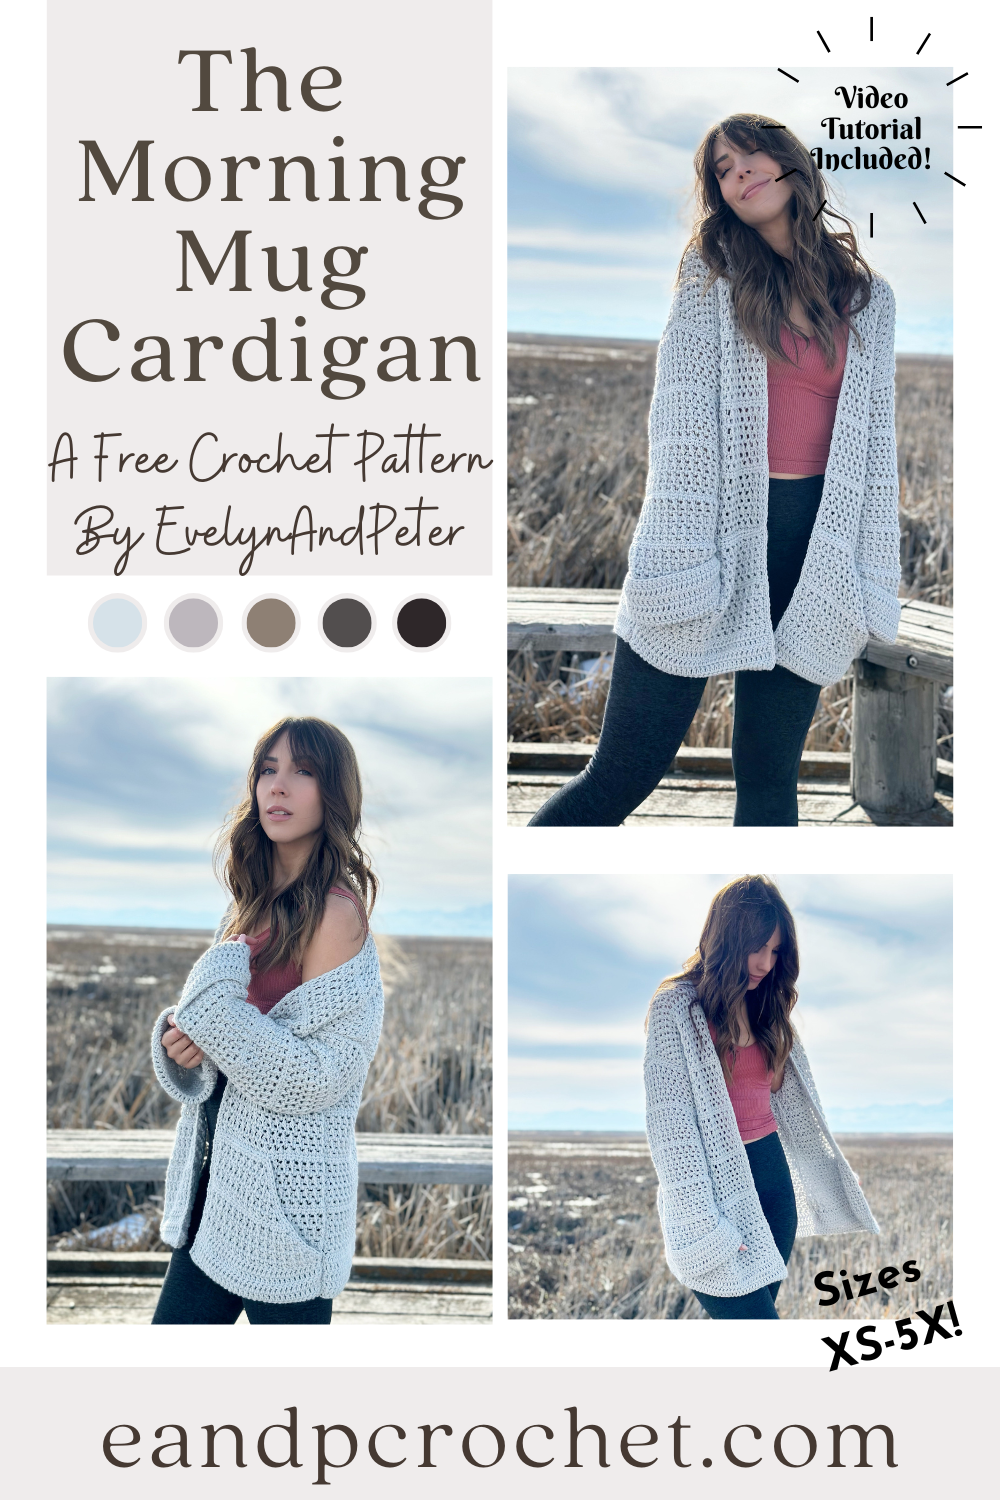
I’ve been wanting to design a longer style cardigan so that I can wear it over leggings for extra coziness. The Morning Mug Cardigan is long, with oversized cuffed sleeves and deep pockets!
The Fit- This cardigan is long and written with plenty of positive ease for a loose comfy fit. The stitch that I use in it is super stretchy. Once you work up your cardigan and put it on, it stretches another 6-8″ than what is listed in the chart below. The sleeves are extra long so that you can do a large cuff at the end. The large pockets are as wide as the front panel and are added last so you can always keep them off if you want to!
The Yarn- I used Lion Brand Pound Of Love for this design. I feel like this yarn doesn’t get the love it deserves. A lot of times, it is looked over for garments because the skein is SO big and you don’t think you need that much. For this cardigan you will use between 2-3 skeins depending on the size you make. It was actually really nice not having to join in a bunch of skeins while crocheting! It’s also a soft and sturdy yarn which holds up nicely. Another plus is all the color options that are available! I used Elephant Grey for mine but there is a bunch to choose from! Be sure to check out my kit, it comes with the yarn and a FREE copy of my printable pattern!
The How- This cardigan is worked in separate panels from the bottom up. You can easily adjust length by adding or removing the 8 row repeat on the back and front panels. Keep in mind the cardigan uses a stretchy stitch and will stretch down with the weight of the cardigan when worn! The chart below does not include the 6-8″ that the cardi will stretch. The sleeves are long and oversized so that you can cuff them. You will notice that the larger sizes have shorter sleeves. This is because it is a drop shoulder design! If you need to adjust sleeve length you can add or remove rows as well. The pockets are wide and deep. They are the width of your front panel with some decreases on one side. If you don’t want pockets just skip over the instructions and move on to the trim!
Don’t forget I have a full video tutorial available if you need some extra help or have a question! Be sure to subscribe to my channel for more free patterns and content!
If you like this cardigan pattern, be sure to check out some of my others! I have a ton to choose from!

What’s better to kick off the new year than a brand new crochet cardigan?! The Kiah Cardigan is definitely in the top 5 of my favorite patterns. I hope you guys love it just as much as I do!
I used Heartland yarn for The Kiah cardigan. I love this yarn so much I try to design at least one awesome cardigan with it each year! This time I’m using the color Wolf Trap. I actually ordered this yarn a while back to make something completely different with it. When it came in the mail it had a pinker hue than what I was expecting and it didn’t go with the other colors on my project. It was absolutely beautiful though, so I shelved it for a later date. I’m so glad I kept it because I think it’s perfect for this design.
The Kiah Cardigan is worked from the bottom up in separate panels. You can easily make your cardigan longer or shorter by adding or removing as many rows as you want on the back and front panels. I think a cropped version would be super cute too! You might recognize the stitch used as the same one in my Winter Moonlight Set! I fell in love with the texture of it and knew that I had to make a cardigan!
I have a full video tutorial available if you are a beginner and need a little extra help! Be sure to check it out and subscribe so I can bring you guys more free tutorials and content!
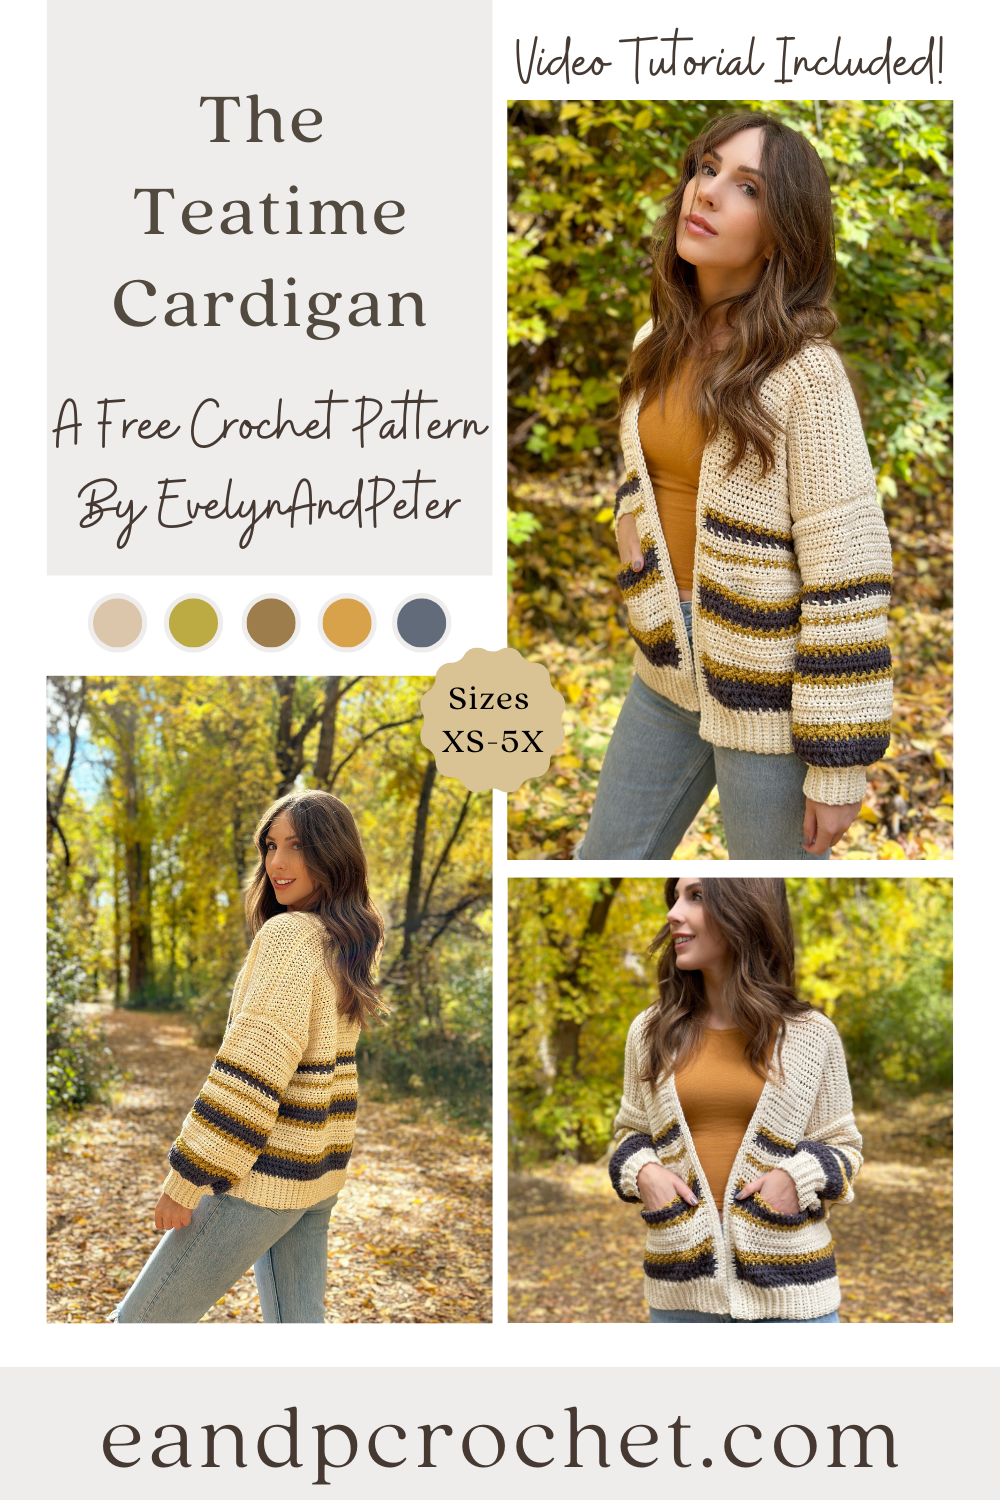
It’s Teatime! So obviously that means you need The Teatime Cardigan crochet pattern! This cardigan pattern gives all the cozy vibes. The Teatime cardigan features fun stripes using a unique blend of stitches, giving it a collegiate look. It has a slightly oversized fit with balloon style sleeves. There are so many color options to fit your style!
The construction of this cardigan is pretty beginner friendly. I do use a few different stitches for the stripes that you may have not used before but don’t be afraid! I have a full video tutorial on how to do these stitches if you need a little bit of extra help. They really are very simple to do once you get them down. The same stitch repeat is used on all of the panels.
One of the fun things about this cardigan is picking out the color combo that you want! There are so many options to do and I can’t wait to see what everyone picks! I used Color Theory yarn for my cardigan and I do have a kit available! You can customize the yarn colors if you purchase the kit. I have a couple of tips when working with stripes. When you change colors at the end of each row, you can crochet the next row directly over the tails of yarn for less ends to weave in! You can also crochet your trim directly over the tails of yarn. I like to tie my tails in a knot first before doing so.
Another great thing about The Teatime cardigan is the length is easy to adjust! You can simply add more rows to both the back and front panels if you want your cardigan longer. If you want it cropped, just remove rows. Do the same amount of rows to all 3 panels before fastening off.
If you like this cardigan then be sure to check out my others! I have so many that you would enjoy!
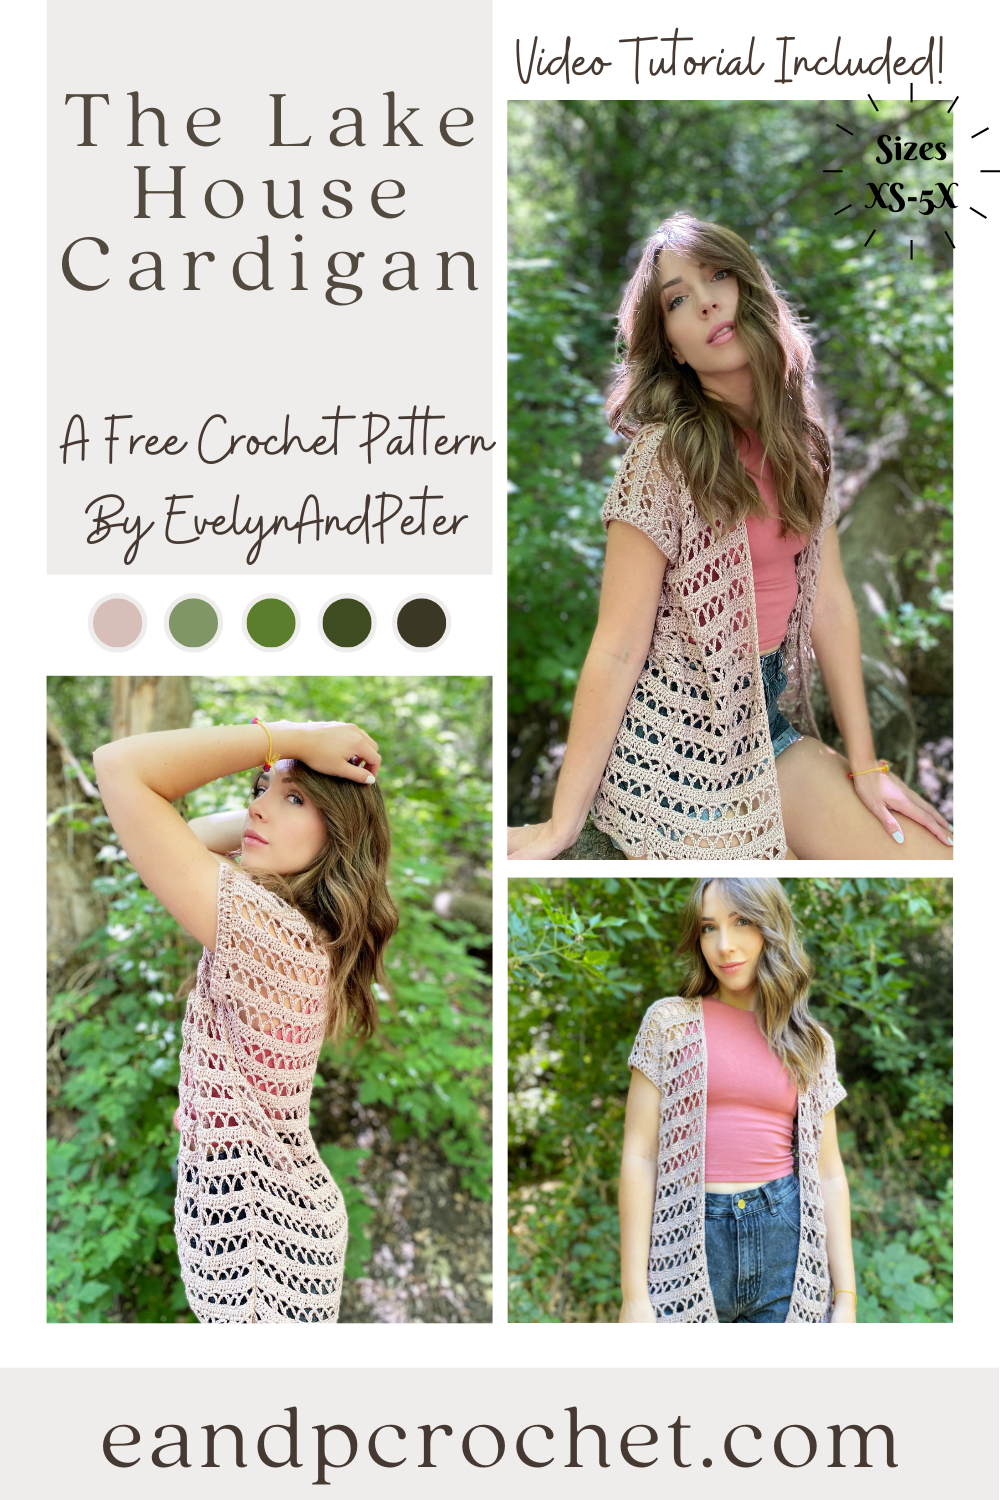
Total lake house vibes with my new cardigan crochet pattern! When I heard that name suggestion it was definitely a no brainer. The Lake House Cardigan is the perfect layering piece in the summer. Or really anytime of the year! It has a long flowy fit with an open lace stitch repeat. Plus, the Truboo yarn makes it extra silky. I can totally picture myself wandering around a summer house on the lake, sipping a glass of wine and crocheting by the water. Can’t you?
The construction of The Lake House Cardigan is very simple. 3 long rectangles, worked as long or as short as you want them! It’s super easy to adjust the length of this cardigan to your liking. After that, we just seam the shoulders together, then seam the sides together leaving a hole for our arms! Then the sleeves and the trim are added last.
Of course if you are a beginner or need a little extra help, I have a full video tutorial available for you! I go over step by step how to make your cardigan. I’m making a size small in the video so be sure to follow along with the written pattern, especially if your making a different size!
If you are using Truboo yarn like me, then you’ll notice it does stretch a bit with the weight of the cardigan as you go. The gauge listed below is a blocked gauge. So when you make your gauge swatch you’ll want to be just slightly under gauge. When you block your swatch it stretches to meet the correct gauge listed. I pinned mine and did a steam block. If you want to make your gauge unblocked it will be closer to 19 Dc by 11 rows for 4×4″
I hope you guys enjoy working up this cardigan! It was so fun to make and I love the finished piece! I have lots of other cardigan patterns available so be sure to check them out!